Lone Star Lab
This page is a “sneak peak” into our research and development.
To contribute back to this vibrant community, we also share details and source links to nearly every part of our process.
Oakley Resto Mod
October 11, 2025
After 30 years of wearing Oakley Sunglasses & Eyeglasses, I have decided to do a few restorations and modifications (Resto-Mod). I also thought that it would be nice to add a riot of color. So I am bringing back the 80’s neon and multi-color splatter paint using Alphanamel automotive pinstripe paint!
Check out the neon under UV light! Day-glow Color!
Check out all of the frames on this this page!


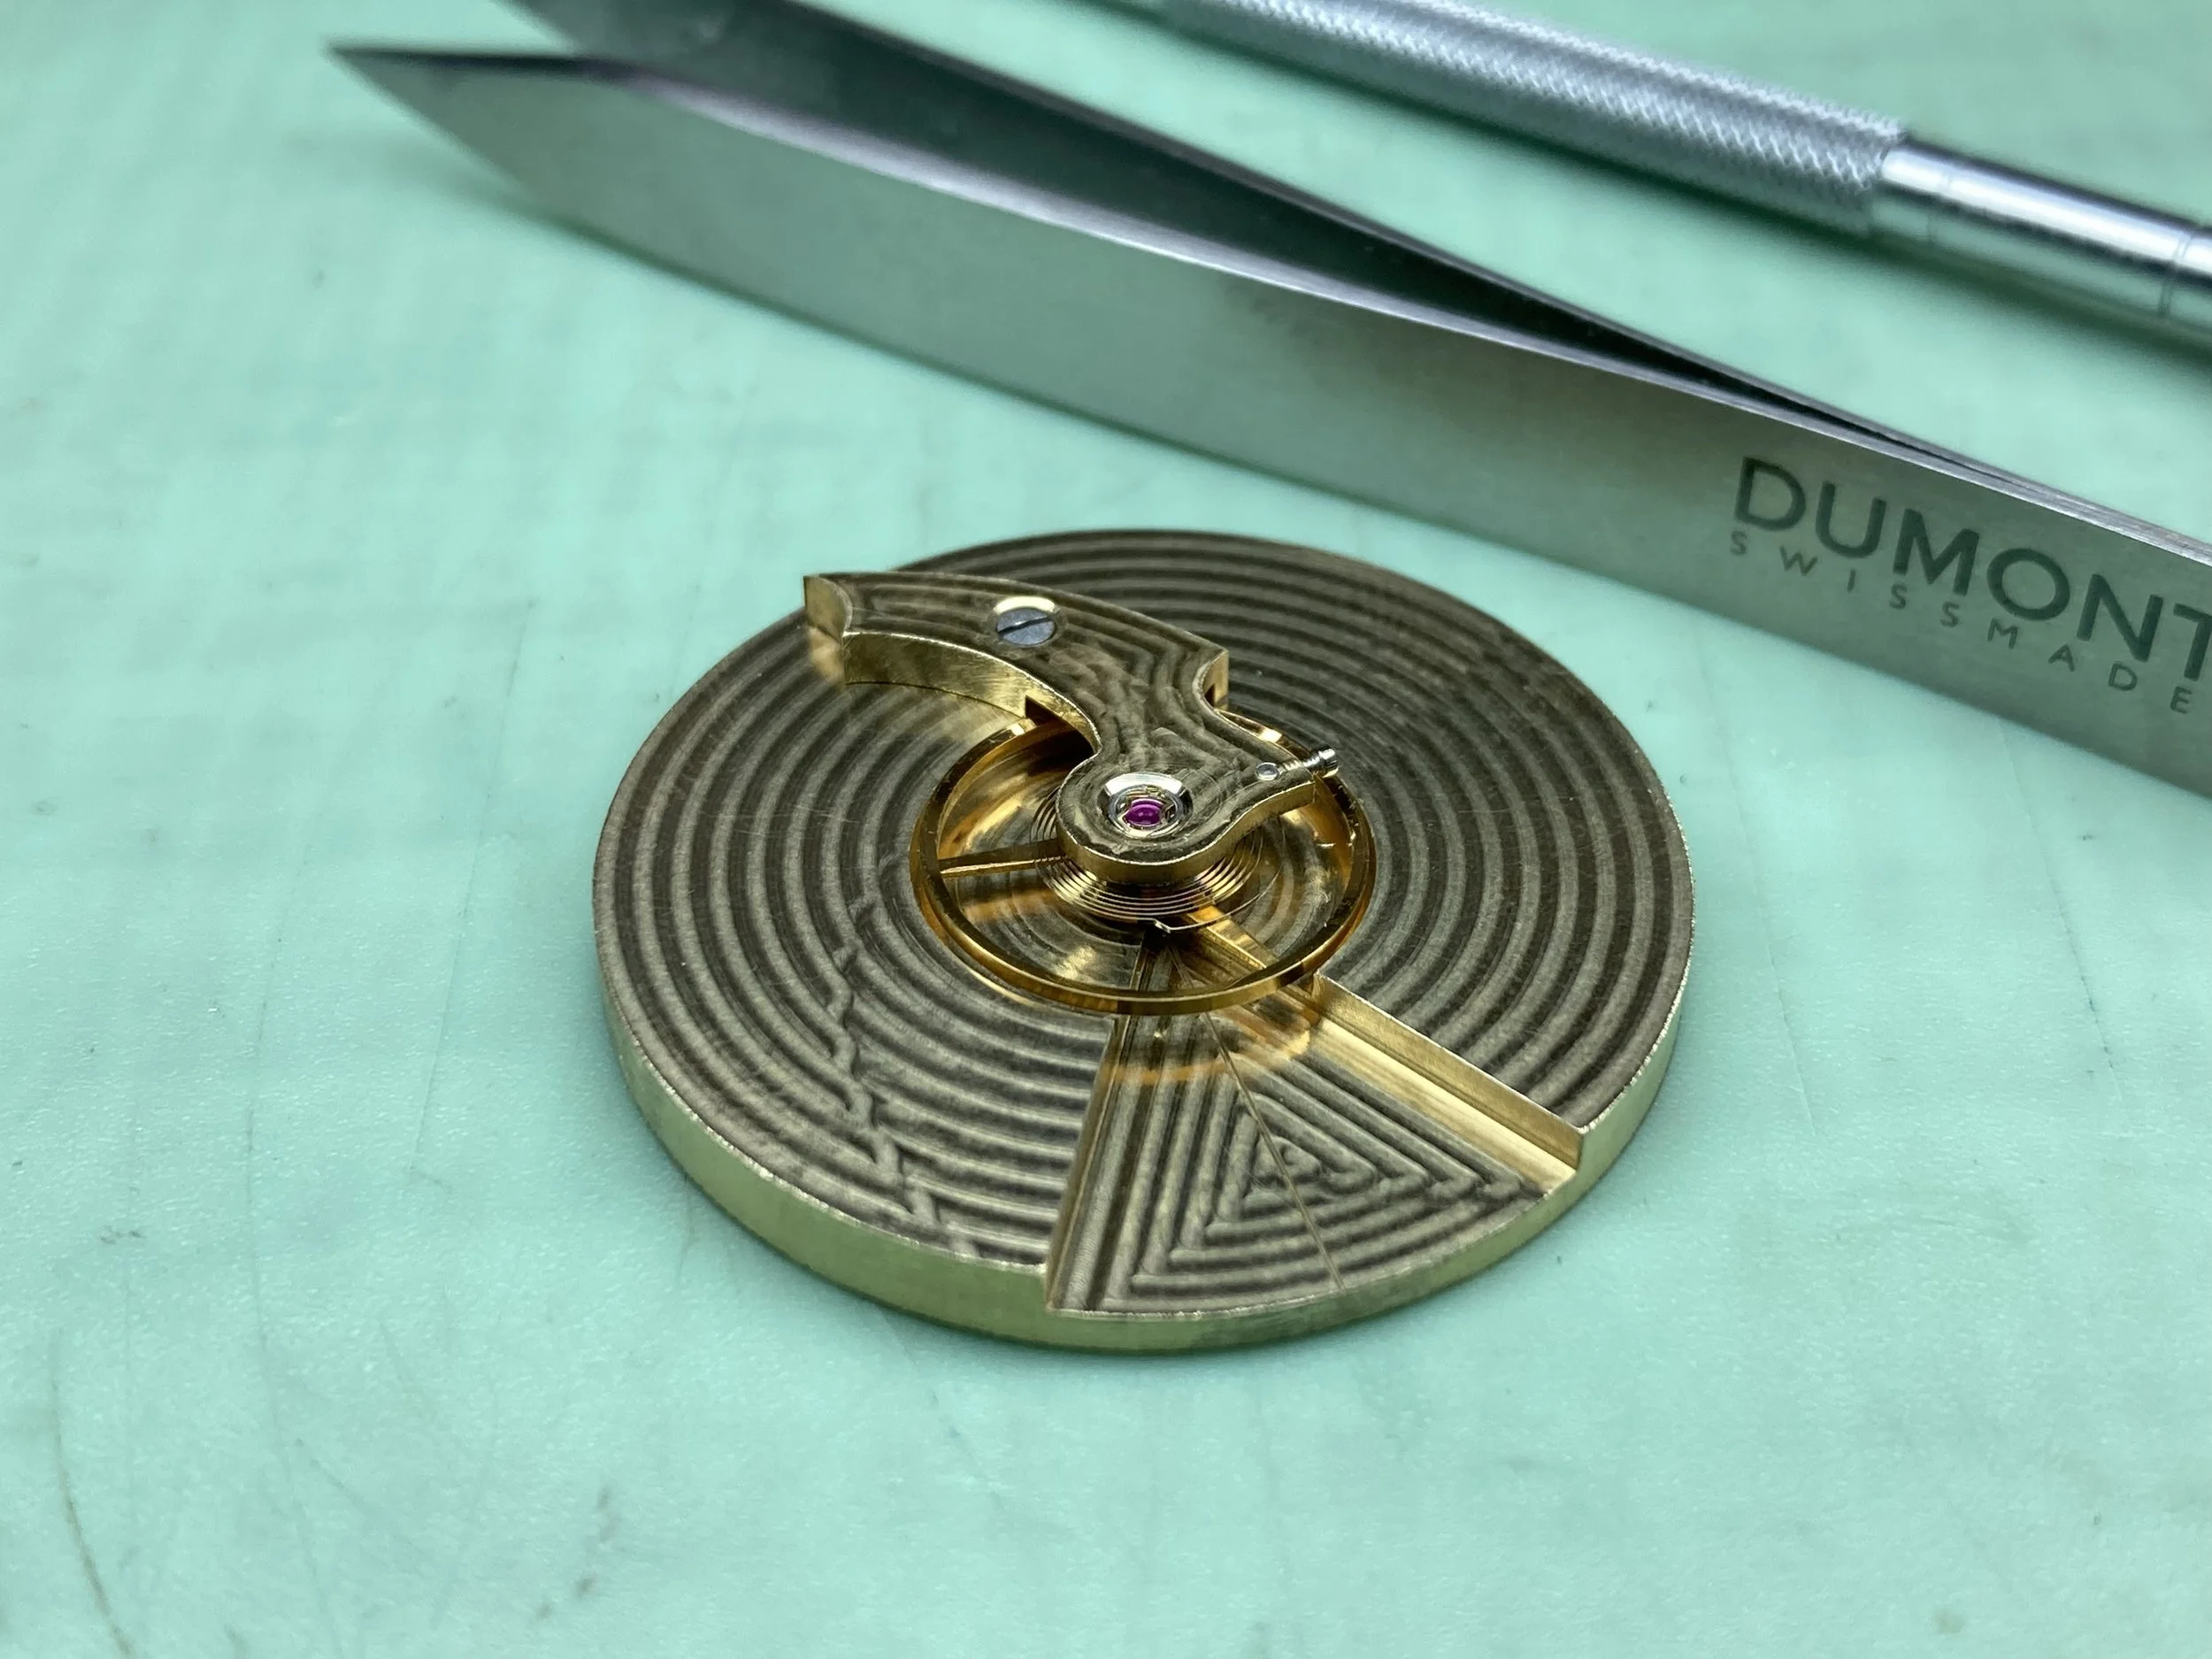
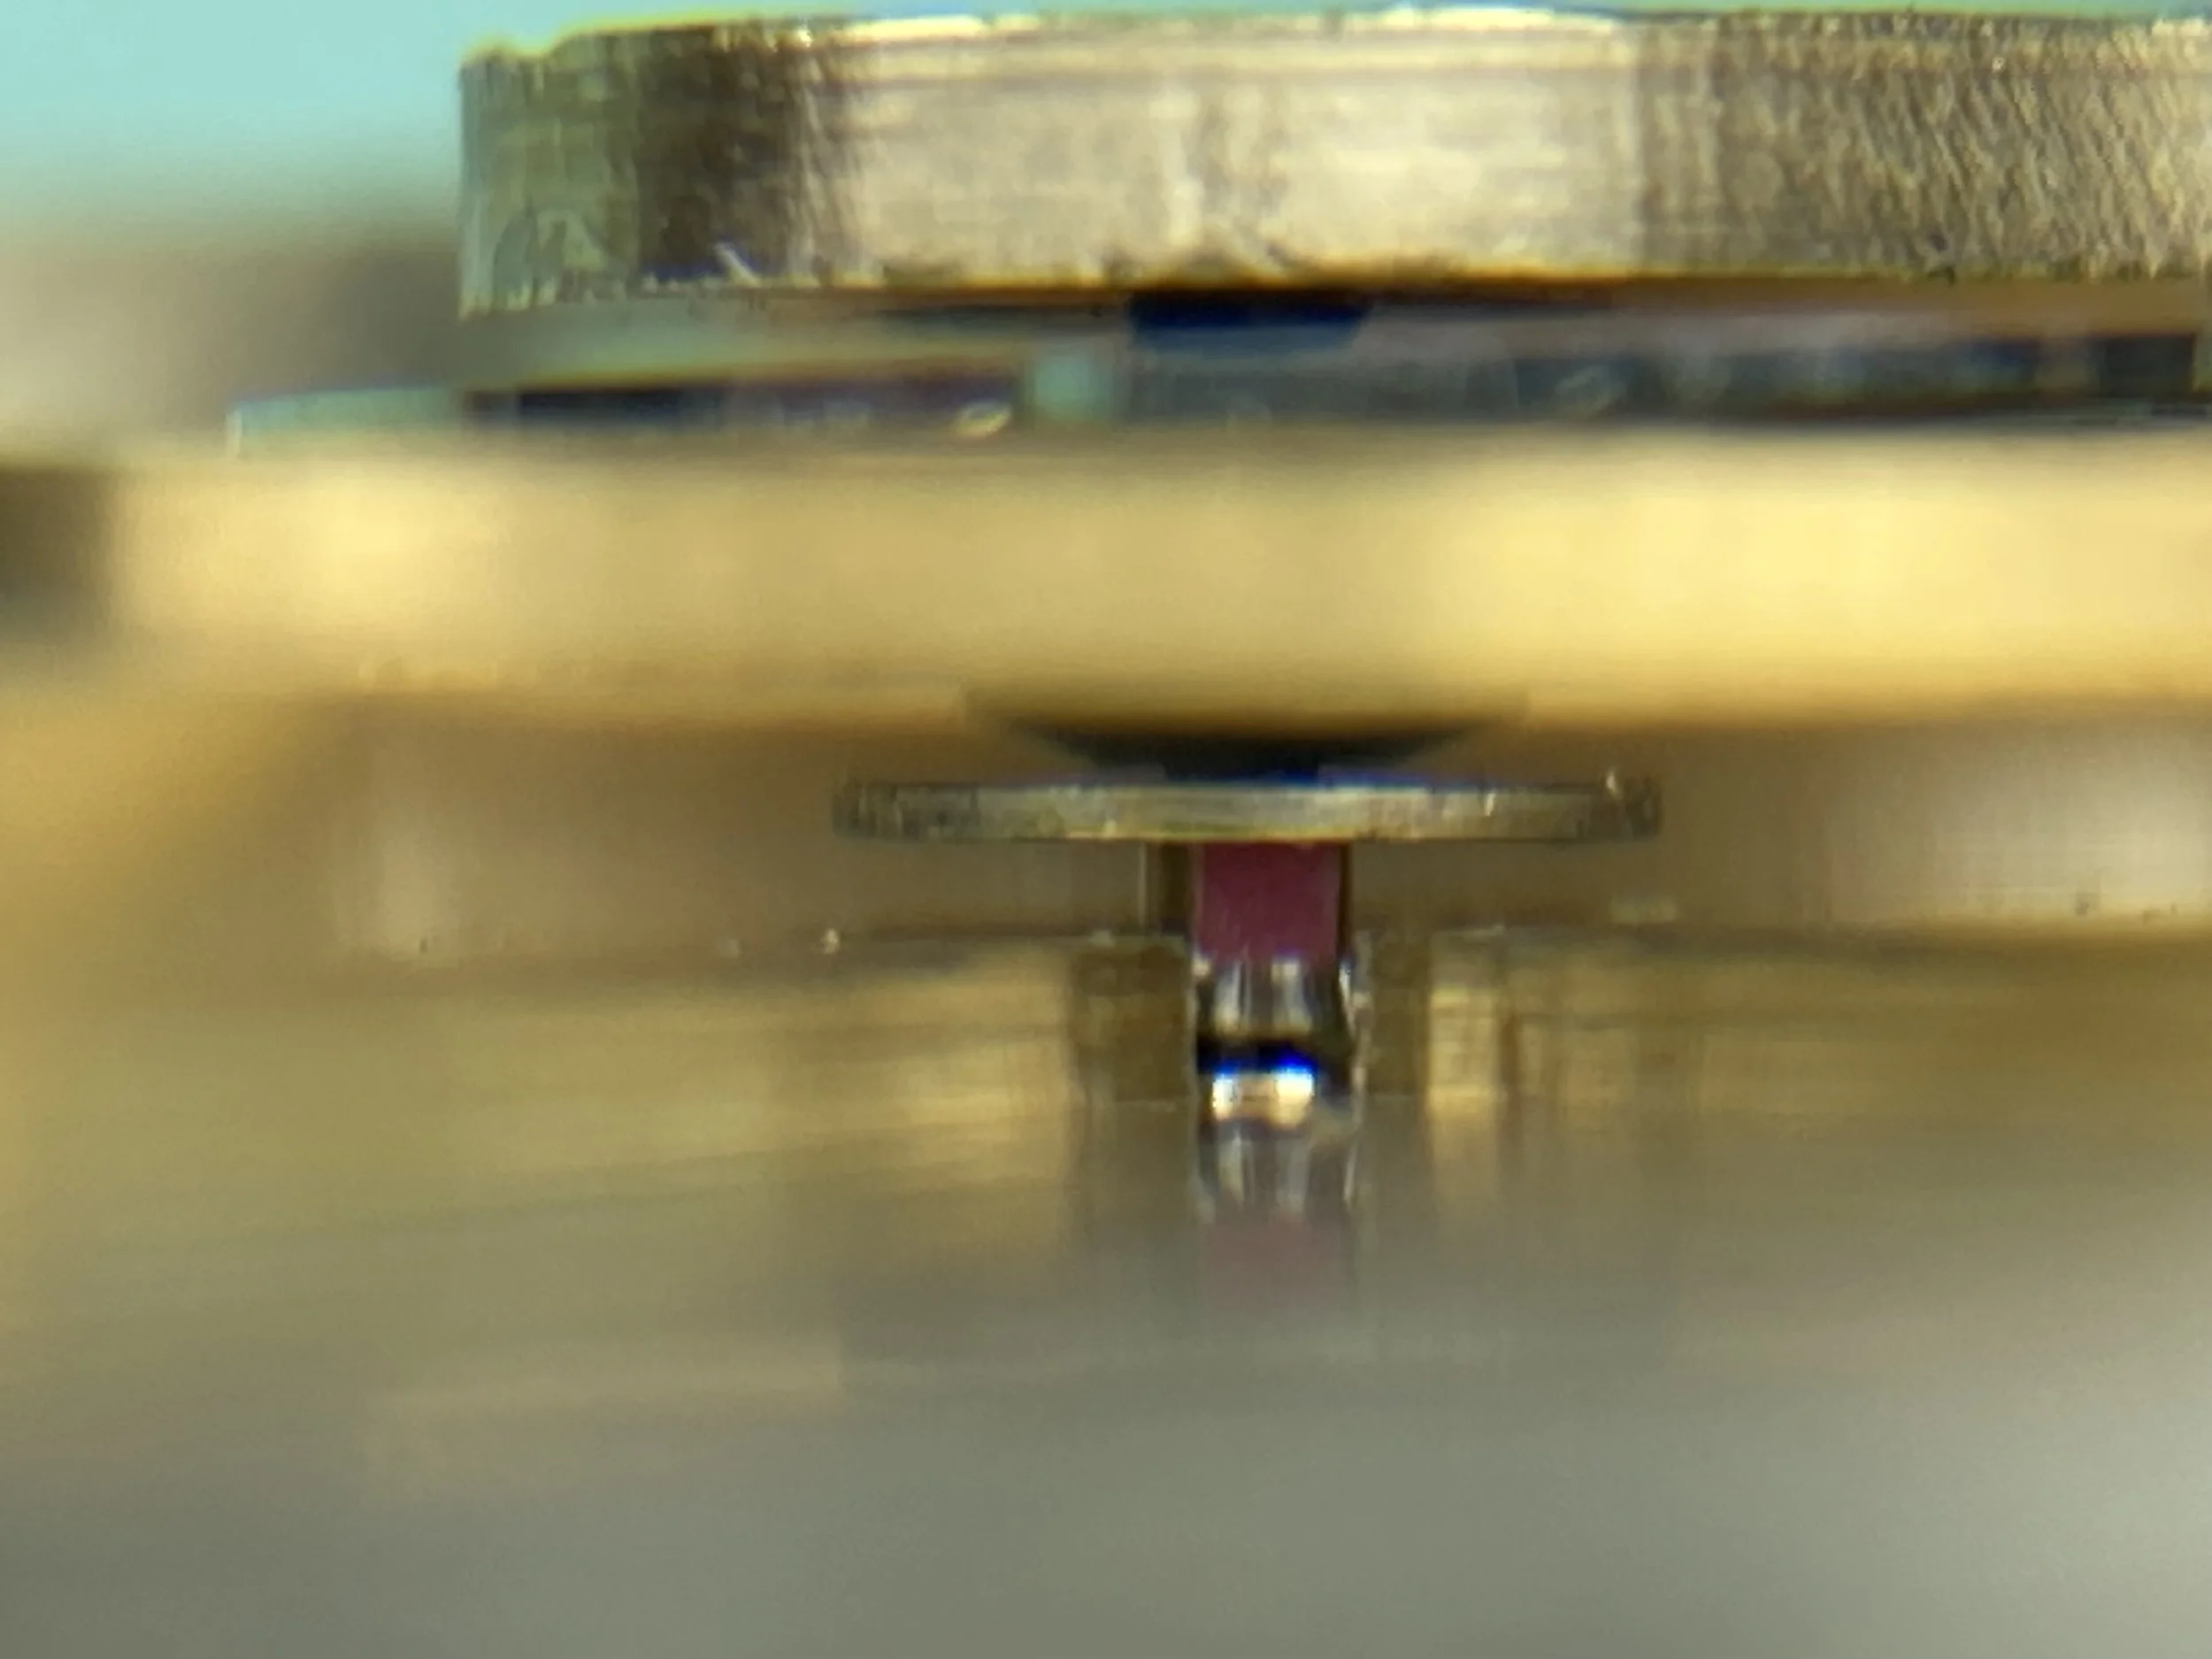
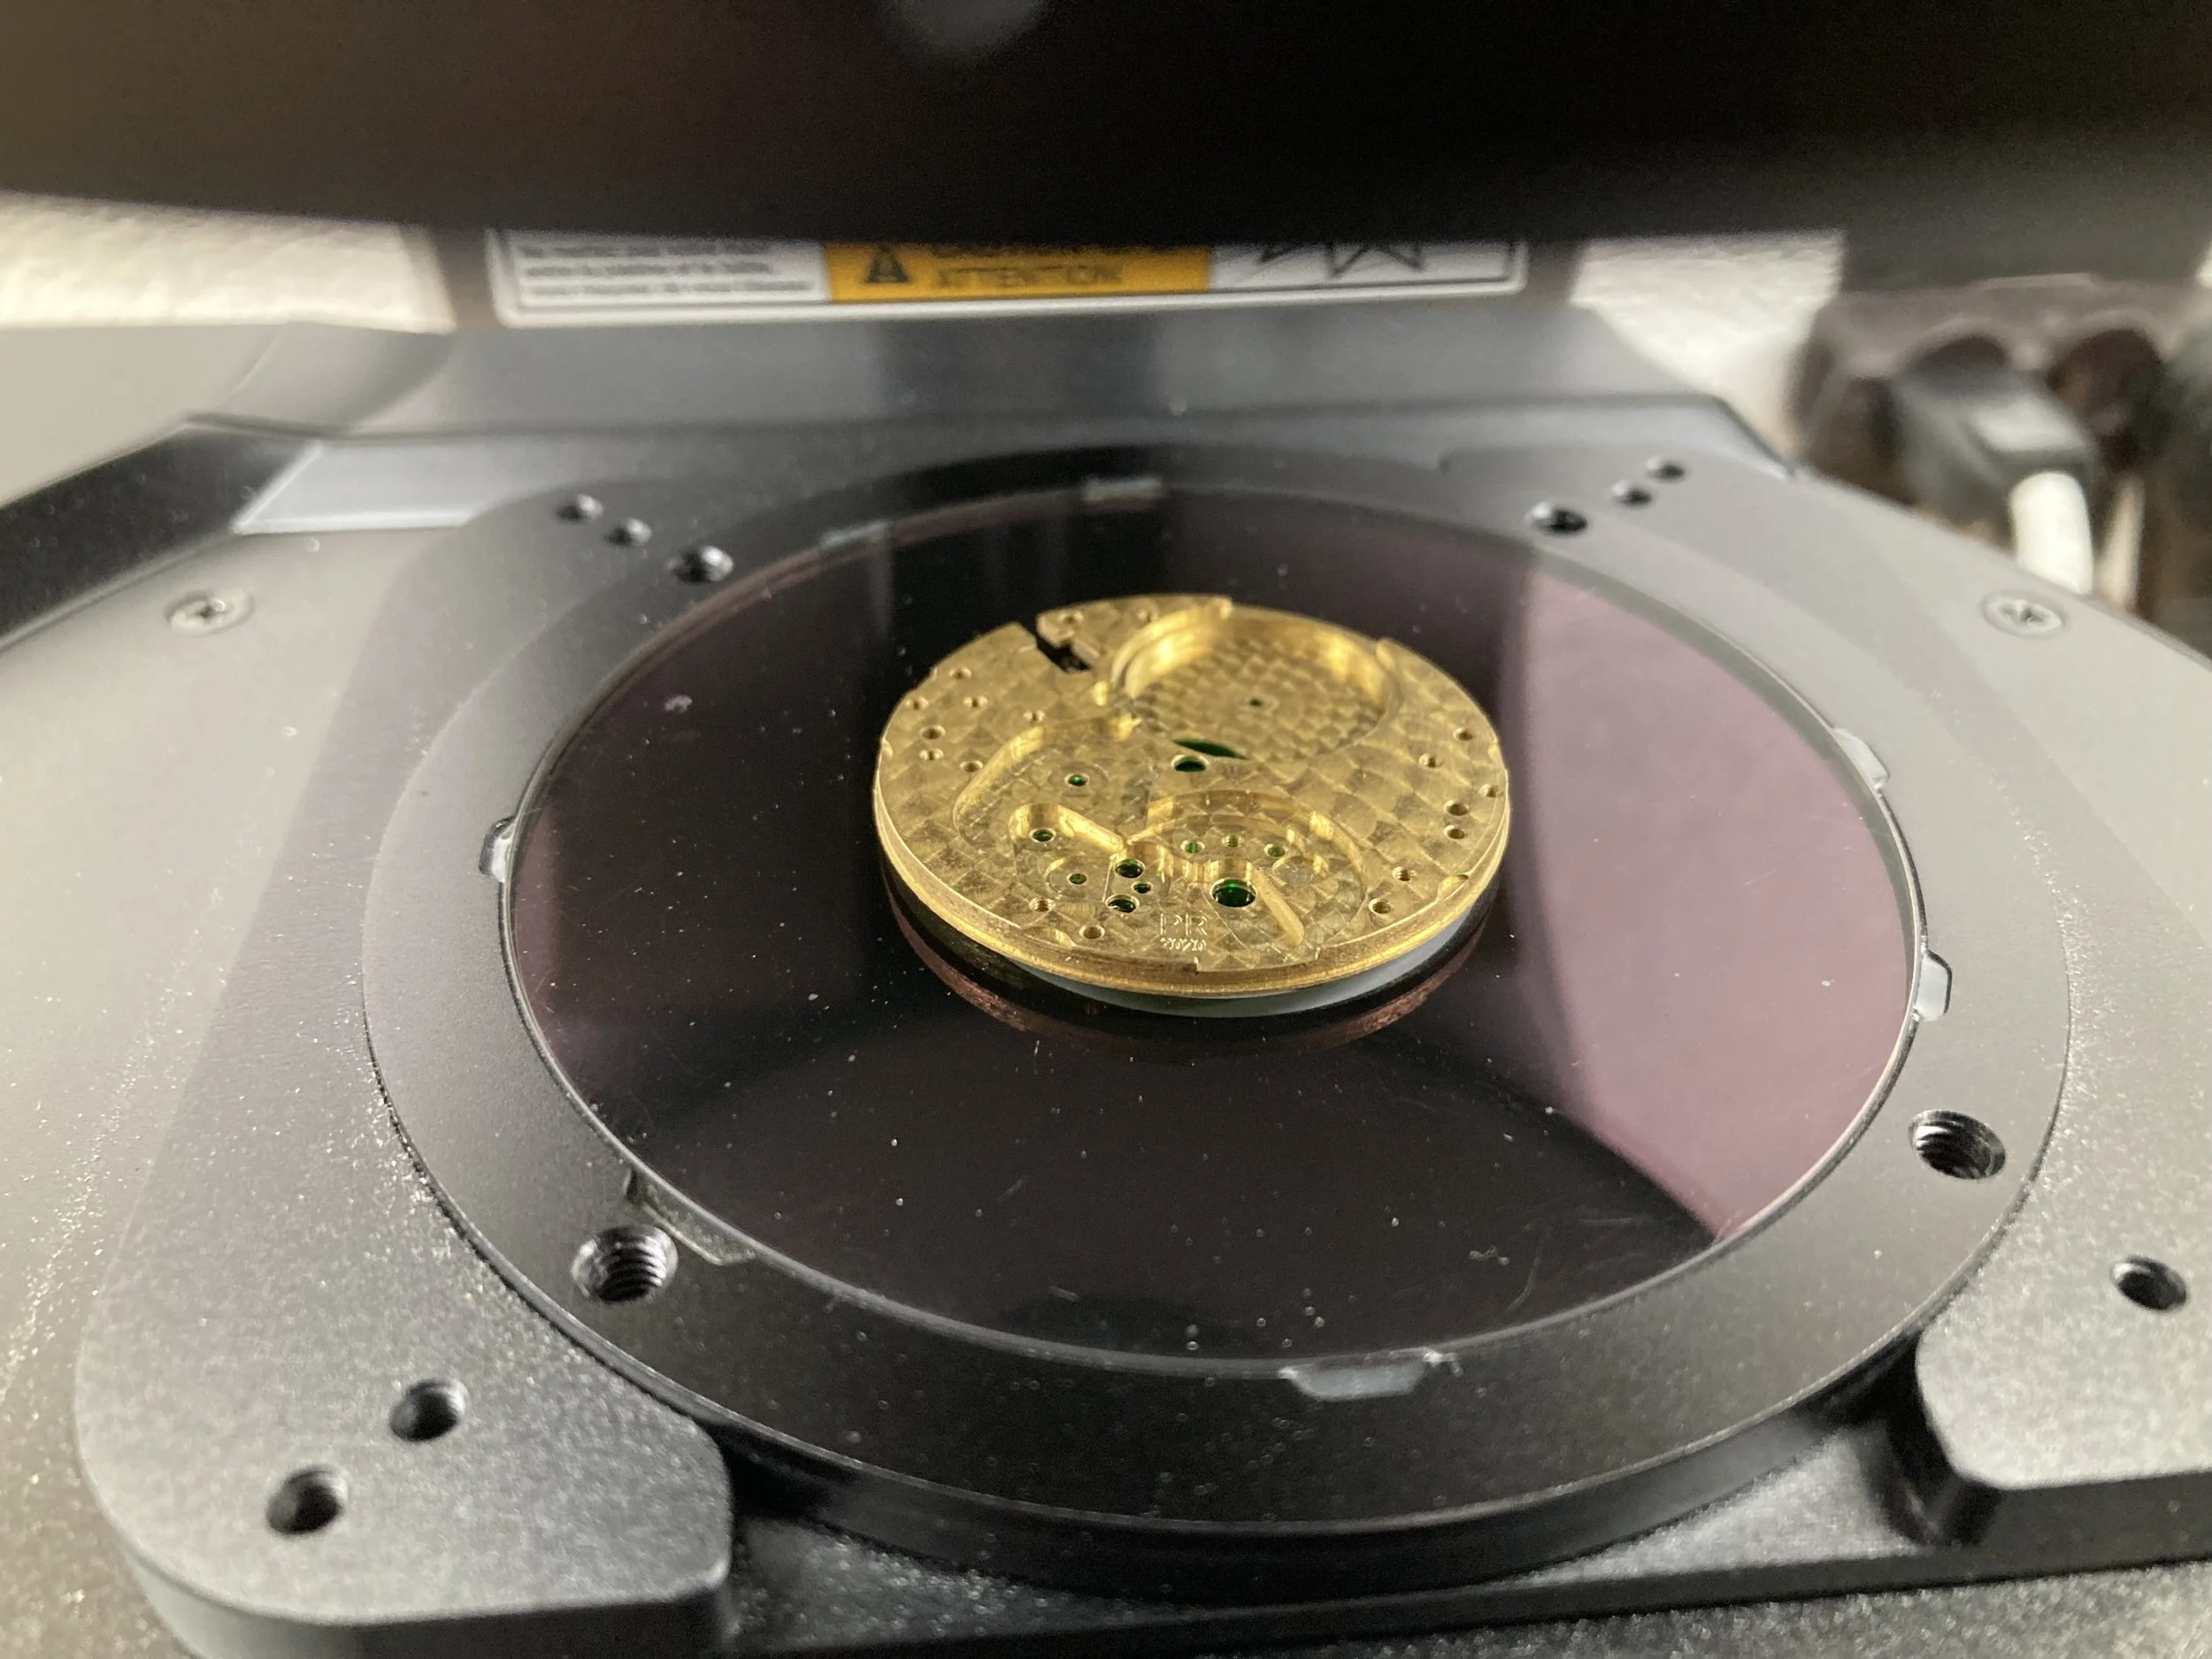
Free-sprung Balance Tool
March 10, 2025
The new Model One movement uses a free-sprung balance. Alignment of the hairspring and impulse jewel required a new tool that allows me to “see” the impulse jewel at exactly the same angles as the escape wheel, i.e., if the jewel is centered in the “window” then it is aligned correctly (last photo). Note, the balance in the photo is the old balance that was used for testing the tool.

Model One v2 Prototype
January 20, 2025
In December 2024 I decided to completely redesign the Model One movement, case and dial from scratch, retaining only the wheels and pinions from the original design. I wanted a new layout, free-sprung balance, new dial, new hands, new Texas alligator band, new 316L stainless steel case, and new finishing techniques on full display (mirror polished angelage on the bridges and wheels, pearlage recesses, specular finish to the top of the bridges using crushed ruby media blasting, hand sculpted hour/minute/second hands, pad printed chapter rings and a true guilloche dial). By January 5th (roughly 1 month later) I had redesigned, built and tested 5 new prototypes, and had a near final product (see photos). While the photos still show the old balance, the overall appearance has achieved my goal of a new design that I will retain.


AWCI Fall Symposium 2024
September 27-28, 2024
This year I was an Invited Speaker at the 2024 AWCI Fall Symposium where I presented 2 talks: “Building a Watch in a Year” and “Building a Modern Horological Machine Shop”. Both talks were well received. Thank you to everyone for your kind comments and questions, and thank you to David Lindow (AWCI President) for the invitation.
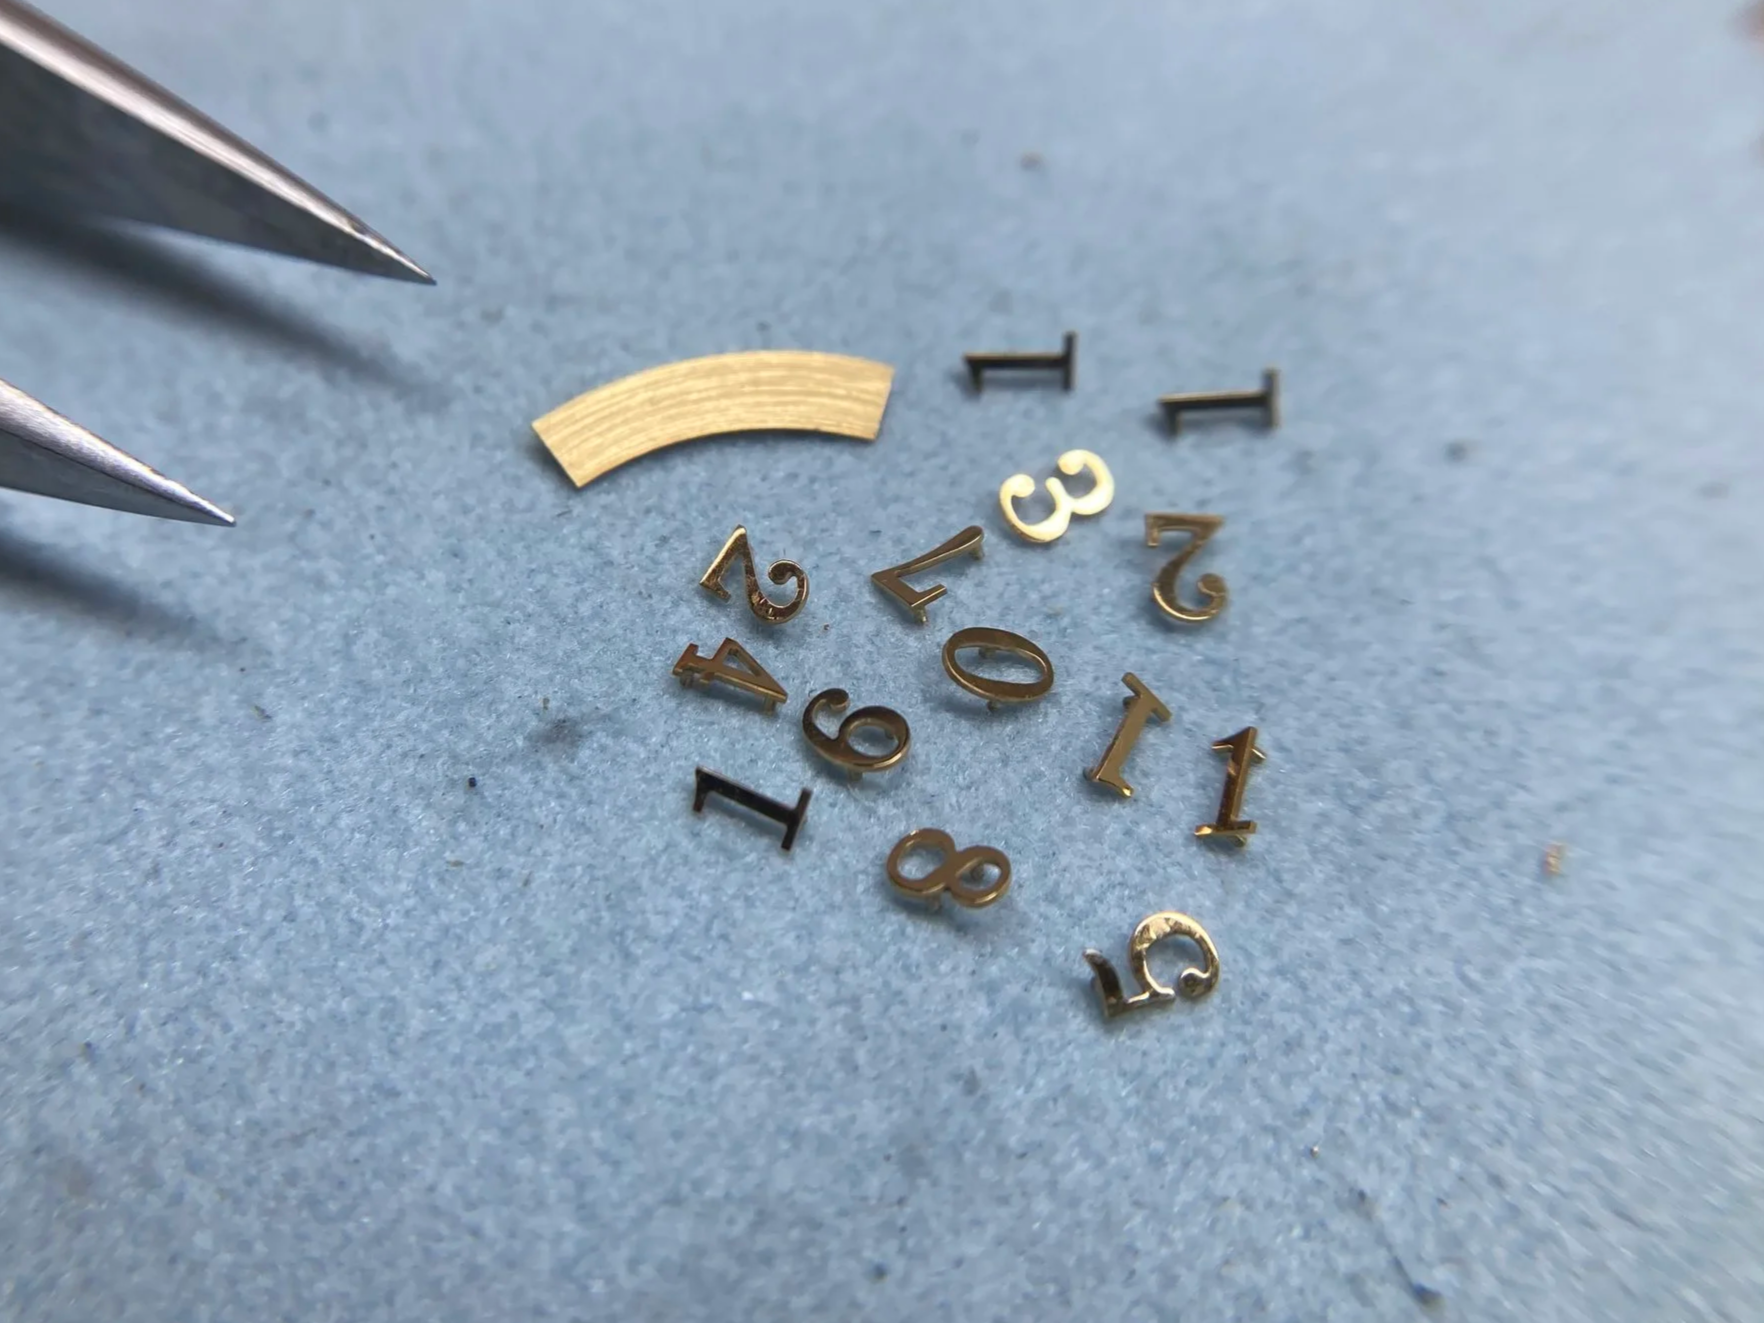
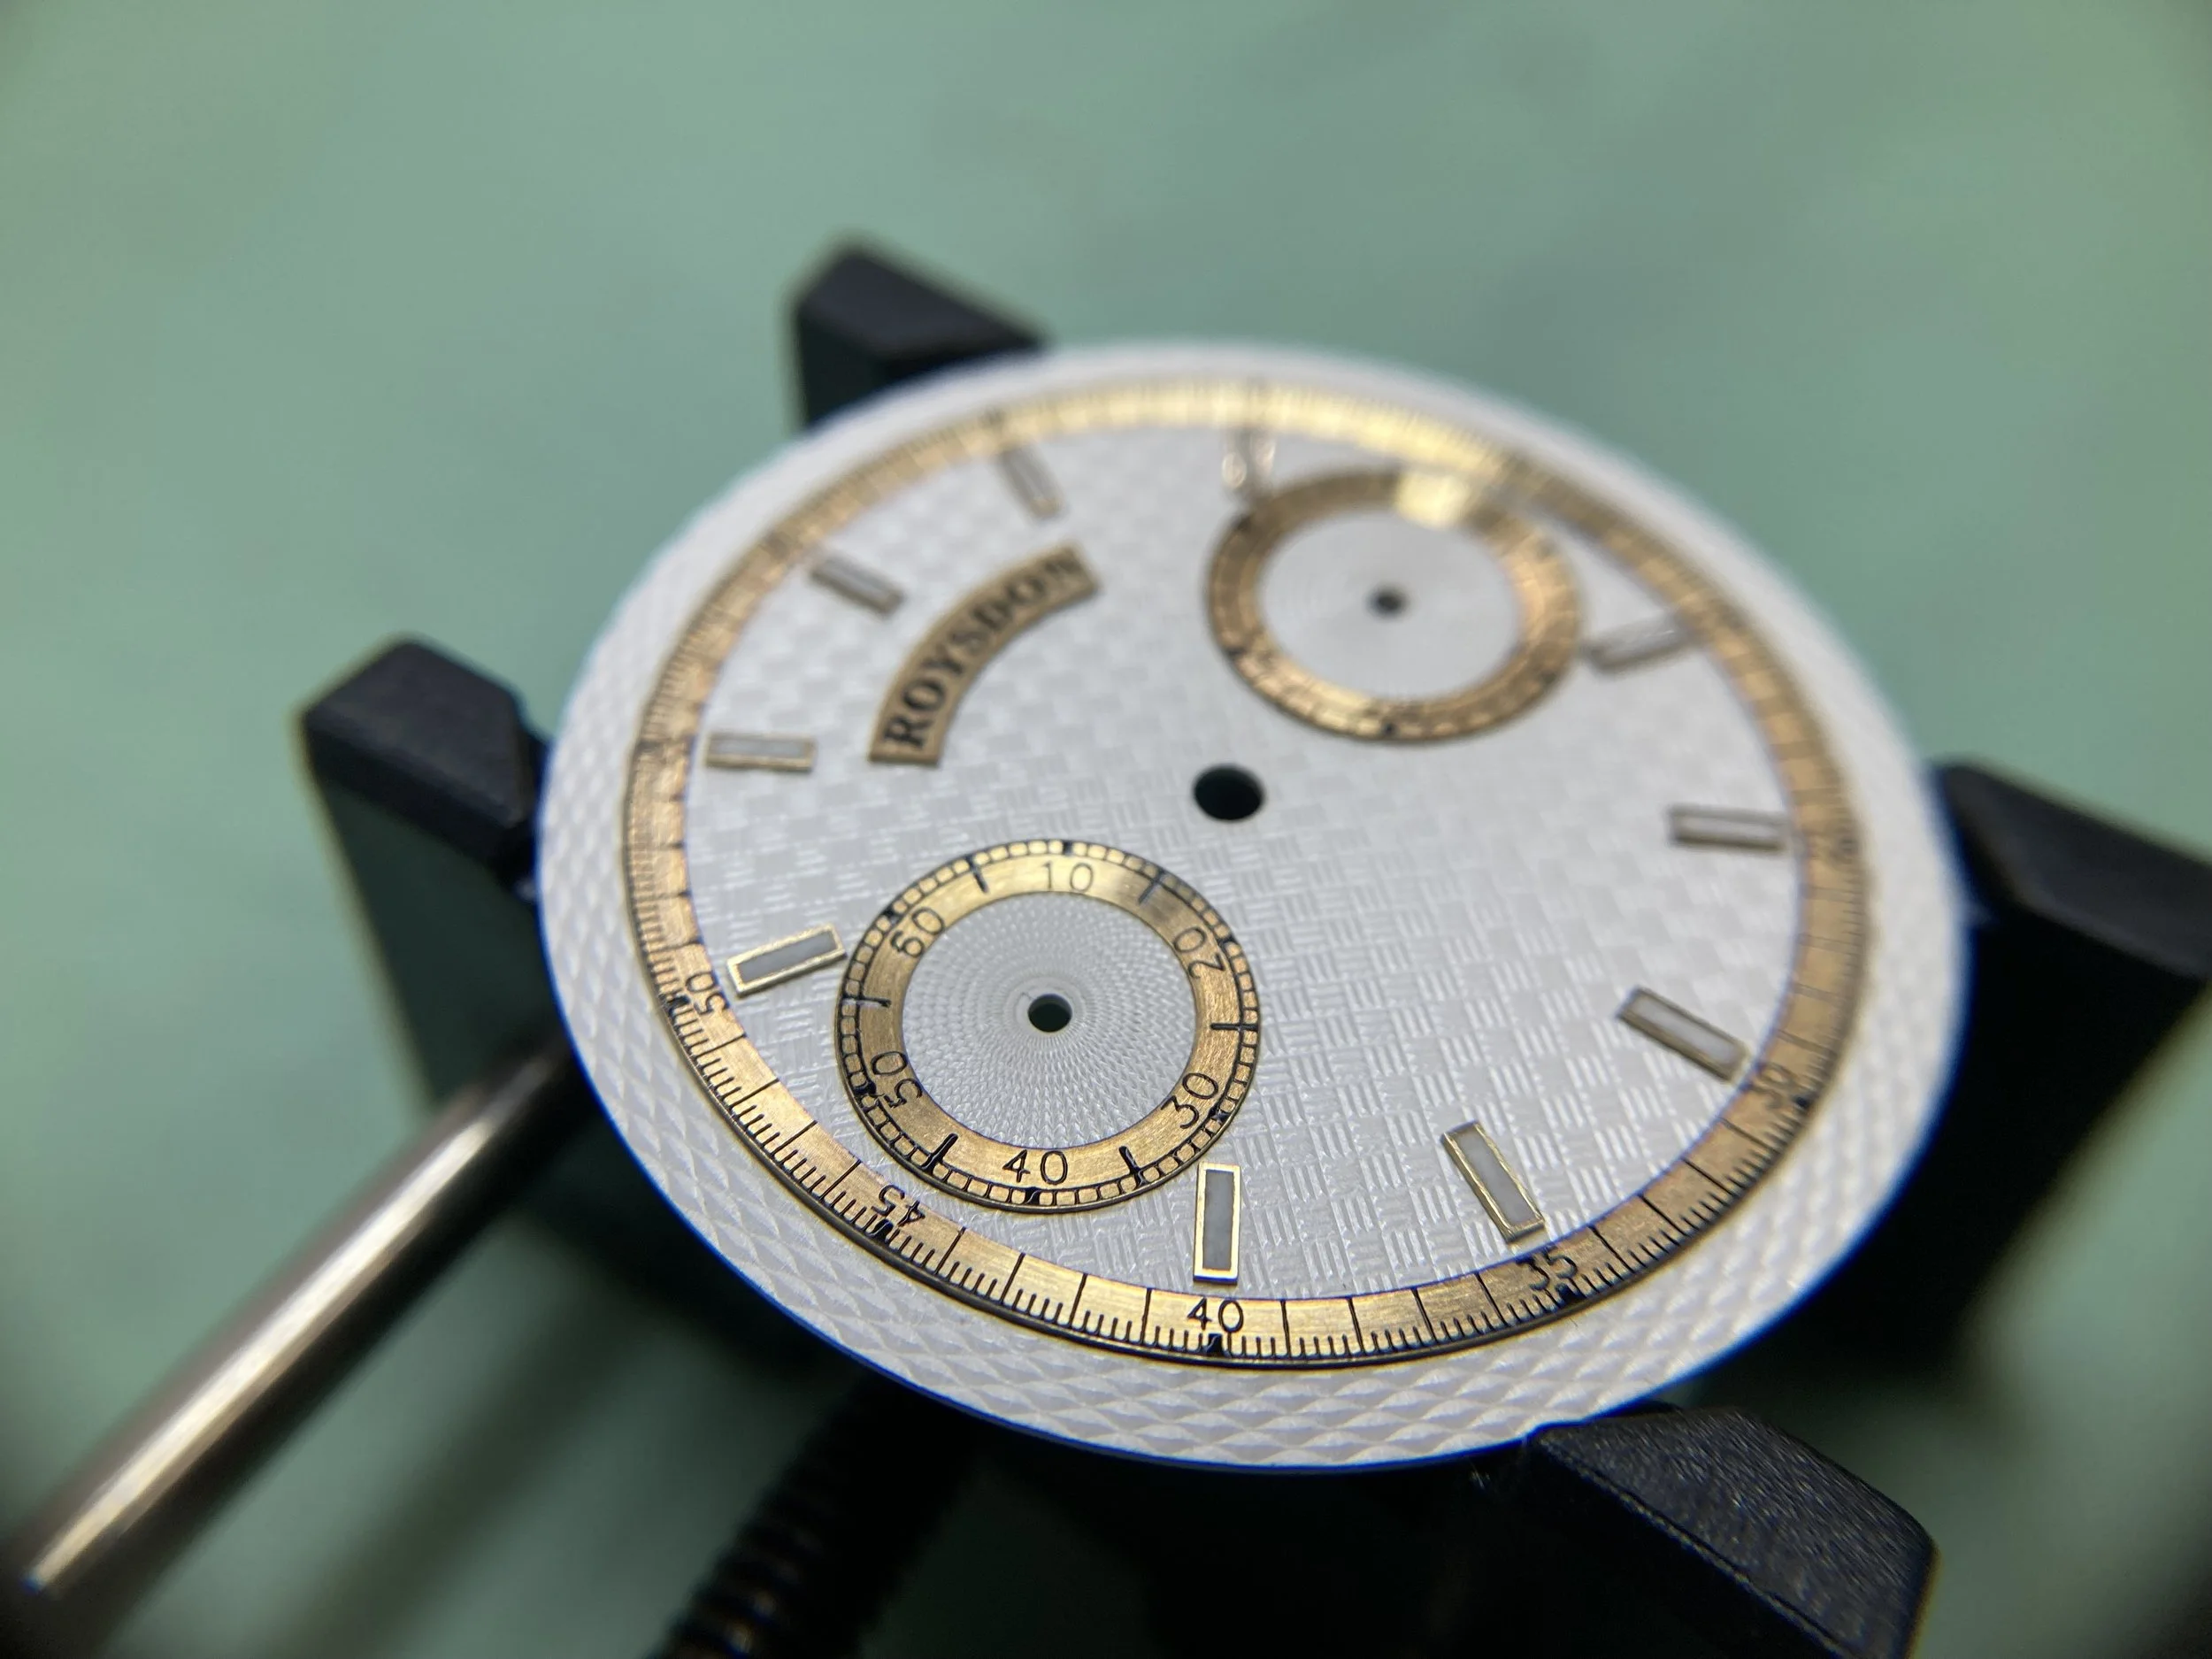
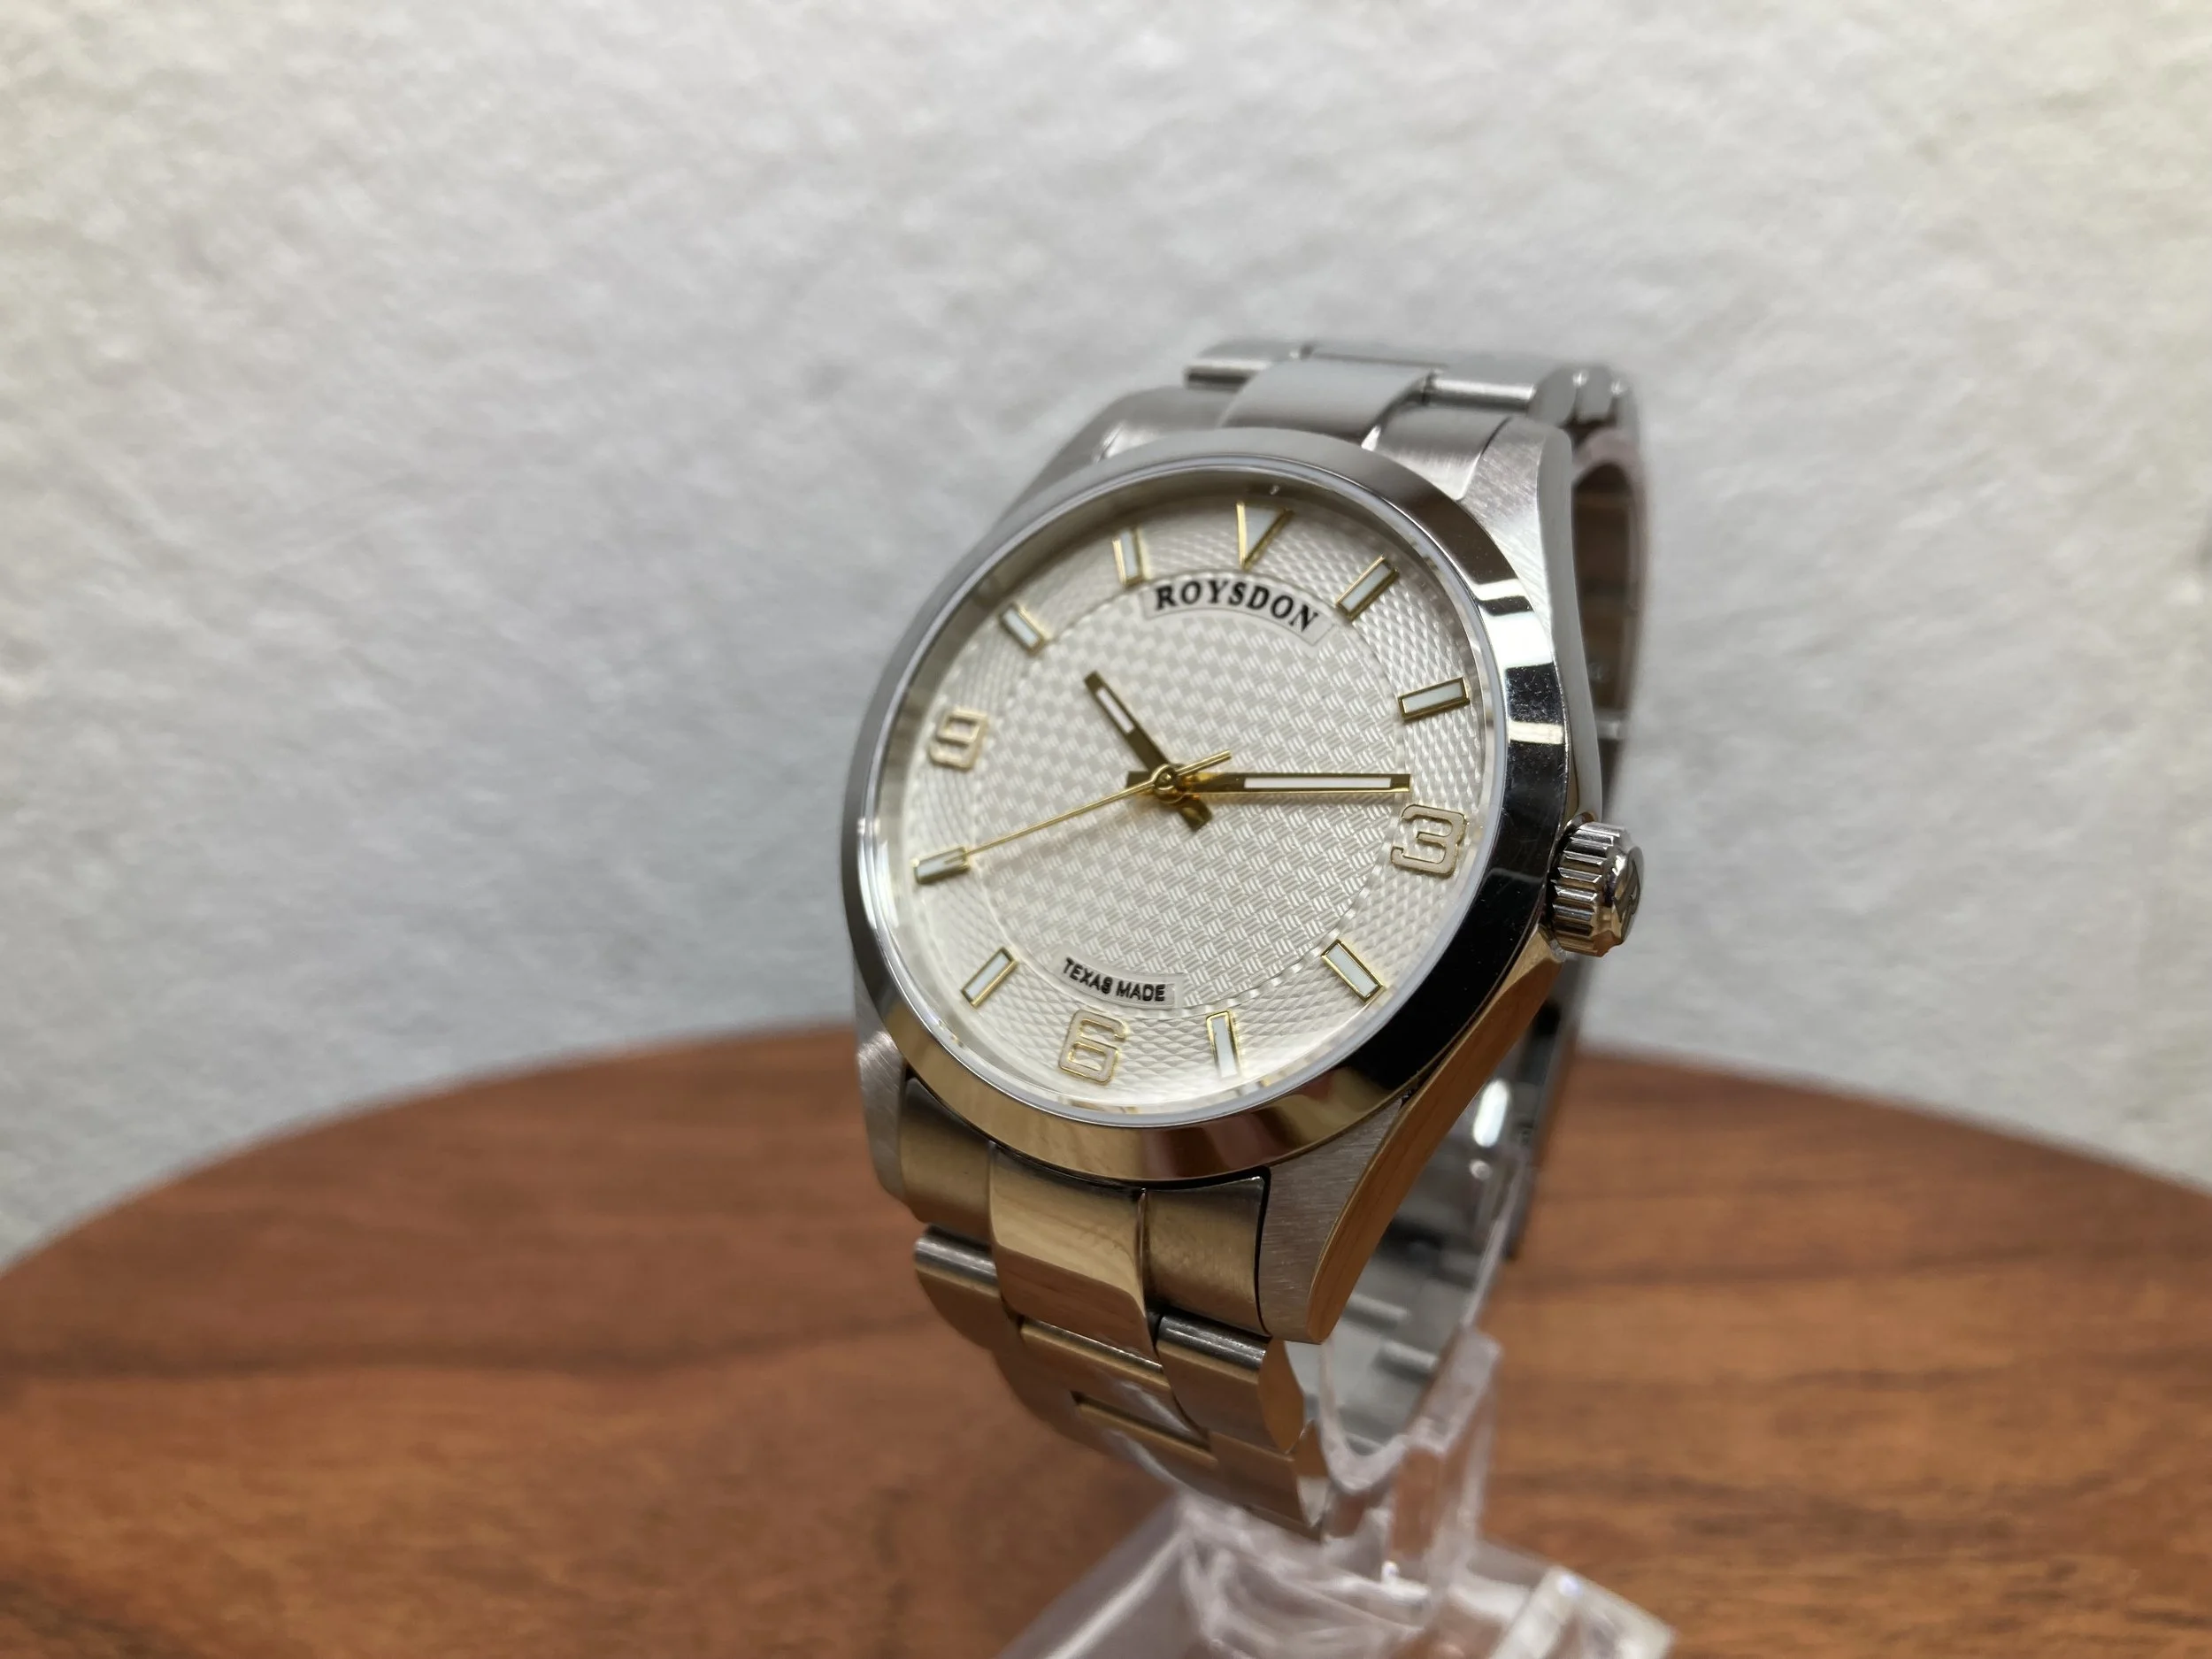
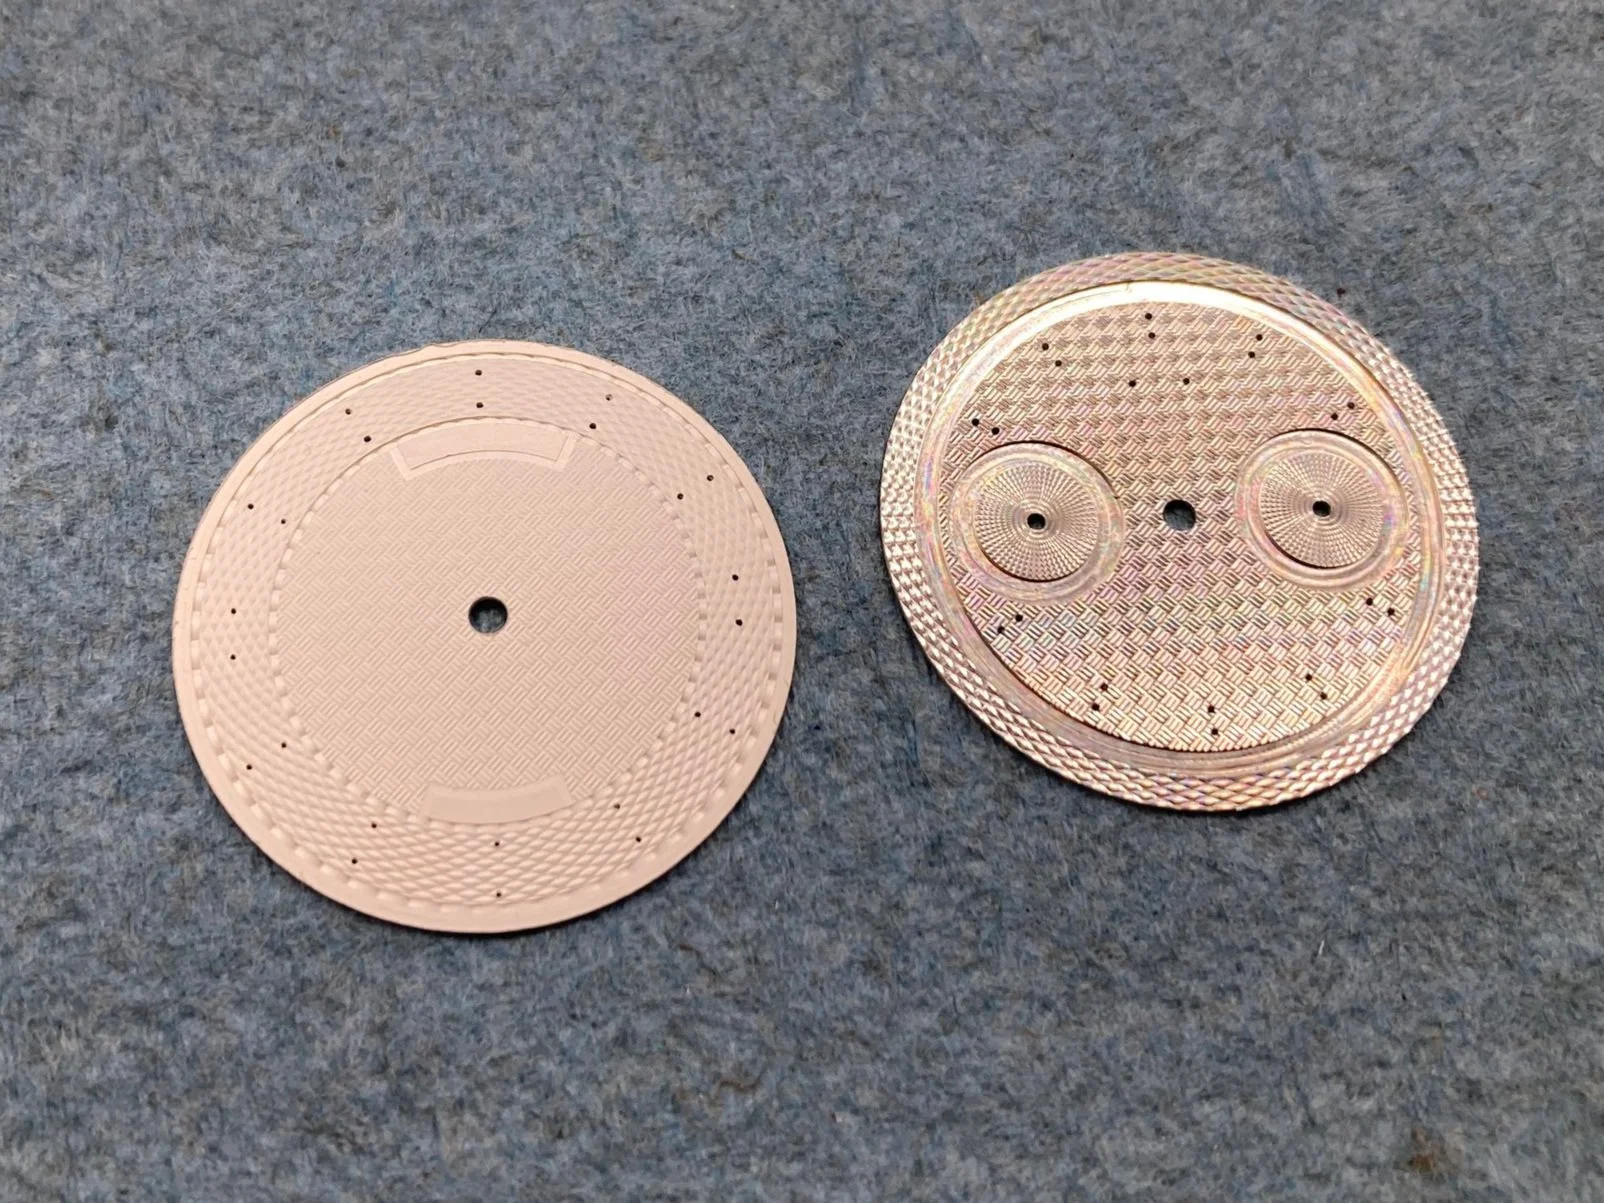
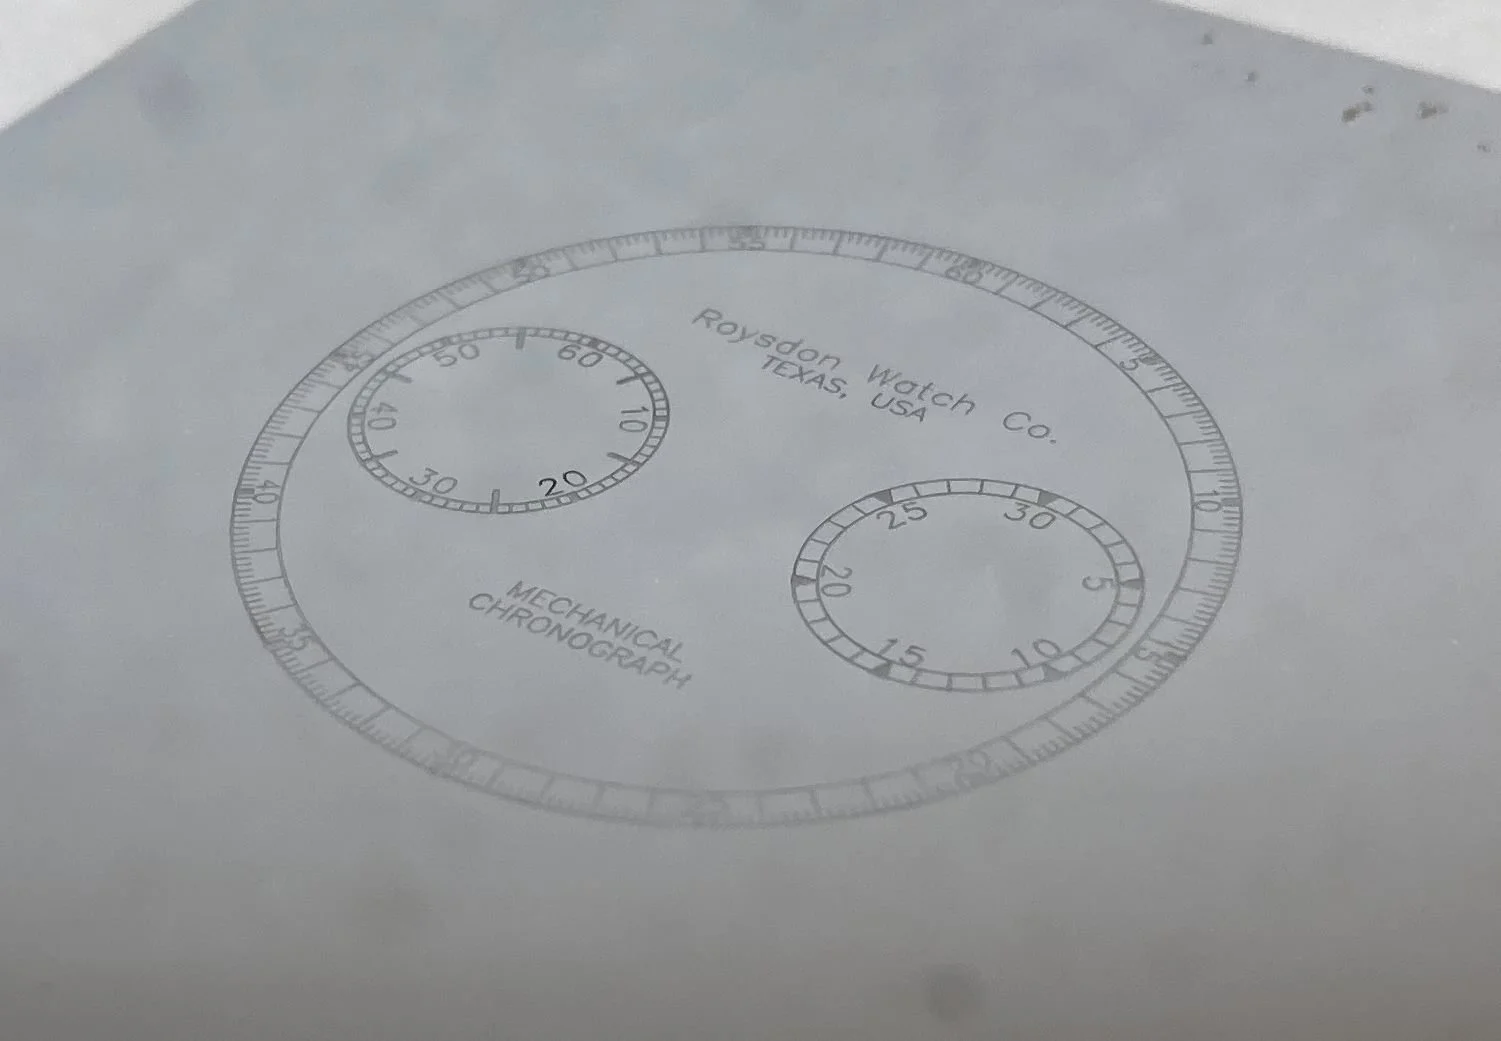
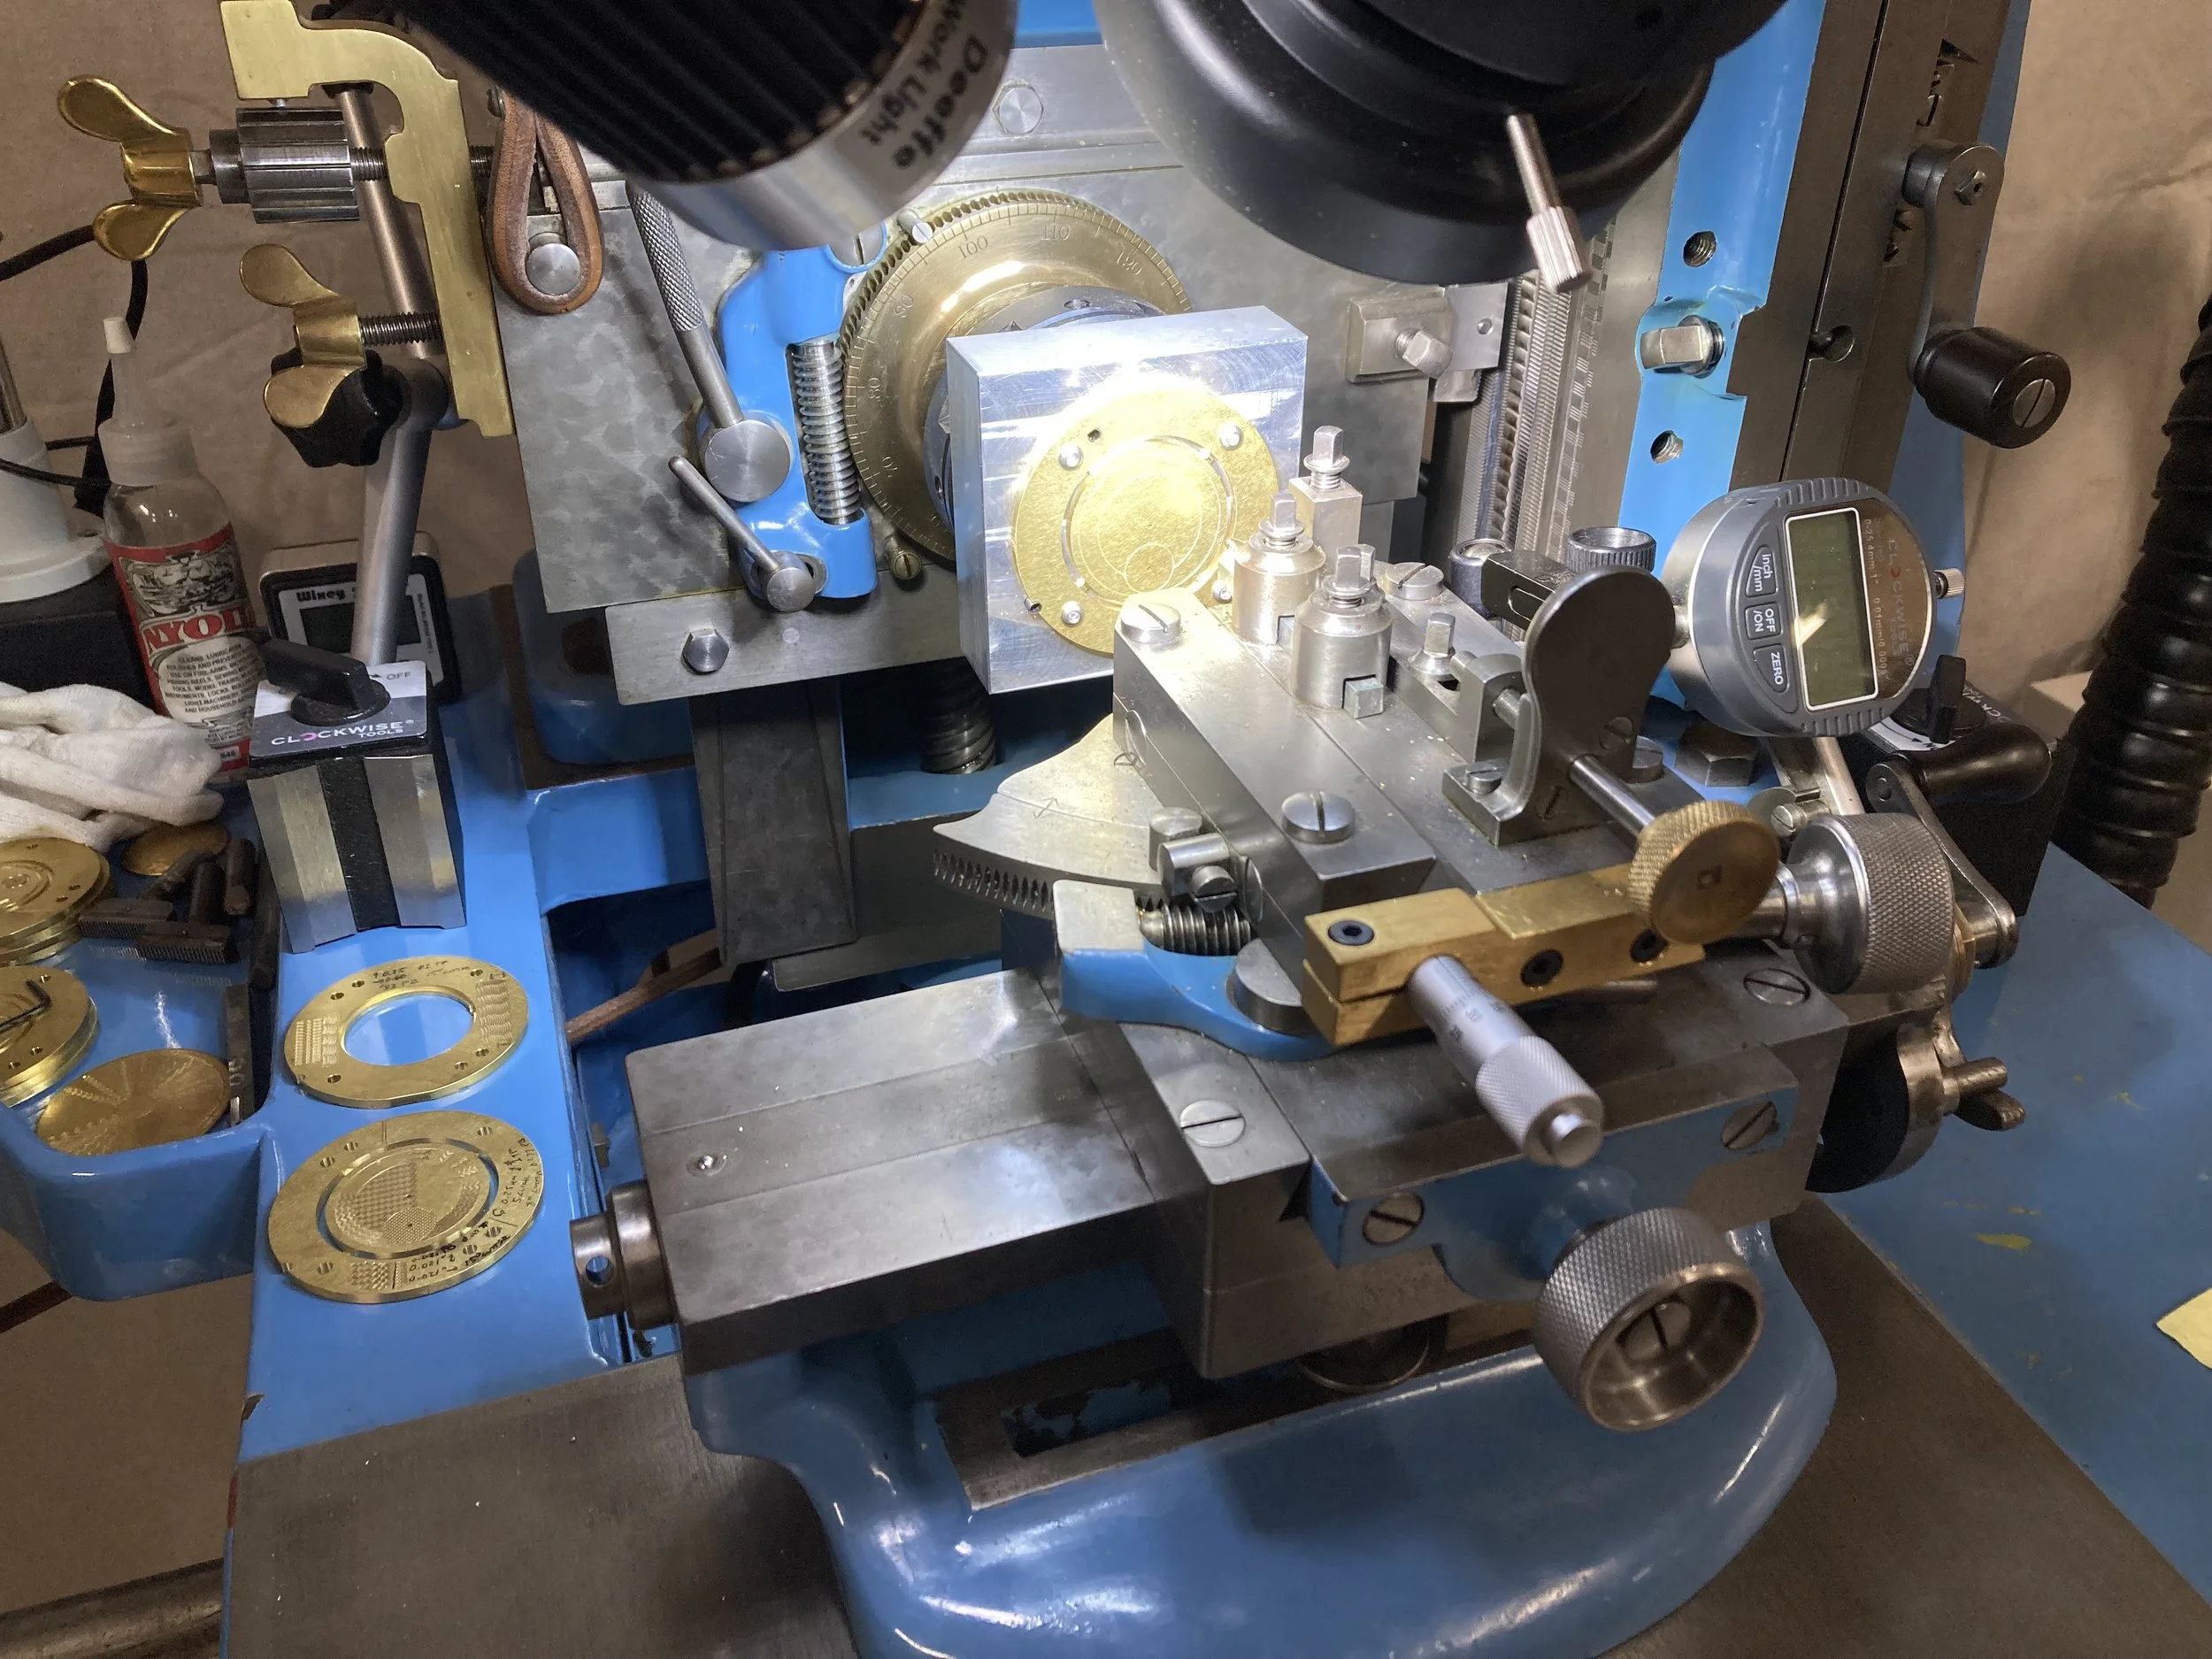
Model 2 Dial
September 14, 2024
The new Model 2 dial is a hand guilloched silver with 3 patterns, 18k gold angular chapter rings with pad printed markers, and 18k gold hour indices with superlume.
This was a particularly challenging project. The main dial has 4 zones for 3 different guilloche patterns. After the hand guilloche, the recess for the chapter rings were machined to a depth of 0.2 mm and a tolerance of 0.005 mm.
The chapter rings were machined, circular grained on a lathe, and then pad printed on our custom built pad printer. This also required making a new cliche for the pad printer. The chapter rings are angular (not flat), meaning that the inside diameter has a height of 0.25 mm whereas the outside diameter has a height of 0.4 mm. This improves the reflection in the light and creates a more dramatic 3D appearance to the dial.
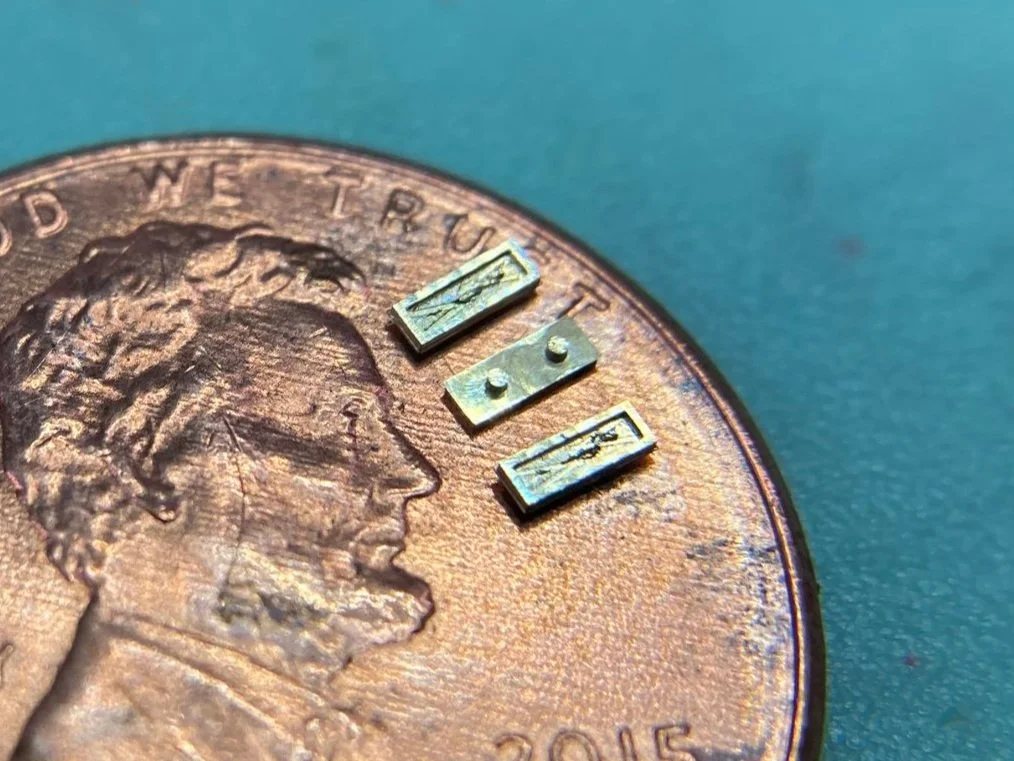
The hour indices were machined with a 2 mm endmill, then the pockets were machined with a 0.05 mm and 0.01 mm endmill (see the photo with a mechanical pencil). The indices were polished and then superlume added to the pockets using an oilier. The indices measure 1.2 mm x 0.9 mm x 0.2 mm (L W H), the pocket for the superlume is 0.1 mm deep, and the feet are 0.3 mm.
Finally, everything was assembled and the result is striking.


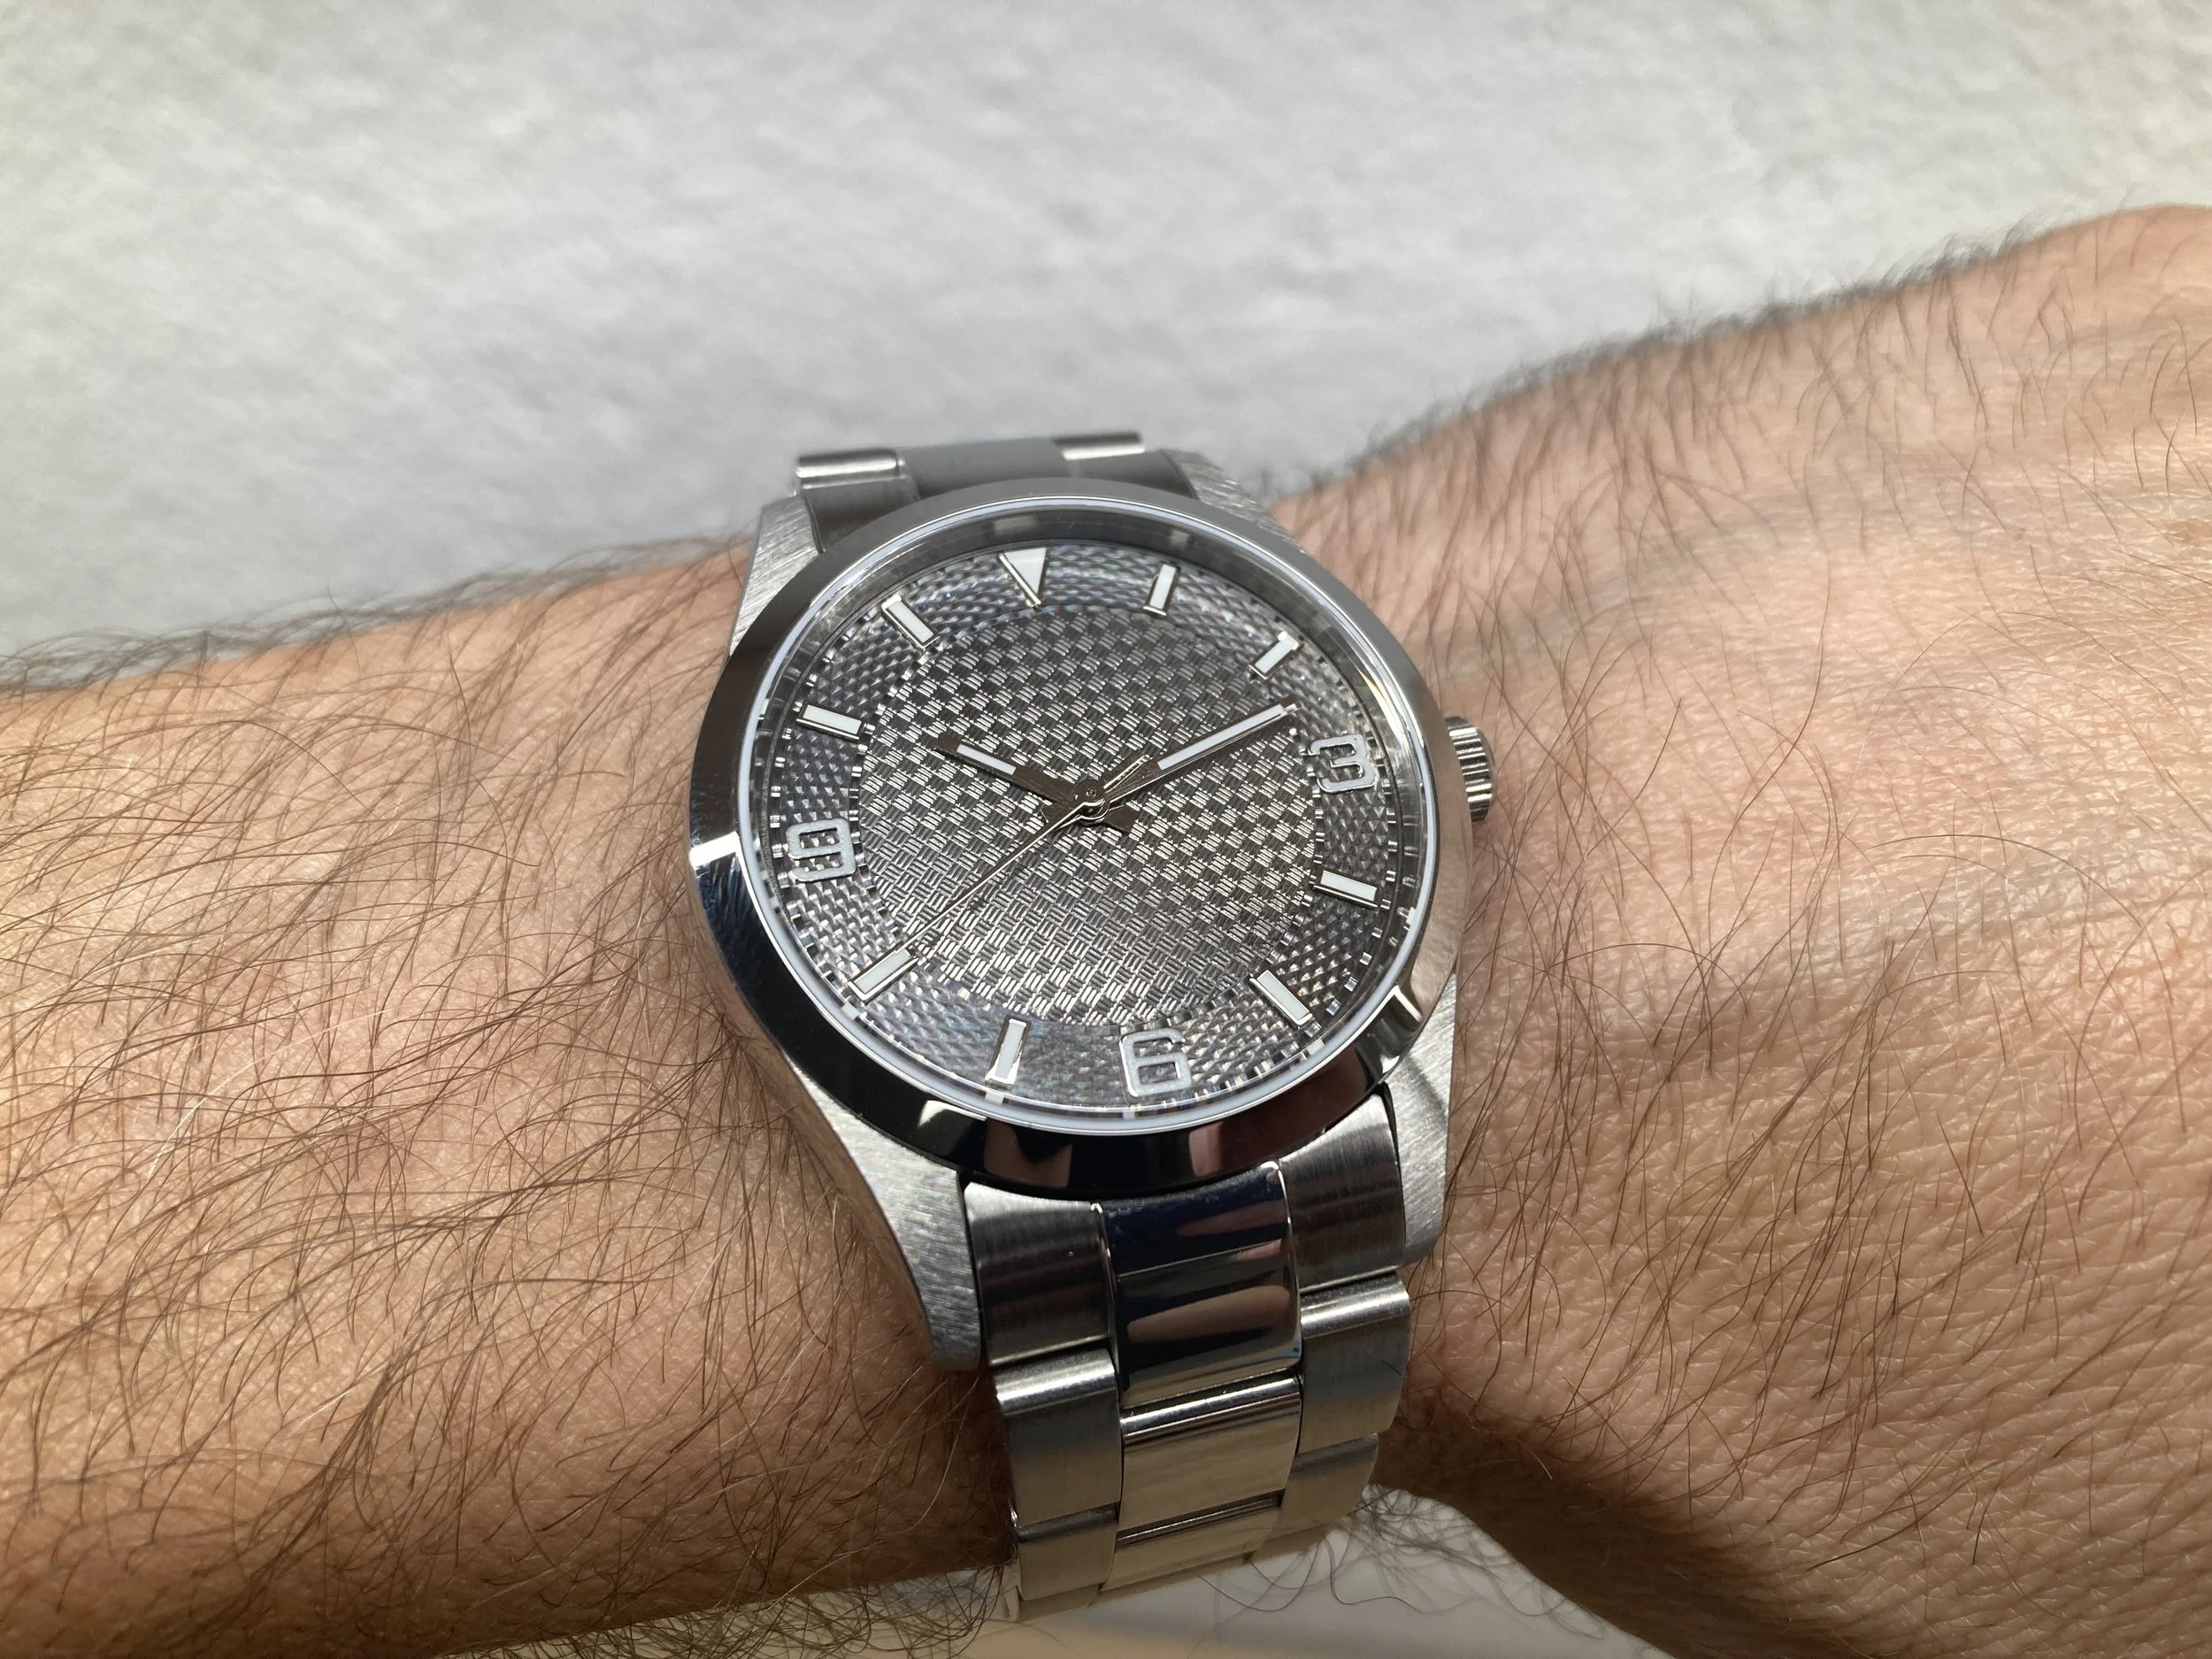
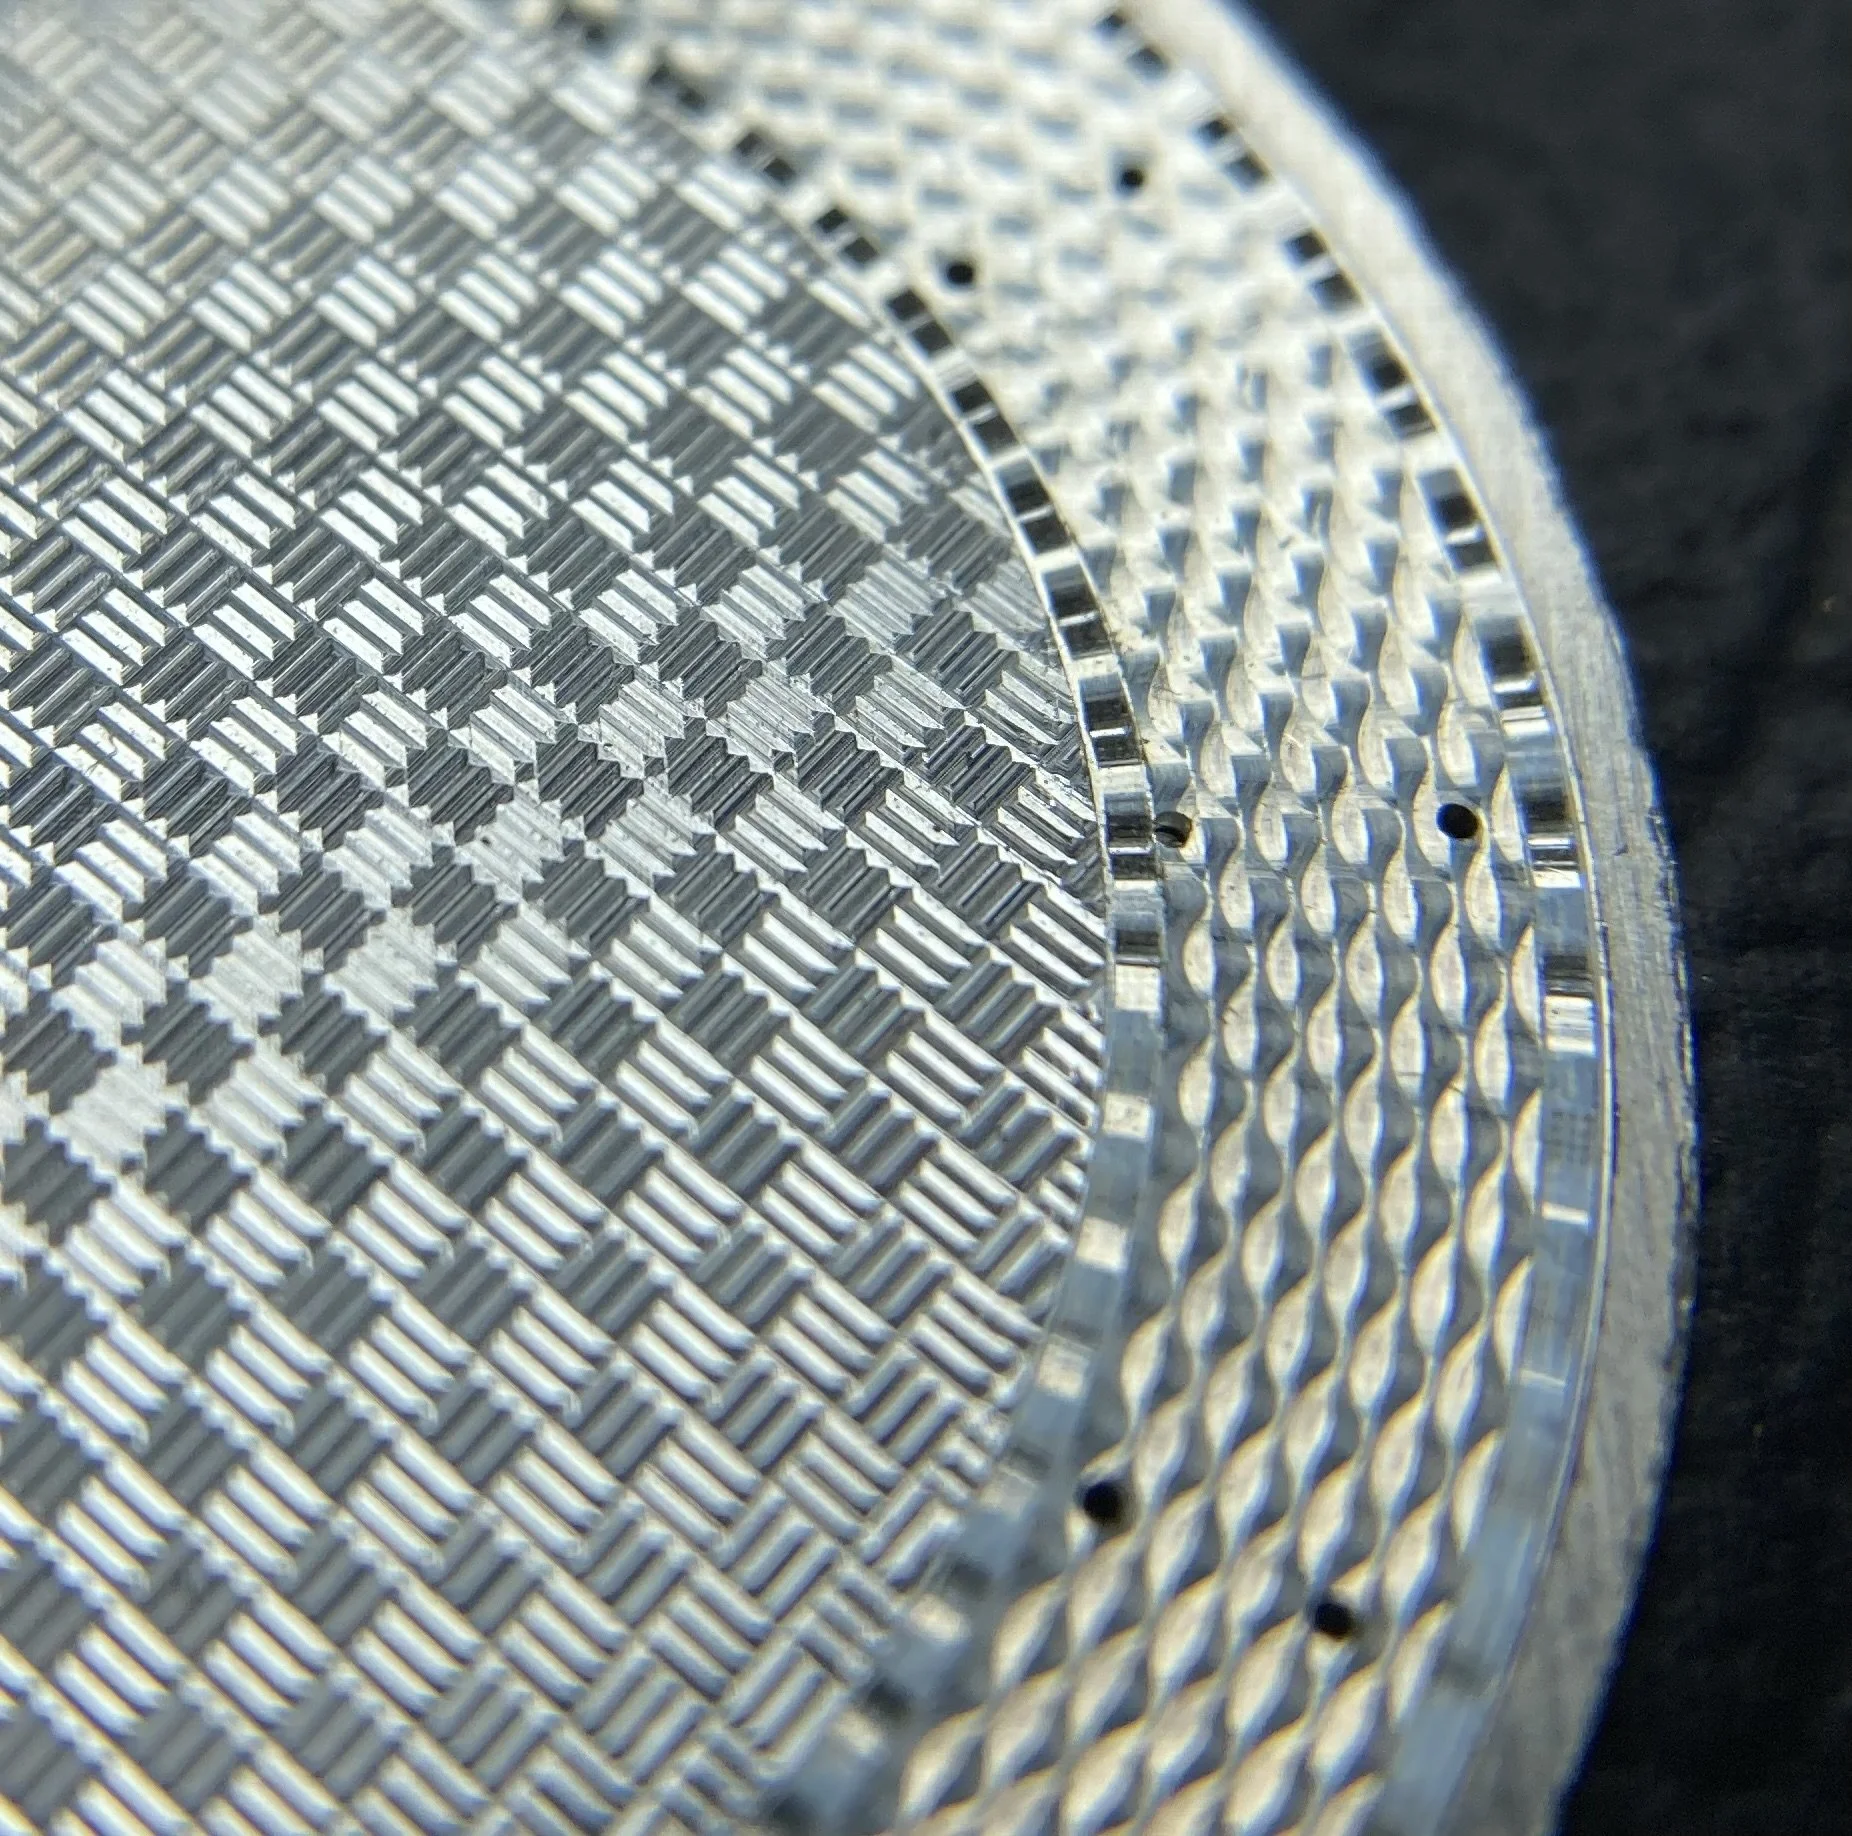
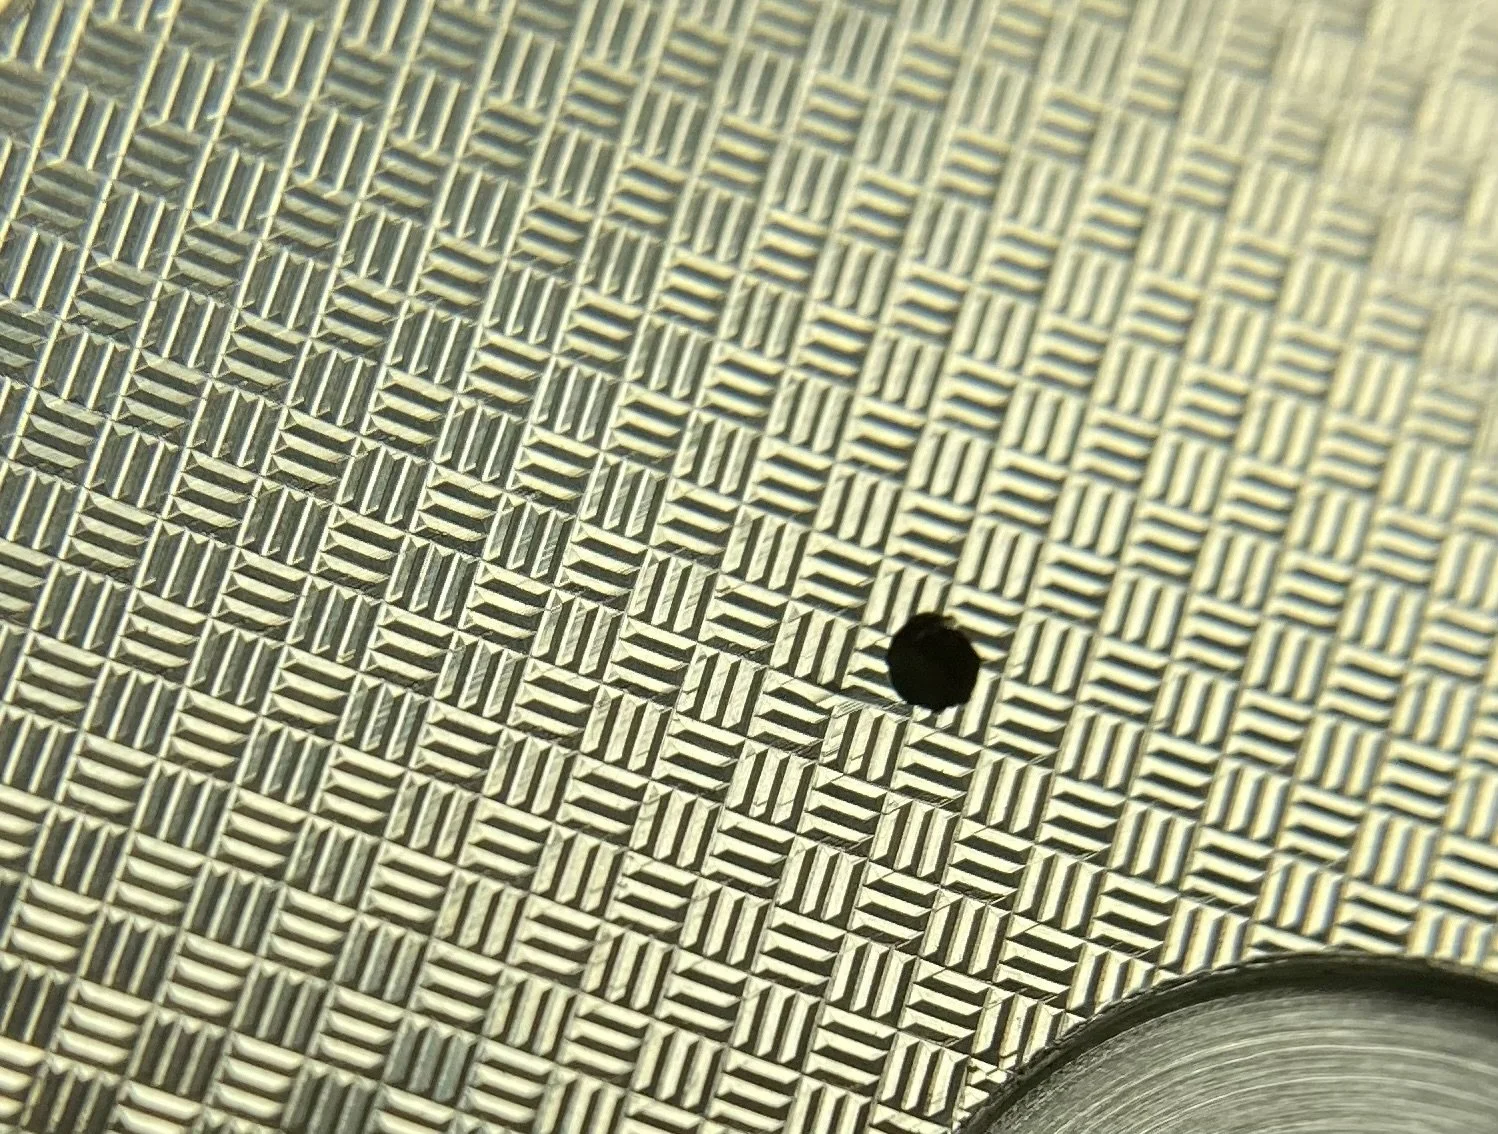
Aviator Guilloche Watch Dial
August 4, 2024
Making a monolithic dial is difficult because the entry and exit cuts of the straight-line guilloche are limited to a 0.5mm region that is later “removed” with a fluted trench (the perimeter cuts that look like ribbon). Including “badges” on a monolithic dial adds additional complexity but the result is worth it. This new dial required the following steps
CNC the lines on the 0.5mm TruSilver dial blank using a diamond drag bit.
Straight-line engine and rose engine the basket weave and barley corn guilloche (see prior posts on this page)
Cut the recesses for the dial feet on the back of the dial (to be attached in step 10)
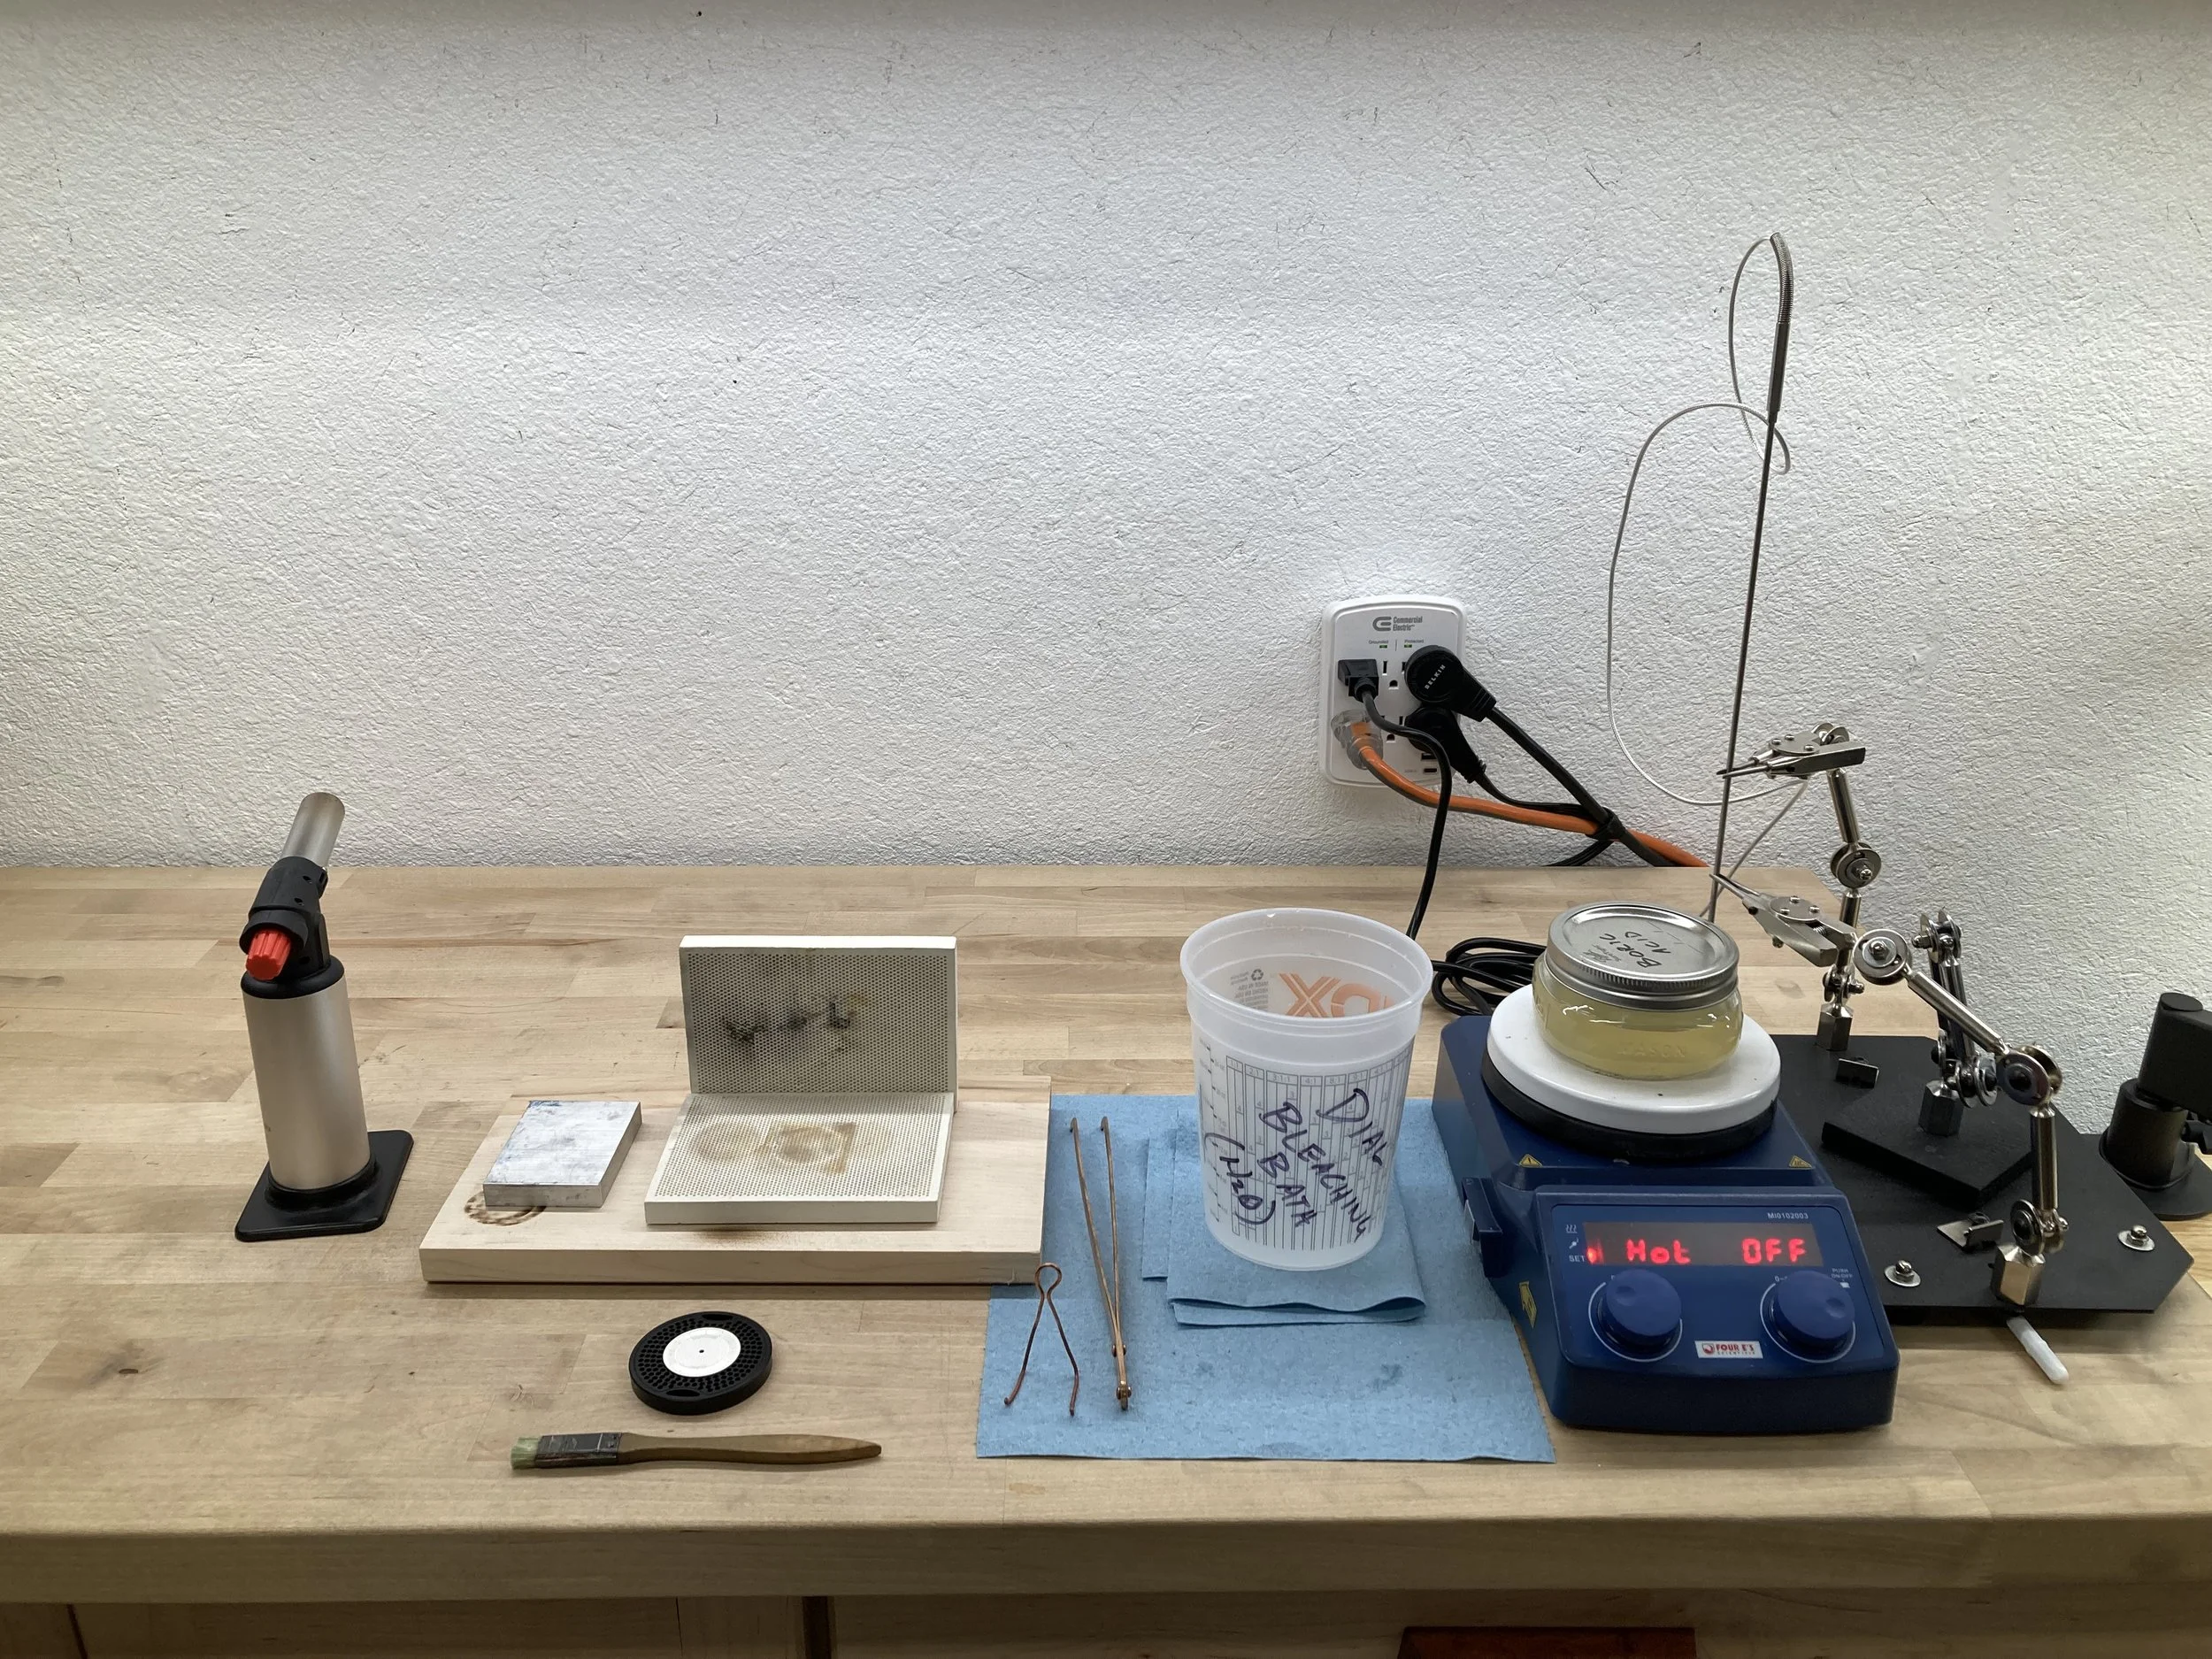
Whiten the dial using a depletion gilding process that includes heating the dial with a torch, then immersing the dial in a solution of Sparex acid (see photo) on a mixing hotplate. This process is repeated 3-10x until the dial is a matte white (see before and after photo with the Aviator and Model 2 dials).
Then the dial is lightly brushed with a soft nylon bristle brush to highlight the peaks of the guilloche.
The badges are straight grained with a watchmaker compass and diamond paste (see photo).
Make the pad printer plate or cliche (see prior posts on this page)
Pad print the text onto the dial (see photo) with special ink using our scratch-built high-precision pad printer (see prior posts on this page)
Apply the hour indices
Apply the dial feet
Assemble the watch
In all I am very pleased with the dial and it has the luster and appearance of a pearl. I am also very pleased with the finished watch. I think this dial is a big improvement (aesthetically) from the prior version.

Guilloche Watch Dial
June 6, 2024
For years I have worn a Rolex Explorer as my “daily driver” watch. I planned to replace that watch with one that I built as soon as I had the right tools. Well that day is TODAY! A true guilloche dial that is black rhodium plated over a 100% silver dial made on the Elara CNC, Plant Straight-line Engine and Lindow Rose Engine.
I also have a new process using a precision ground and machined “carrier” plate (see pictures) that allows me to scribe the guilloche “zones” (or layout) on the CNC, transfer the already aligned silver and carrier plate to the Straight-line Engine, then transfer the plate to the Rose Engine, all without alignment steps. This saves many hours (if not days) of work.
A huge thank you to my guilloche mentors David Lindow and Josh Shapiro!

Guilloche Wedding Band
May 23, 2024
I recently received the Lindow Rose Engine that I purchased many months ago. My first task was a wedding band for my brother. I am really excited to begin using this Rose Engine to complete my watch dials.
A huge thank you to my guilloche mentors David Lindow and Josh Shapiro!

Dial Pad Printing Process
February 27, 2024
As promised, here is the complete process from making the cliche to printing on a real dial. This dial is just a test dial, but it showcases the entire printing process. In all, this video represents a year of work to learn and perfect all of the various aspects of printing a dial.
A huge thank you to my dial pad printing mentors, Dennis Carignan and Lindsay Stämpfli, for the tips and tricks on the dial plate (cliche) manufacturing and ink selection!
Finally, I can move on to other watchmaking activities… like making the chronograph movement!
Pad Printer Plates & Dials
November 25, 2023
Thanks to Denis Carignan for the help and mentoring to create the new pad printing plates for the Model One and Model Two.
Here are pictures of the plates (top) using the “Carignan process” and a TEST PRINT on plastic (bottom) with a mechanical pencil for scale. It is really hard to get a good photo of a large mirror polished plate, it literally reflects everything.
Next test will be on a real dial!


New Pattern Bars
November 25, 2023
Thanks to Josh Hacko for the new pattern bar and touch-piece for the straightline engine.
Here is a picture of a TEST DIAL with the new pattern bar. The basket weave is finally decent. The guilloche uses 0.2 mm steps, i.e., the lines are 0.2 mm, less than half the size of mechanical pencil lead!
Next test will be on silver, and we will go through the entire process to make a real dial.
Pad Printer Modifications
November 7, 2023
The manually-operated pad printer has now undergone several months of testing and fine tuning.
We added a digital microscope and machined an articulating arm / mount to facilitate and improve alignment of the print to the dial.
Machined and built a “flip top” with clear Lexan over the dial to help improve alignment of the print to the dial.
We switched from Duralaze plates ("cliches") to D2 Tool Steel plates,
We also added an XYR micrometer platform and plate holder the laser and made the same plate holder for the pad printer.
We added a fume extractor to the laser, improving shop conditions considerably.
Finally, we are using Mohawk Lacquer as a top coat on the dial, and we switched from Sigma MP ink to PPG OneShot Ink. The results are greatly improved!
We will post a dial printing video soon.
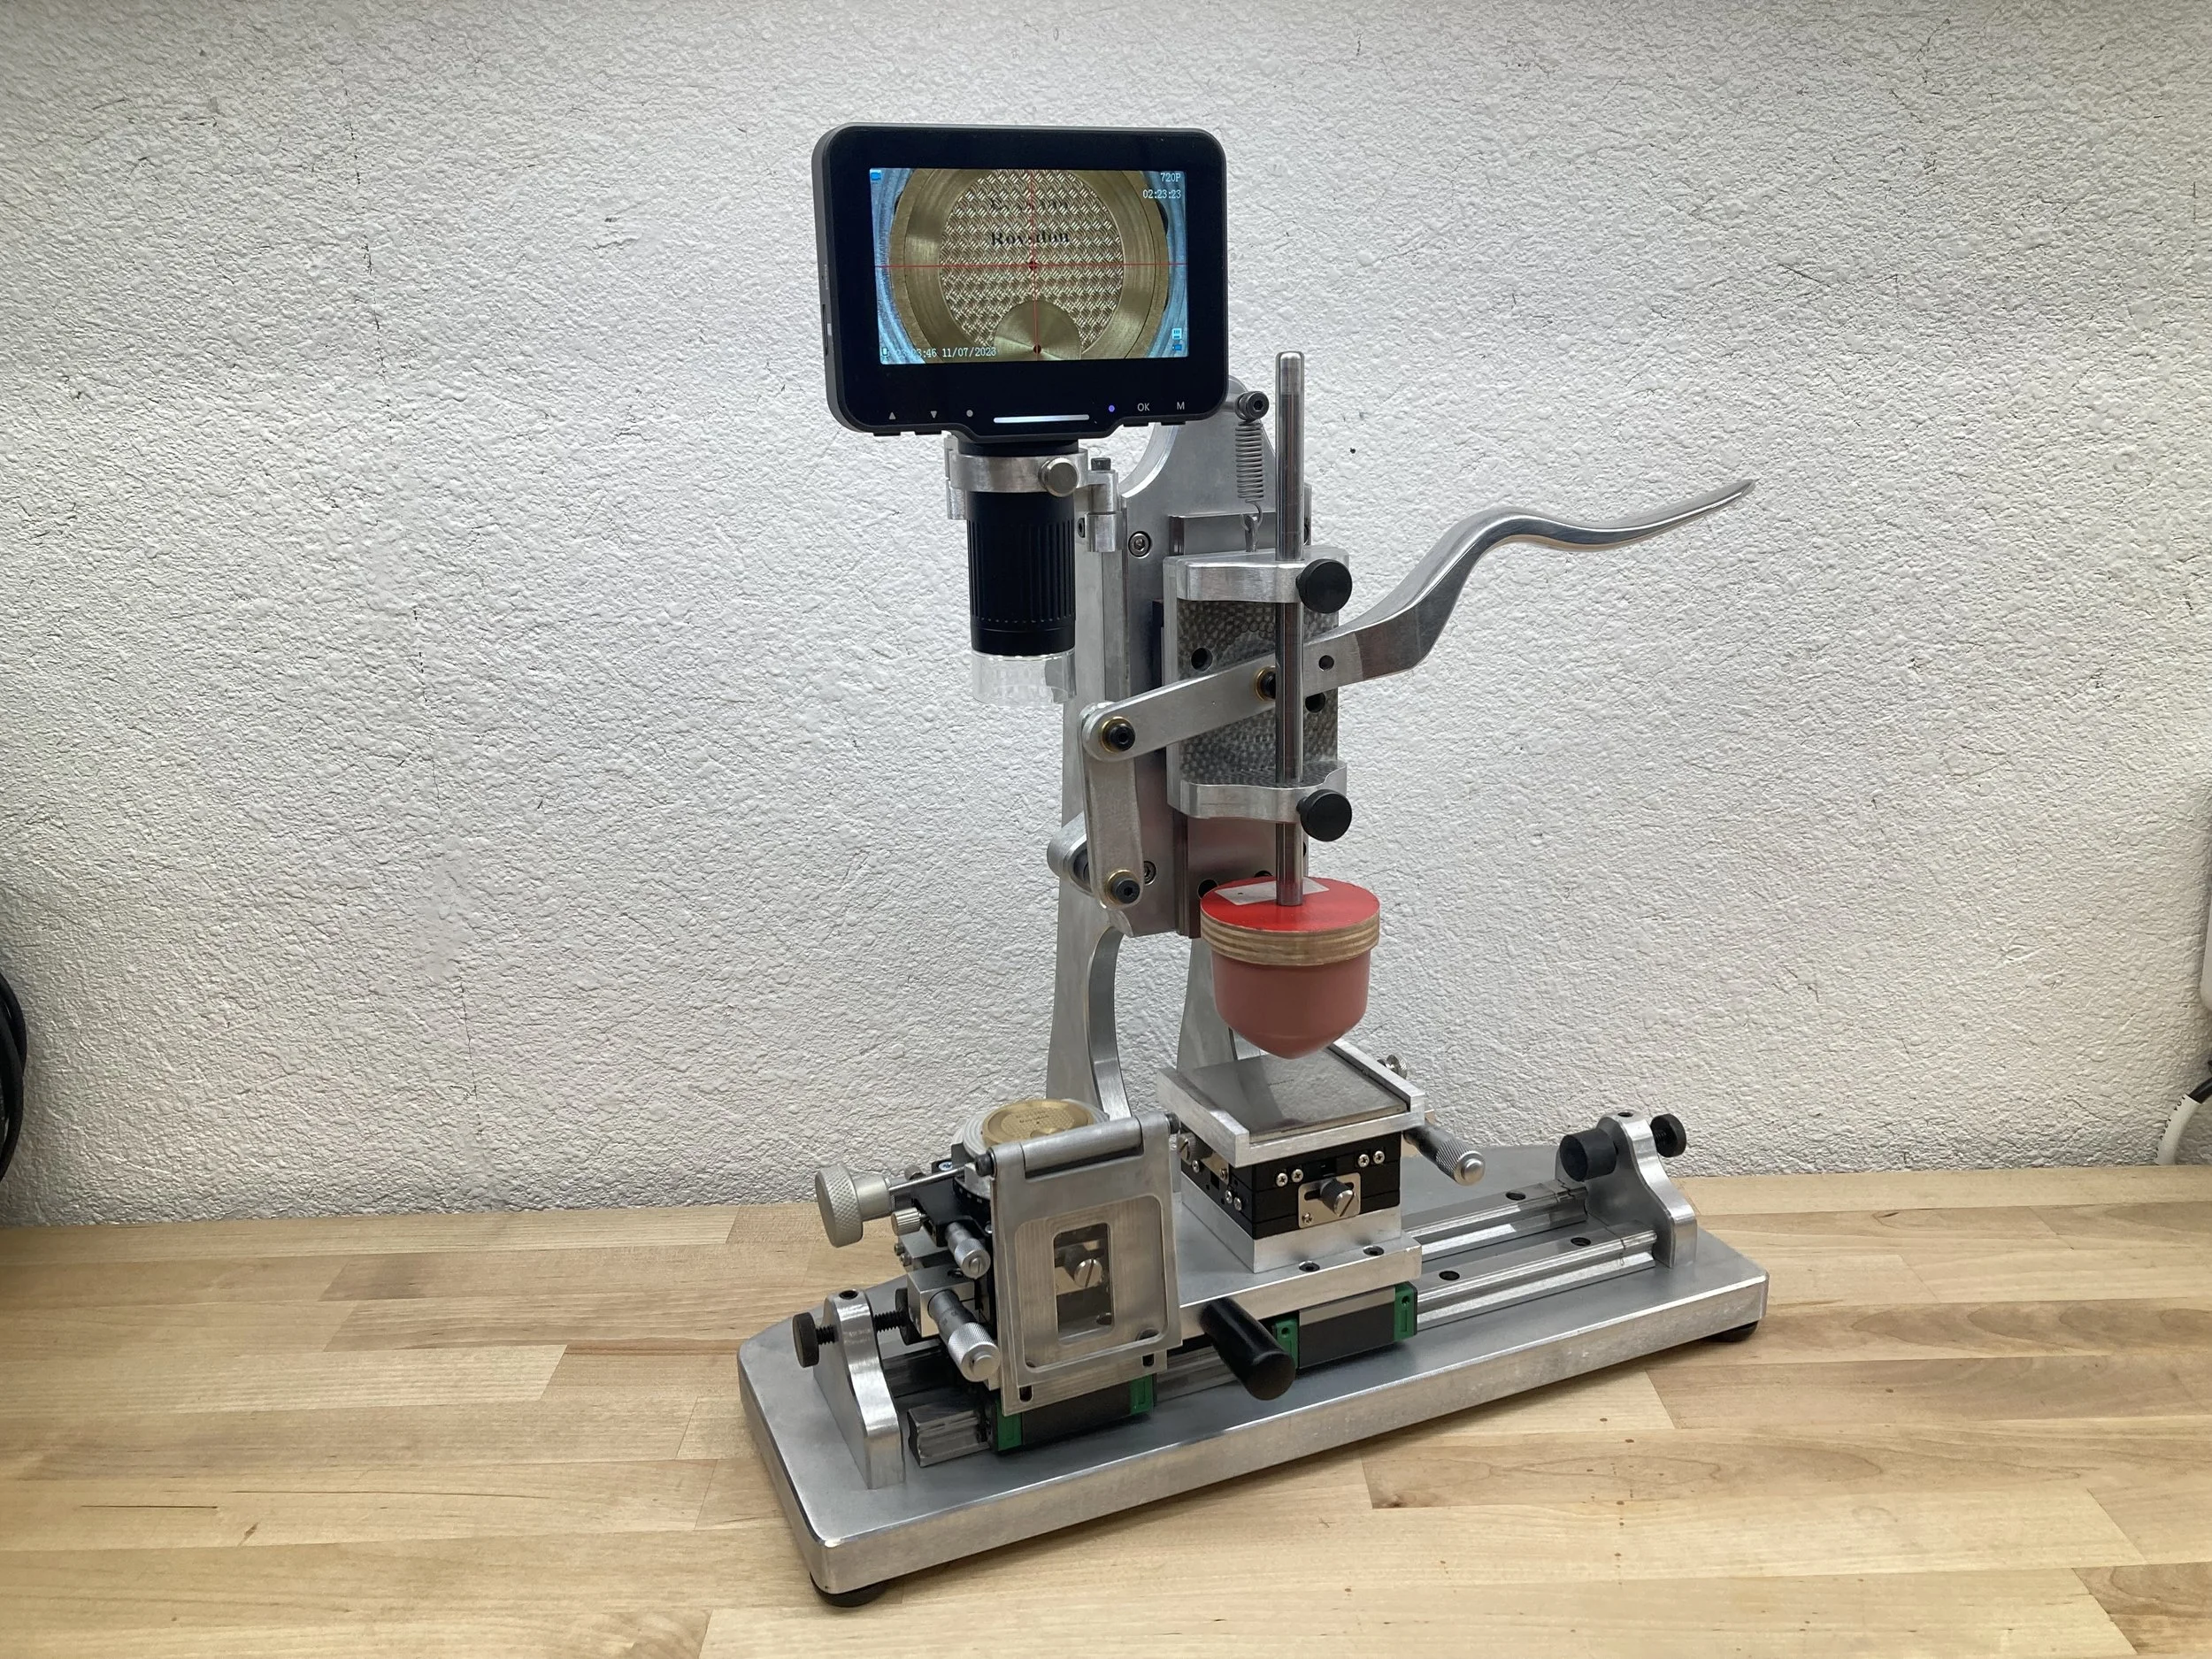
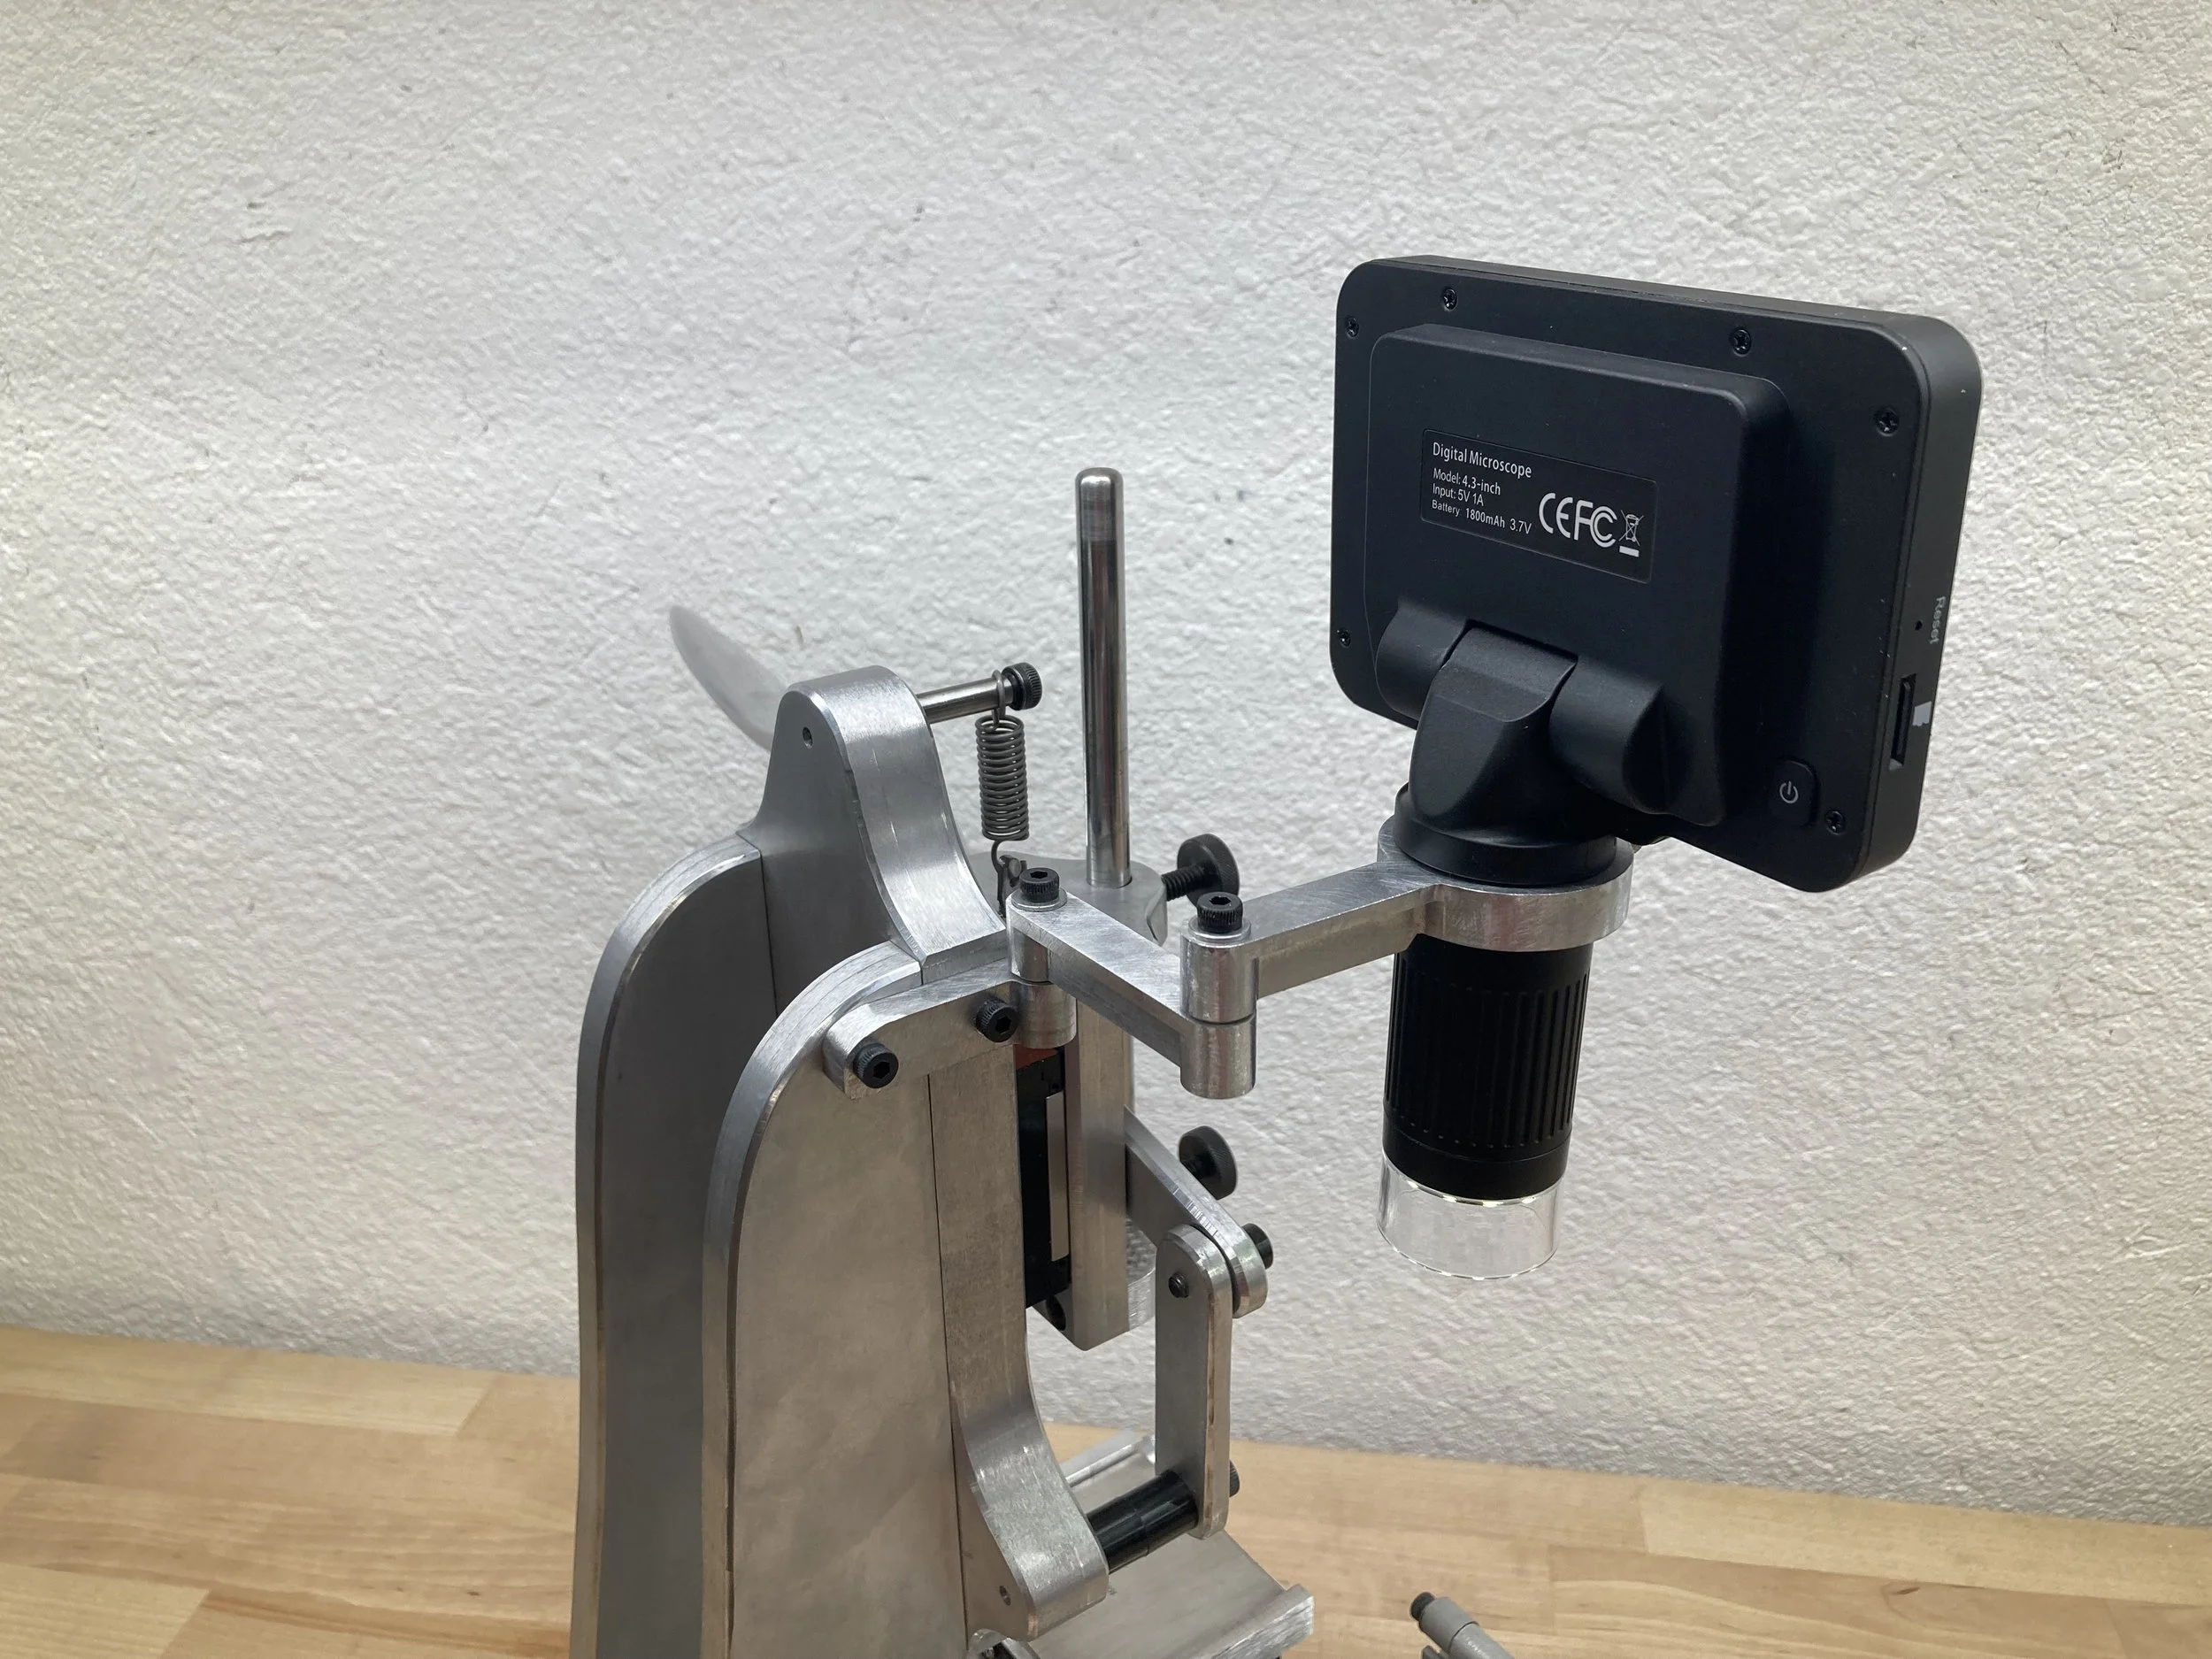
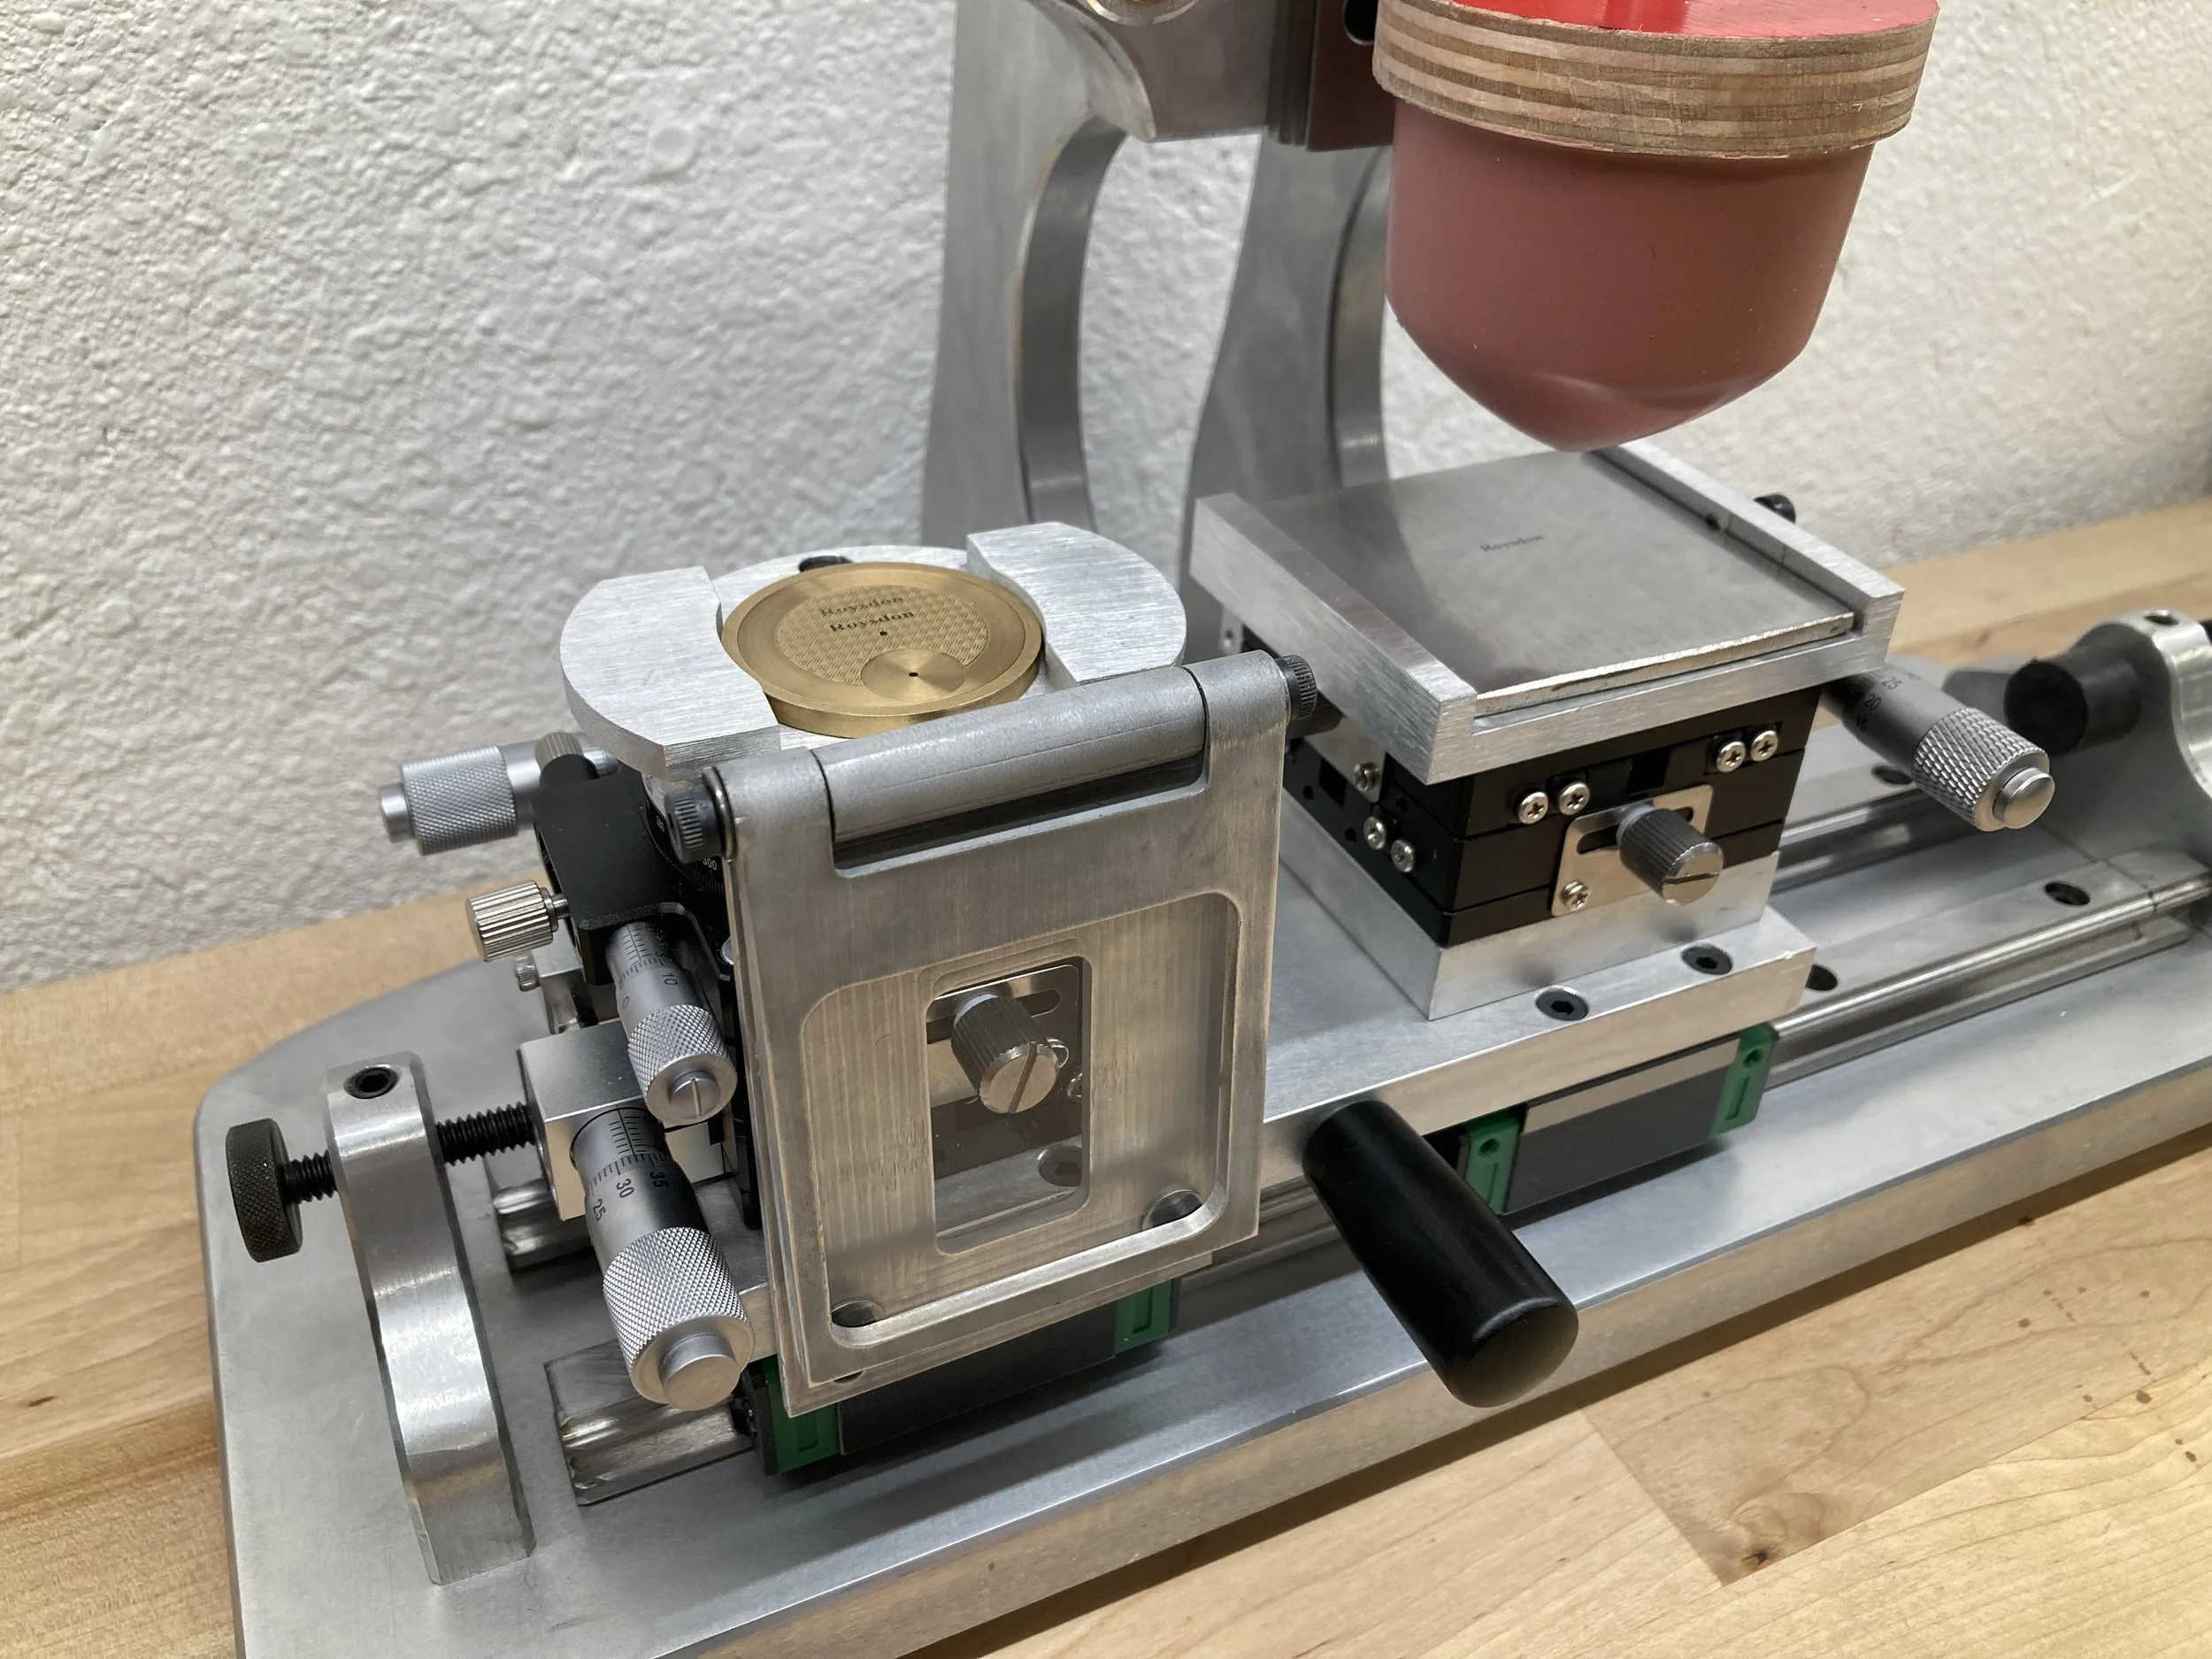
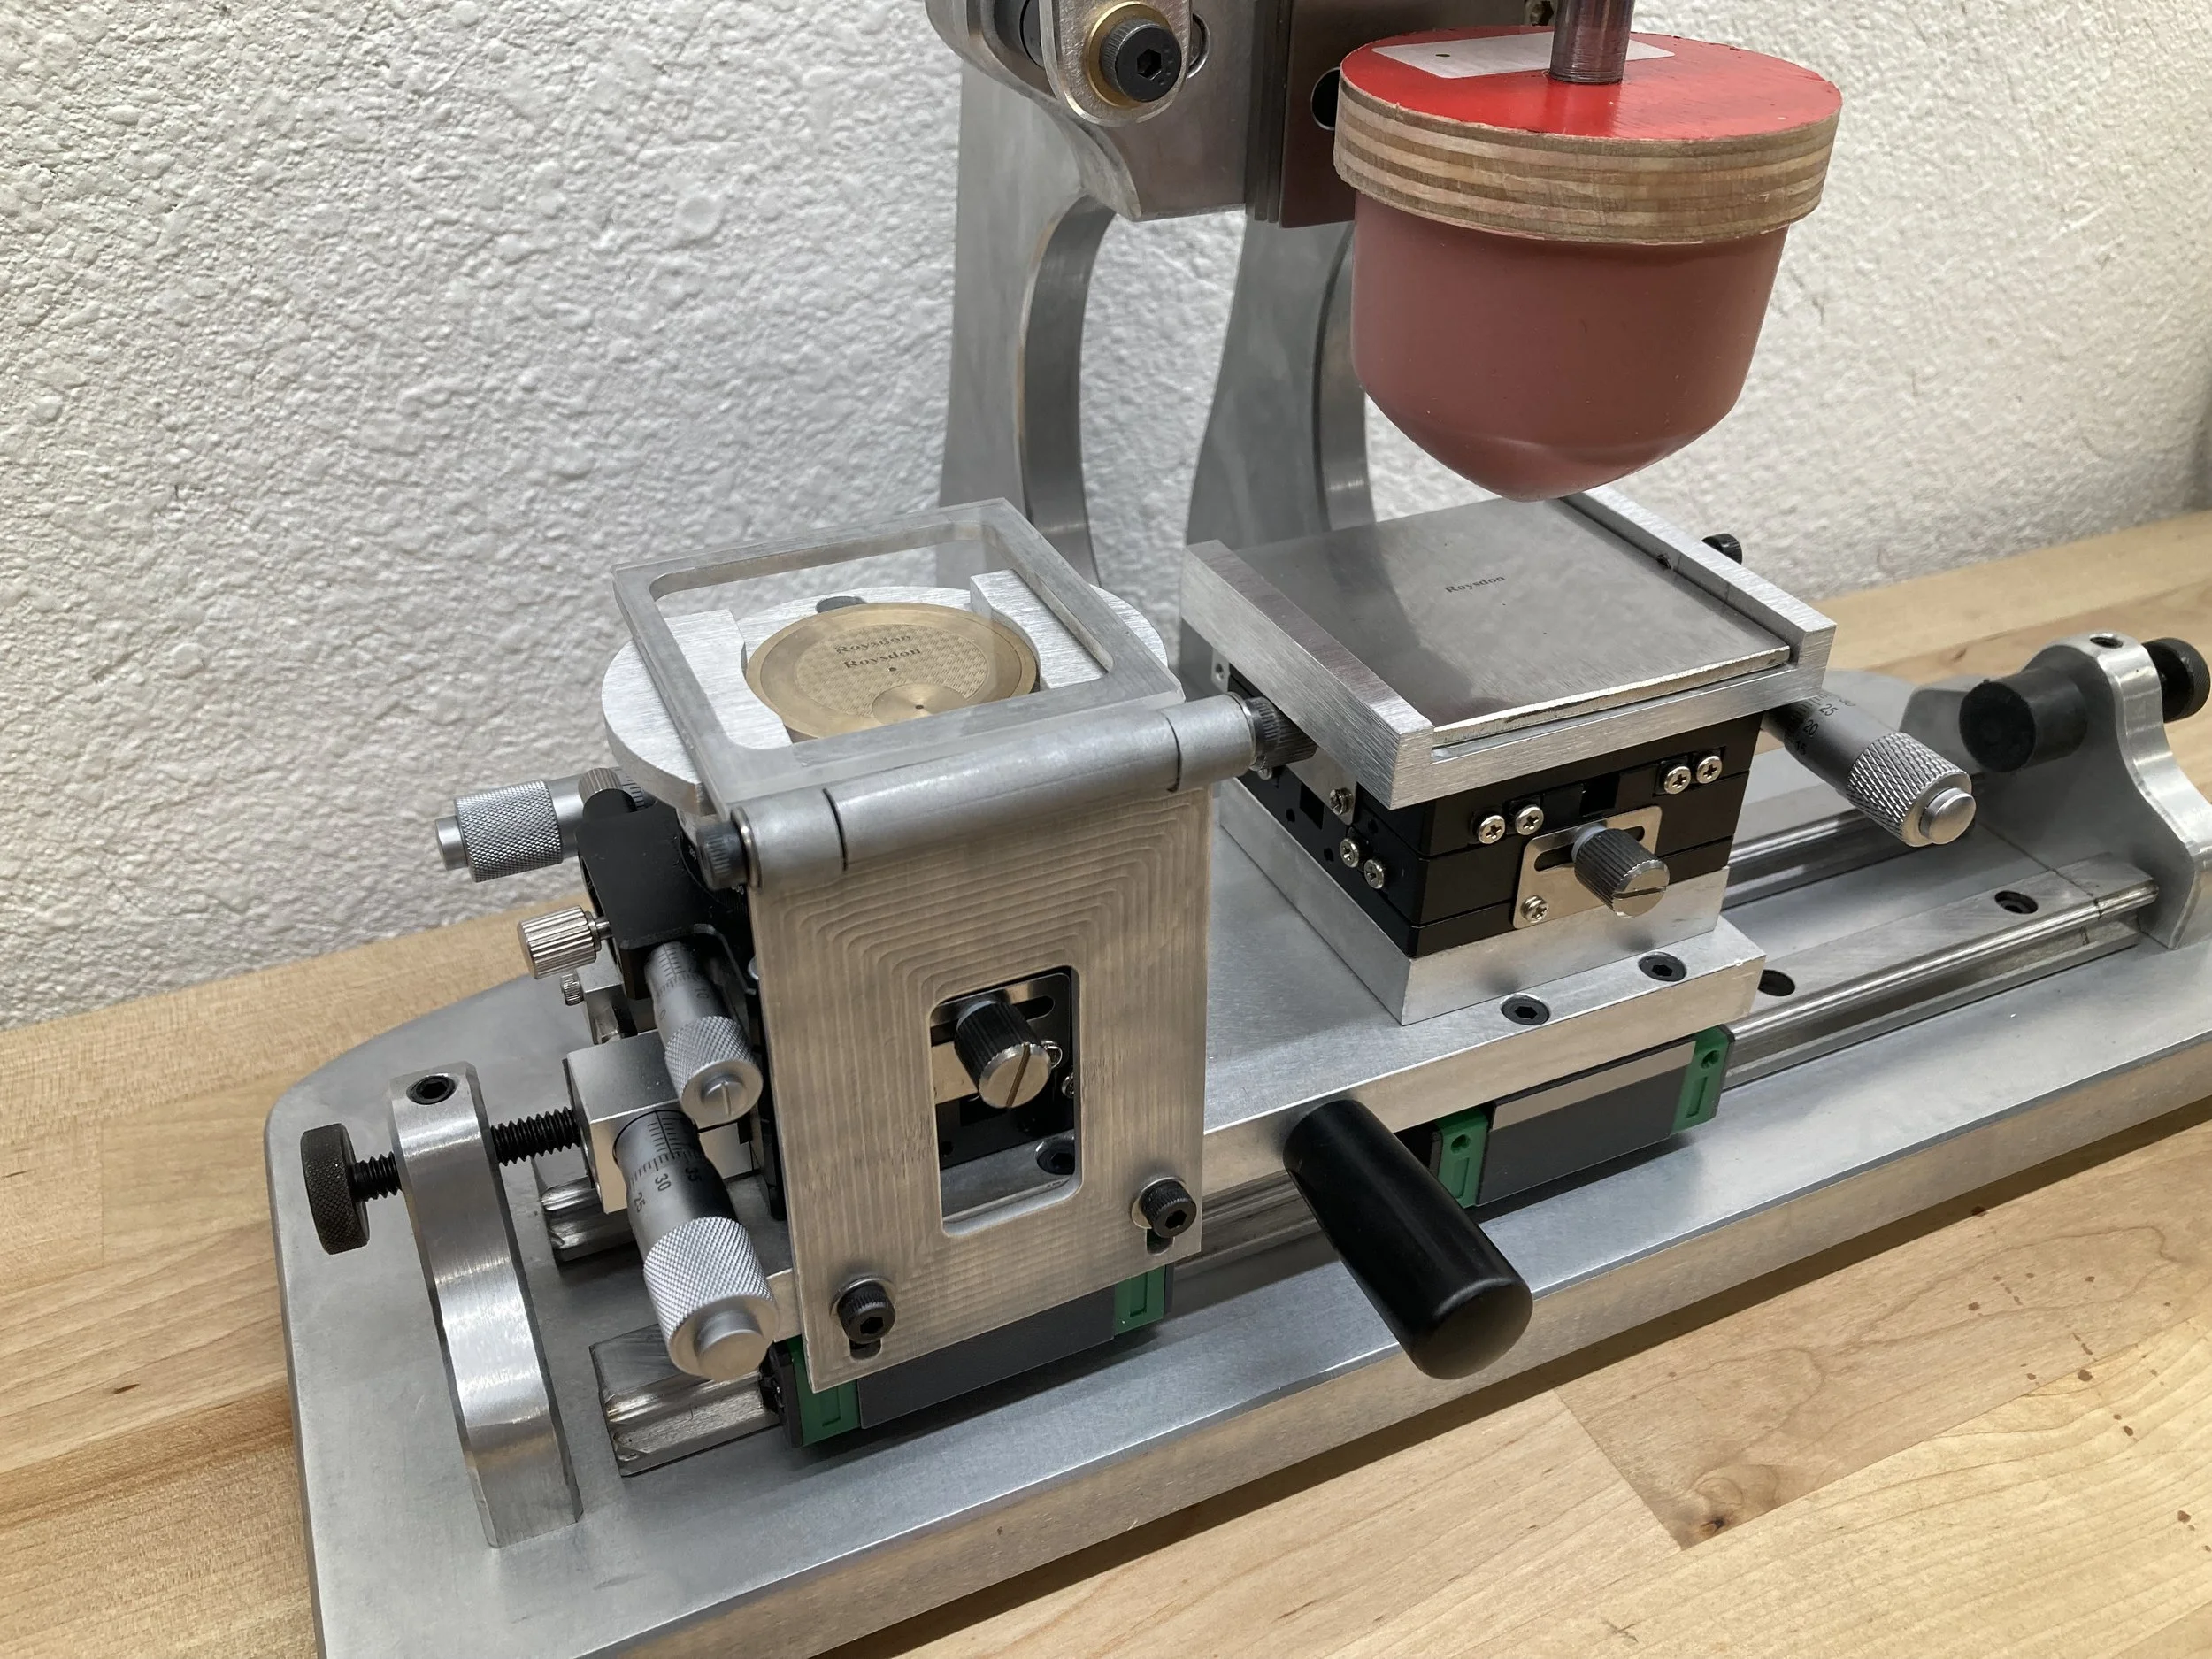
Plate Etch Depth
September 22, 2023
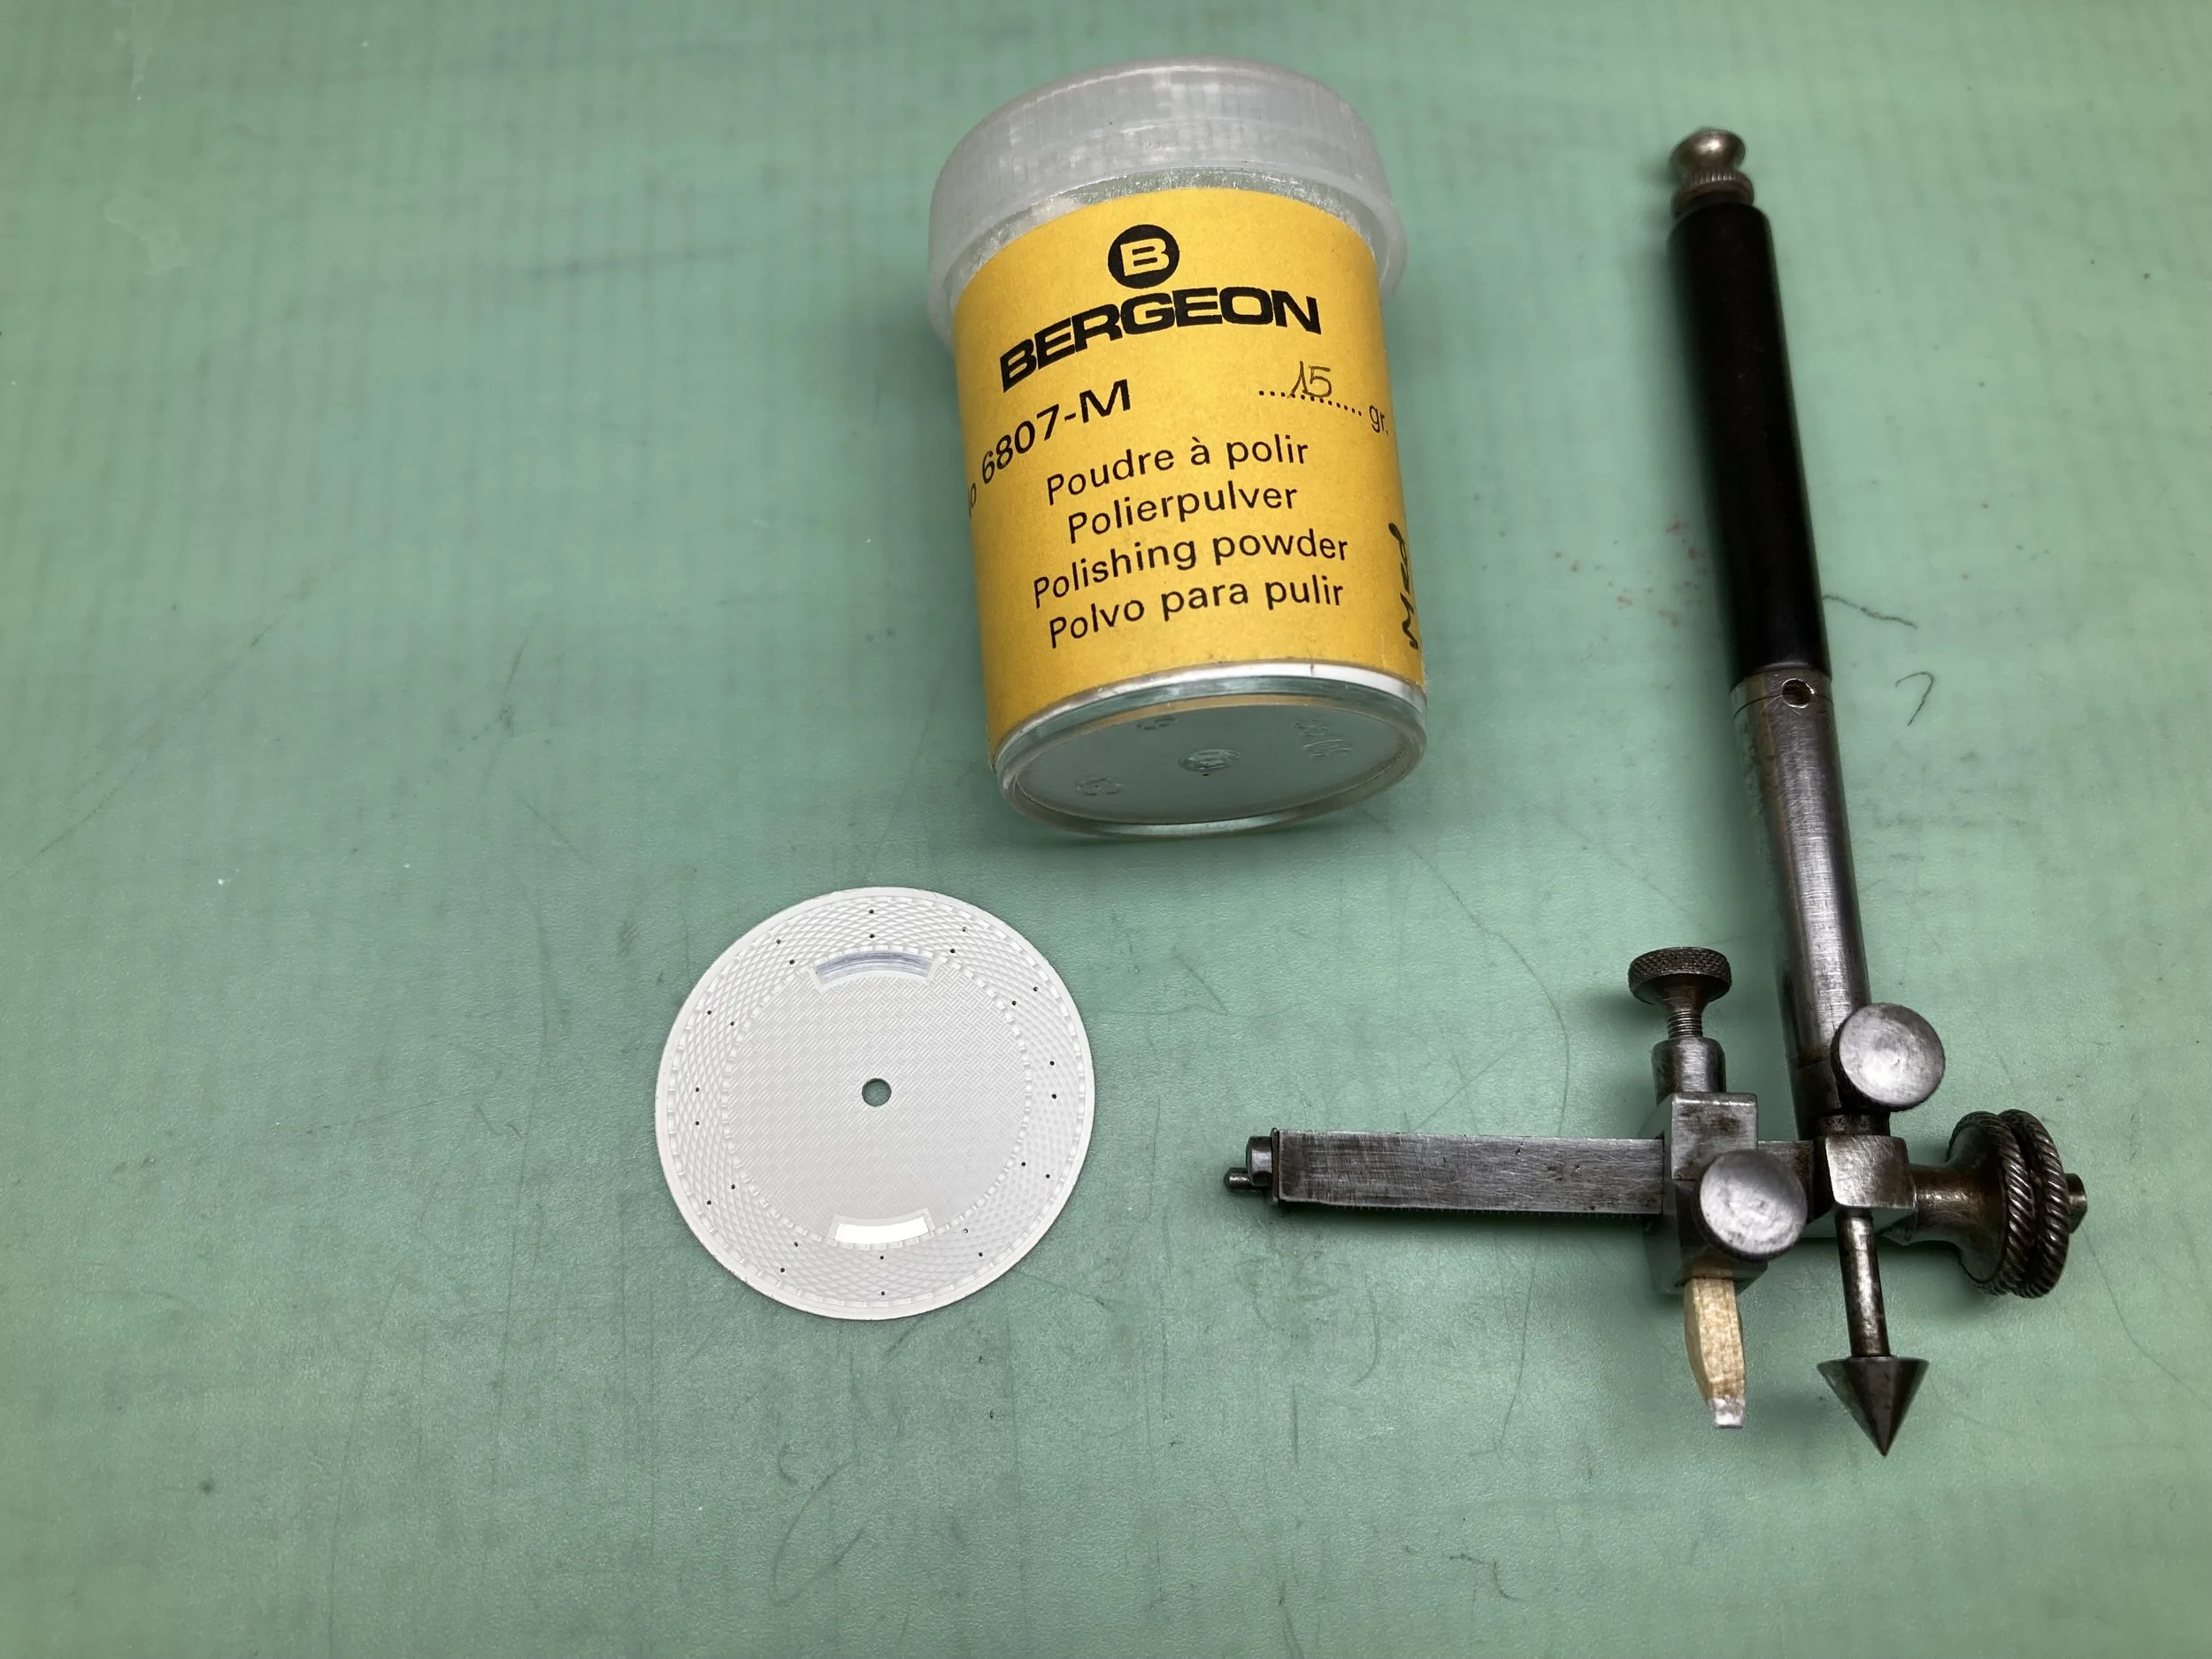
Pad printing requires a plate (“cliche”) that is etched to a very precise depth of 25 microns (+/- 1 micron). To achieve this took several months of experimentation with laser settings (see the last photo), cliche materials, surface finishing techniques, and verification of depth using a Surface Roughness Tester. While we are pleased with the results, it was a tedious process.
Our goal in our work is to be authentic and honest, so we are sharing our results and settings with you. In our final results we used D2 Tool Steel, and a JPT 50W fiber laser with 2 laser settings:
Etch Pass: Hatch = 0.01 mm at 0 and 90 degrees, parallel path and outline, Loop Count = 2, Speed = 500 mm/sec, Power = 35%, Frequency = 50 kHz.
Finish Pass: Hatch = 0.01 mm at 0 and 90 degrees, parallel path and outline, Loop Count = 1, Speed = 600 mm/sec, Power = 20%, Frequency = 60 kHz.
The etch is then cleaned with a 800 grit diamond lapping plate, and the edges of the engraved letters are individually cleaned with a sharp x-acto blade.
The engraved text is 2 mm tall, with the thin lines measuring 0.01 mm wide.
All laser test files and examples can be downloaded here.


Pad Printer Testing
September 16, 2023
The manually-operated pad printer has now undergone several days of testing that required several steps and fine tuning. The Duralaze "cliche" is laser engraved to a depth of 25 microns on a 50W fiber laser; this laser etch process took nearly 60 iterations to get the depth and etch pattern correct. Then we use a 60 durometer silicone pad with 2-part black ink. The exact viscocity of the ink took 30 iterations to achieve a viscocity and flash time that would correctly transfer the ink from the cliche to the dial without gaps or "splats" in the printed letters. The text in the photo is 2 mm tall, with the thin lines measuring 0.01 mm wide. More testing is necessary to achieve acceptable results for watch dials.
*We use a Duralaze cliche made by InkCups, silicone pads and Sigma MP inks by Printex USA, and a JPT 50W fiber laser.

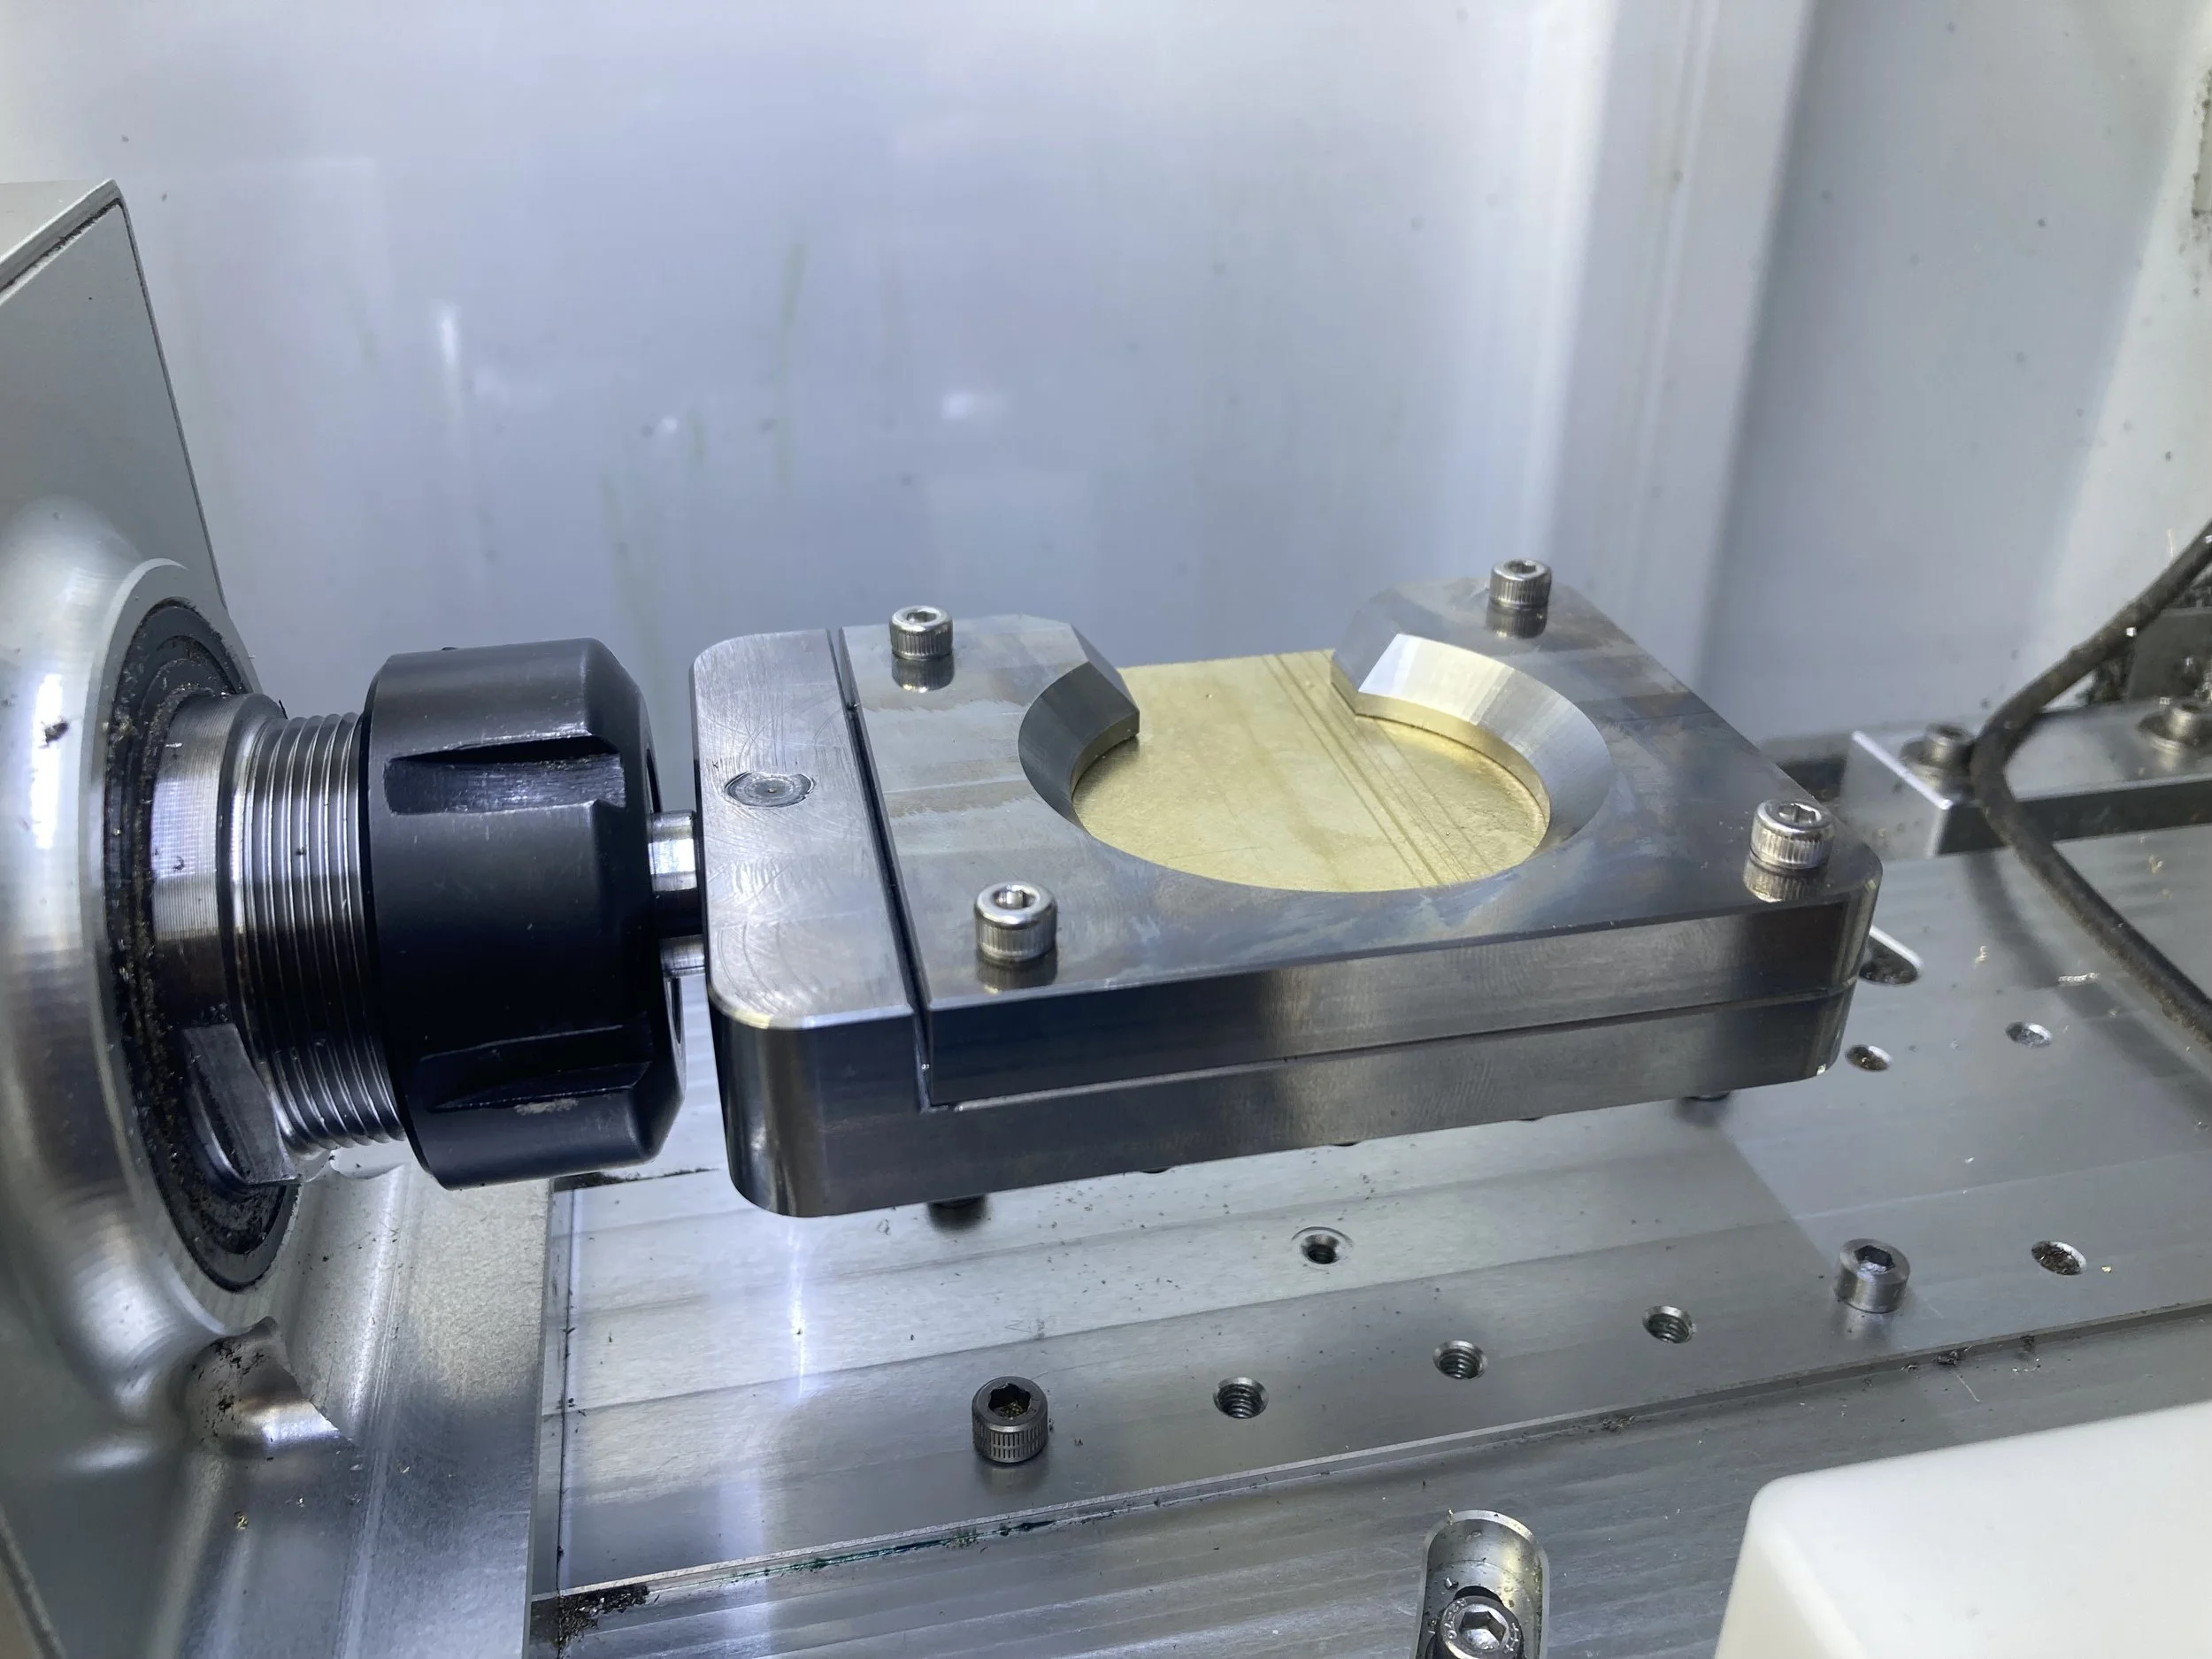
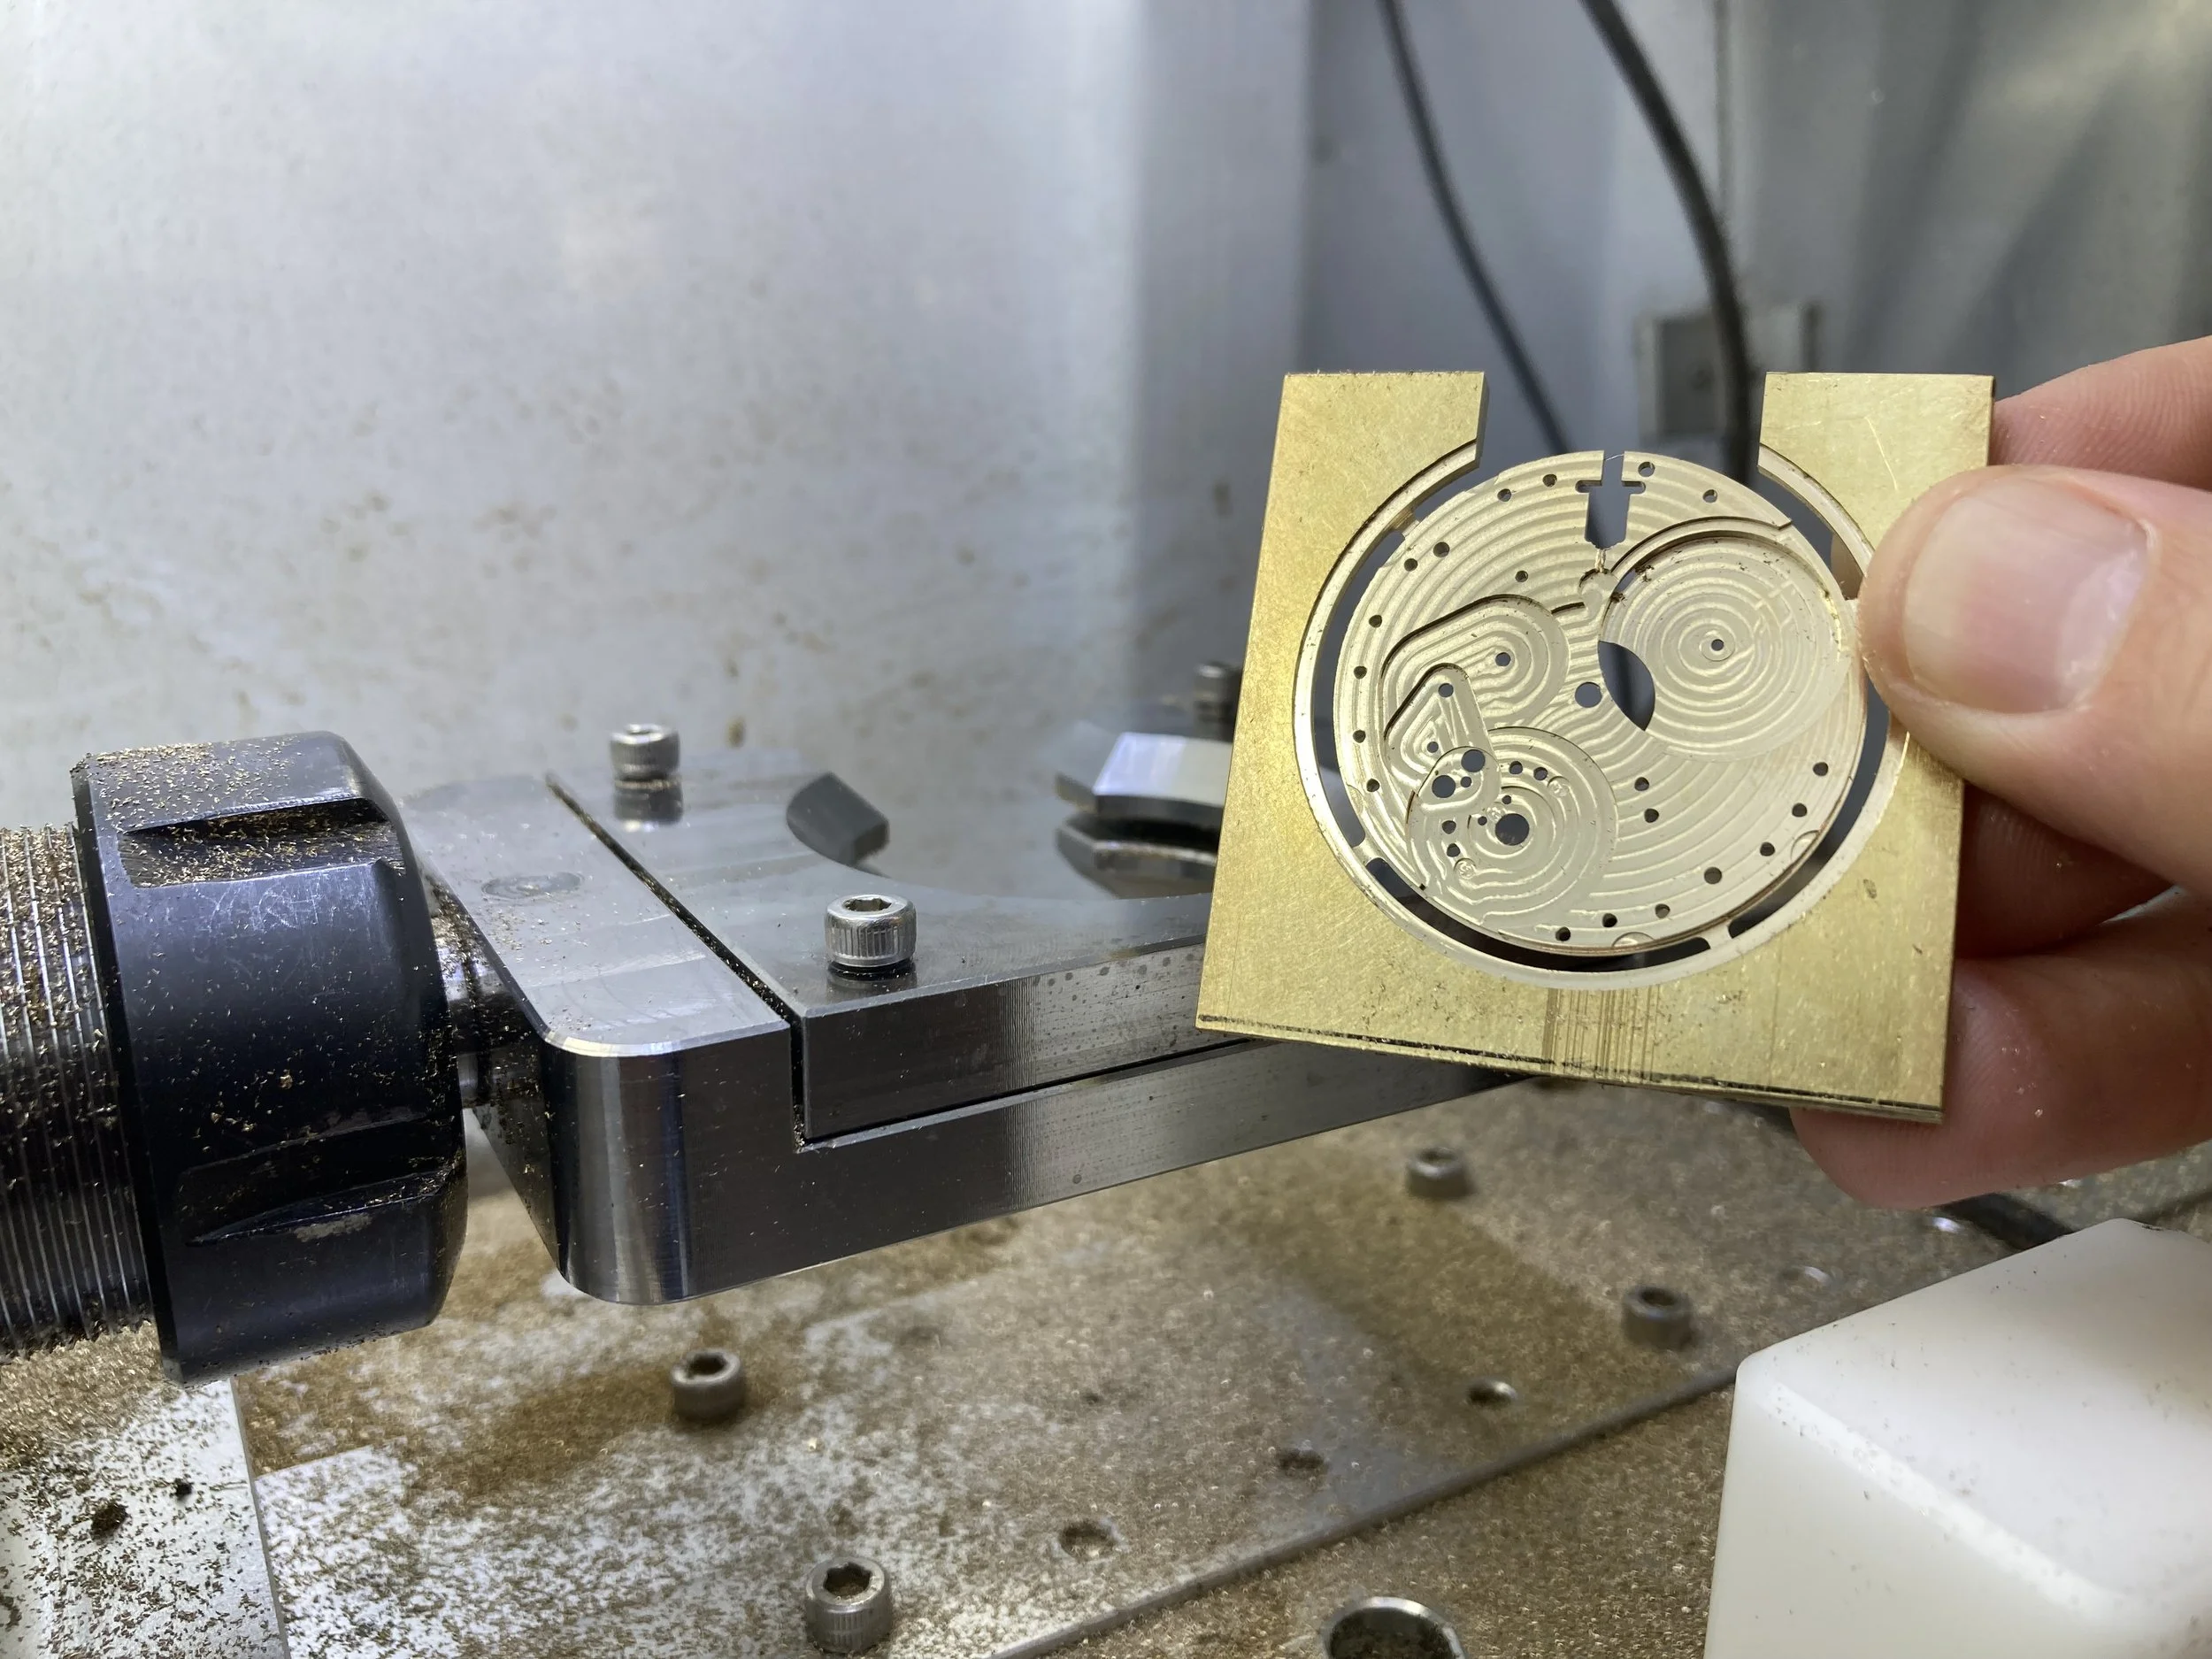
Guilloche Watch Dial
August 26, 2023
We are considering making a small run (4 pieces), version 2, of the Roysdon Model One. This new version will have a guilloche dial completely handmade by Dr. Roysdon. The video documents making a dial from a practice dial blank in brass. The final dial will use silver.
The straight-line engine (photo below) was acquired thanks to help from both David Lindow and Josh Shapiro. Thank you both!
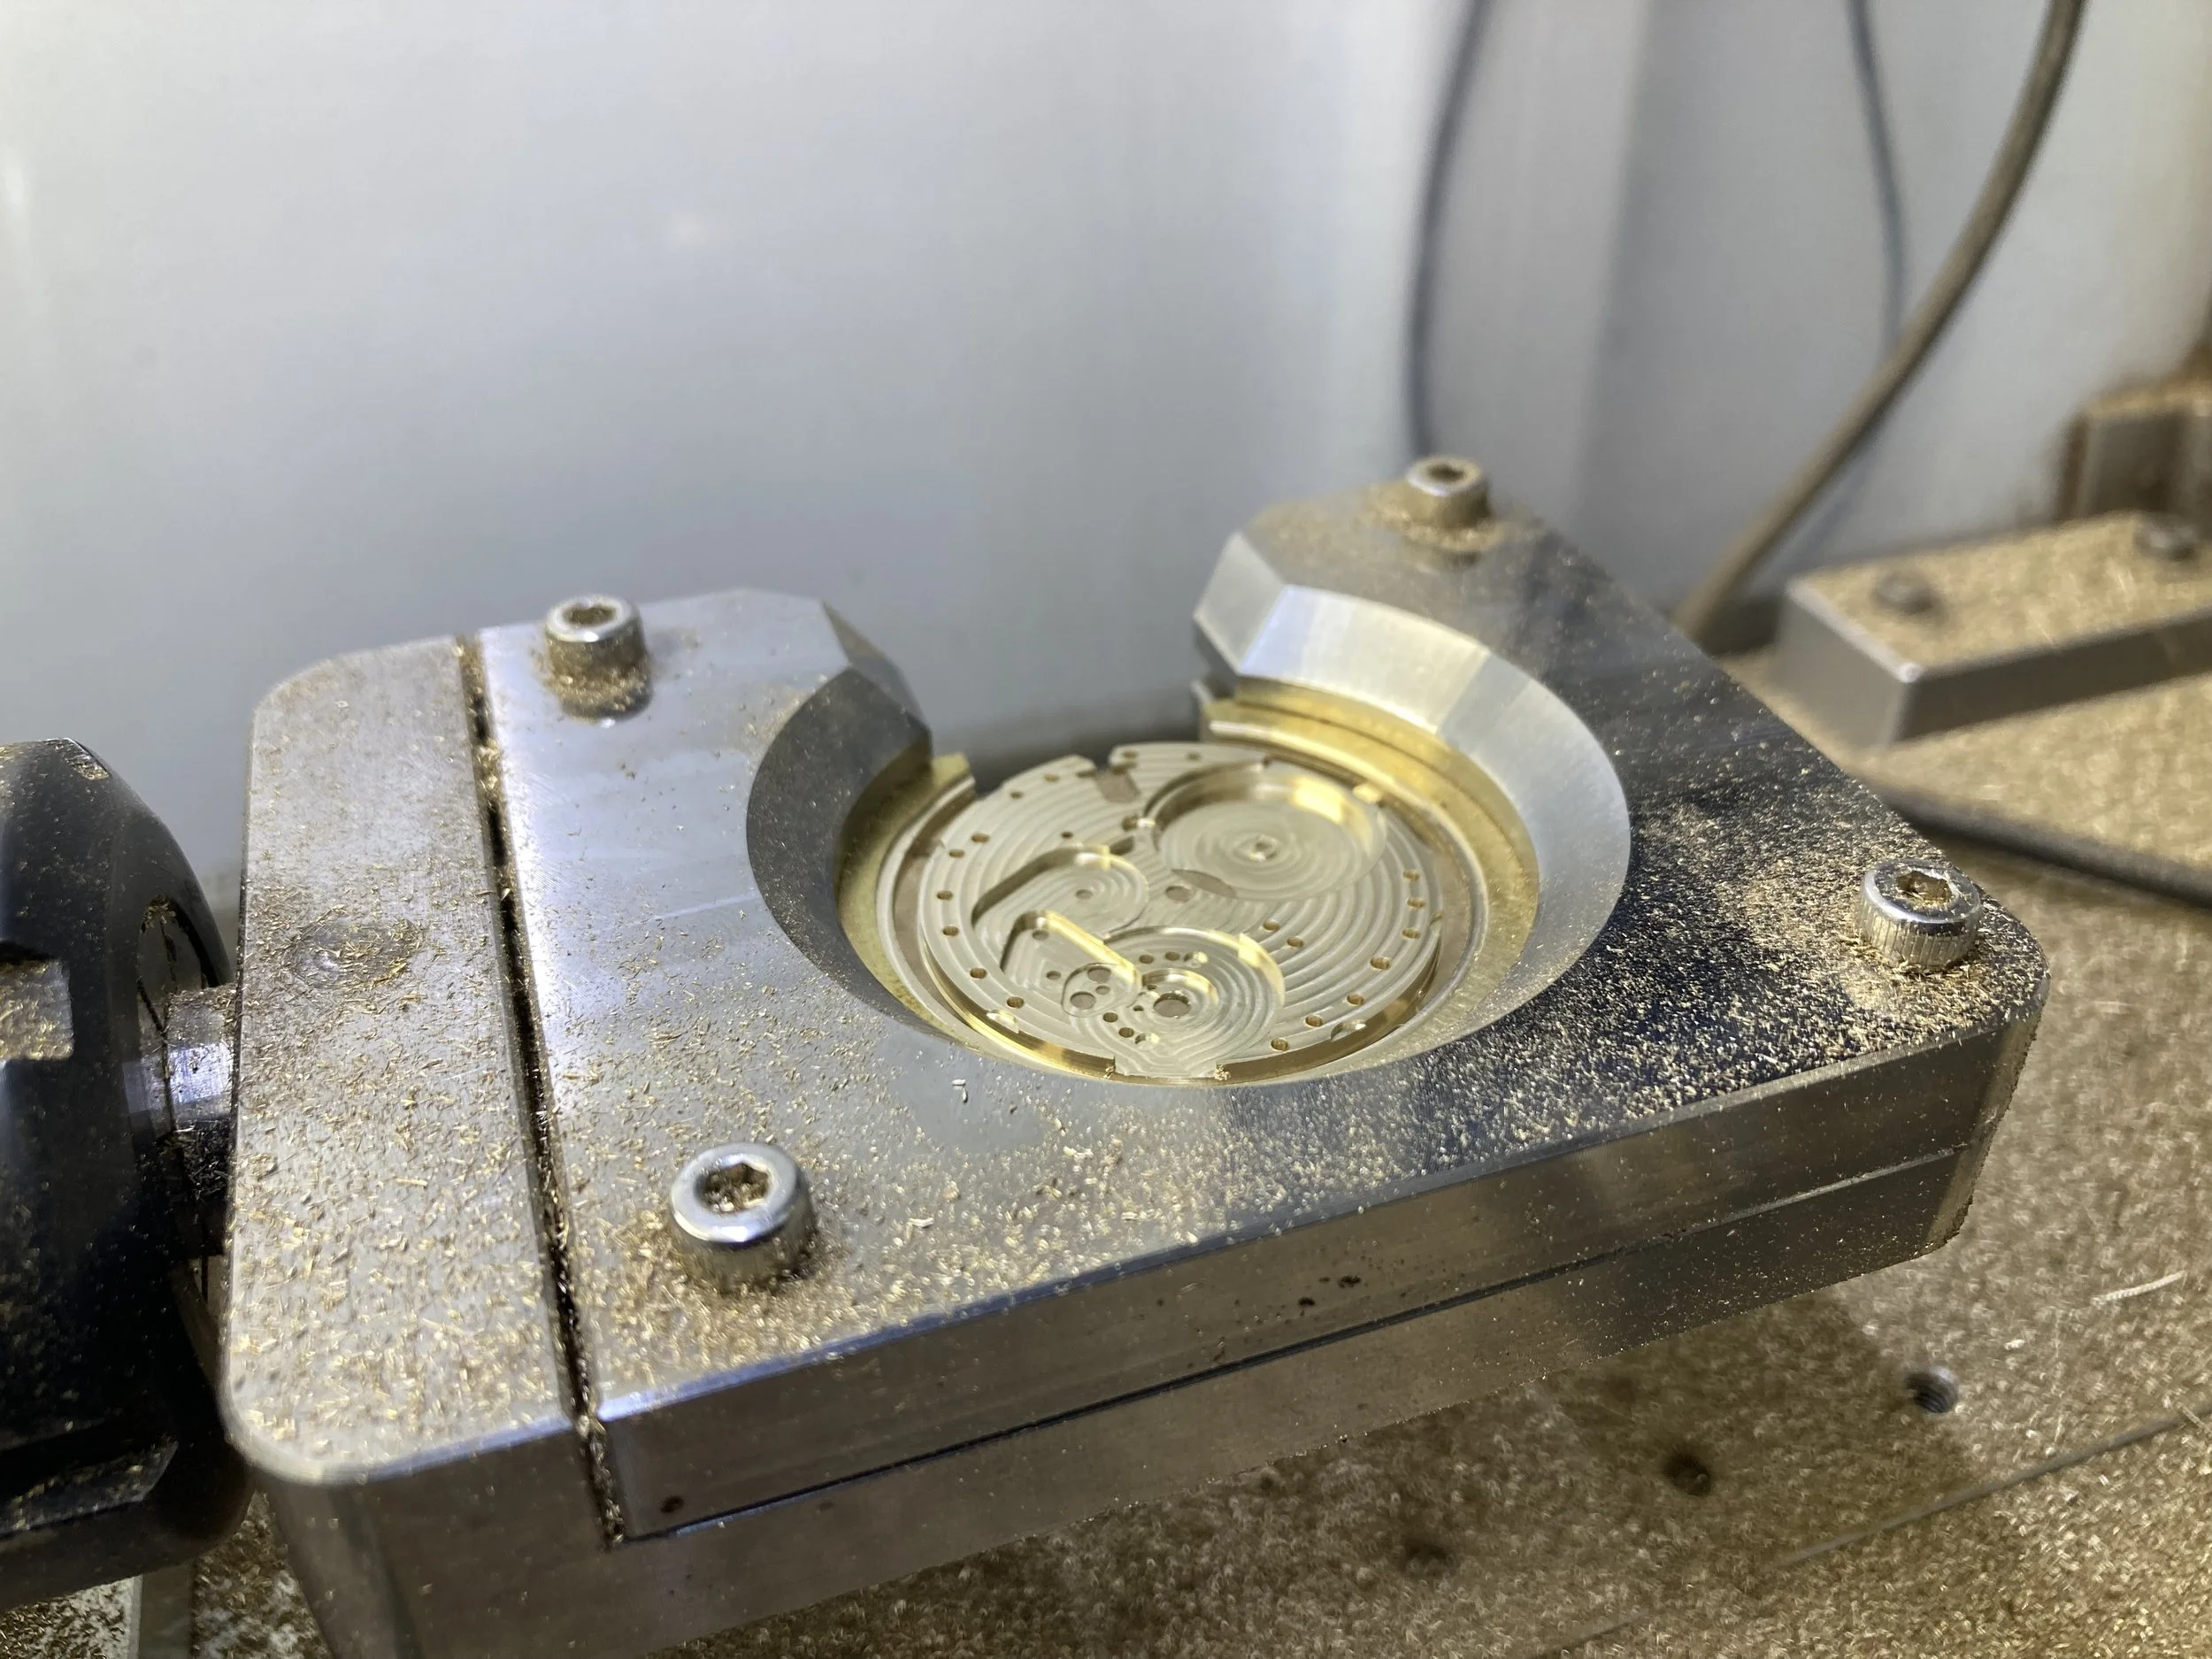
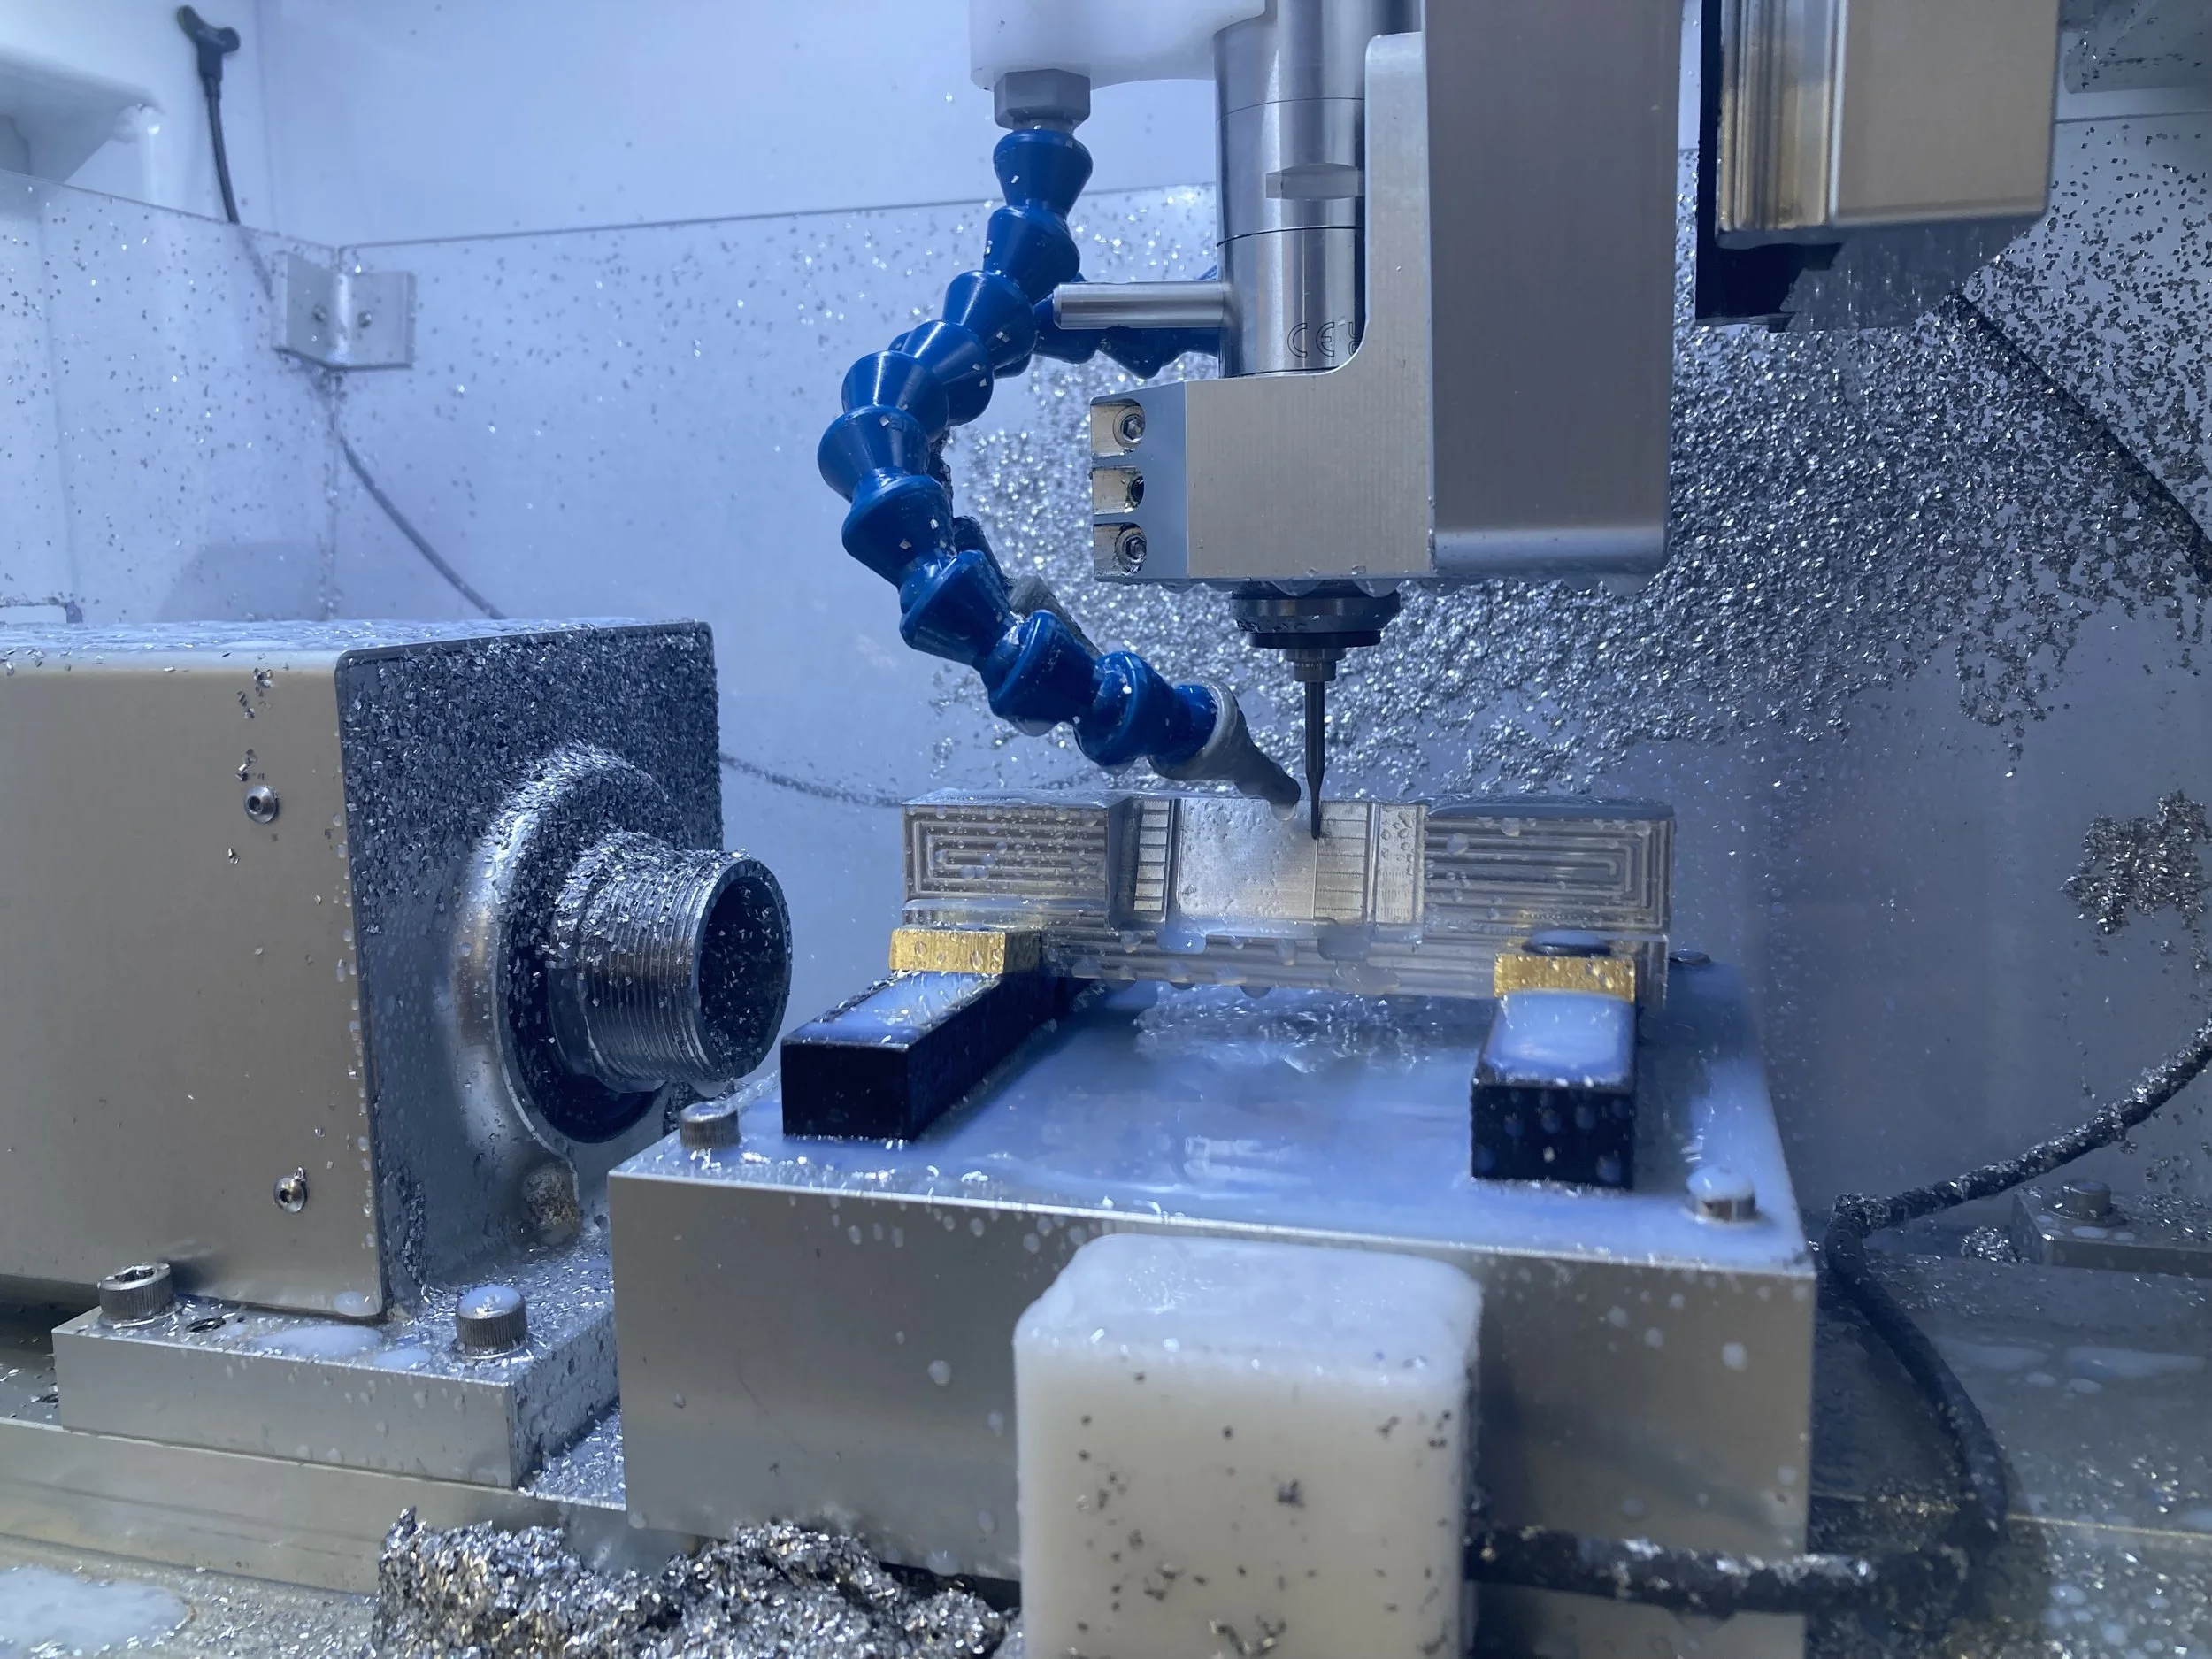
Mainplate & Bridges
August 18, 2023
We are considering making a small run (4 pieces), version 2, of the Roysdon Model One. This includes machining the mainplate and bridges on our new 4th axis fixture.
When we machined the v1, the mainplate took nearly 10 hours to machine, because the mainplate requires at least 3 setups: top, bottom, and one side (drilling the hole for the stem). However, our new 4th axis fixture (and new CNC machine) has reduced this process to less than 1.5 hours!
Enjoy the videos!
We used Fusion 360 for CAD and CAM, and the NS CNC Elara 4-axis Mill for machining.
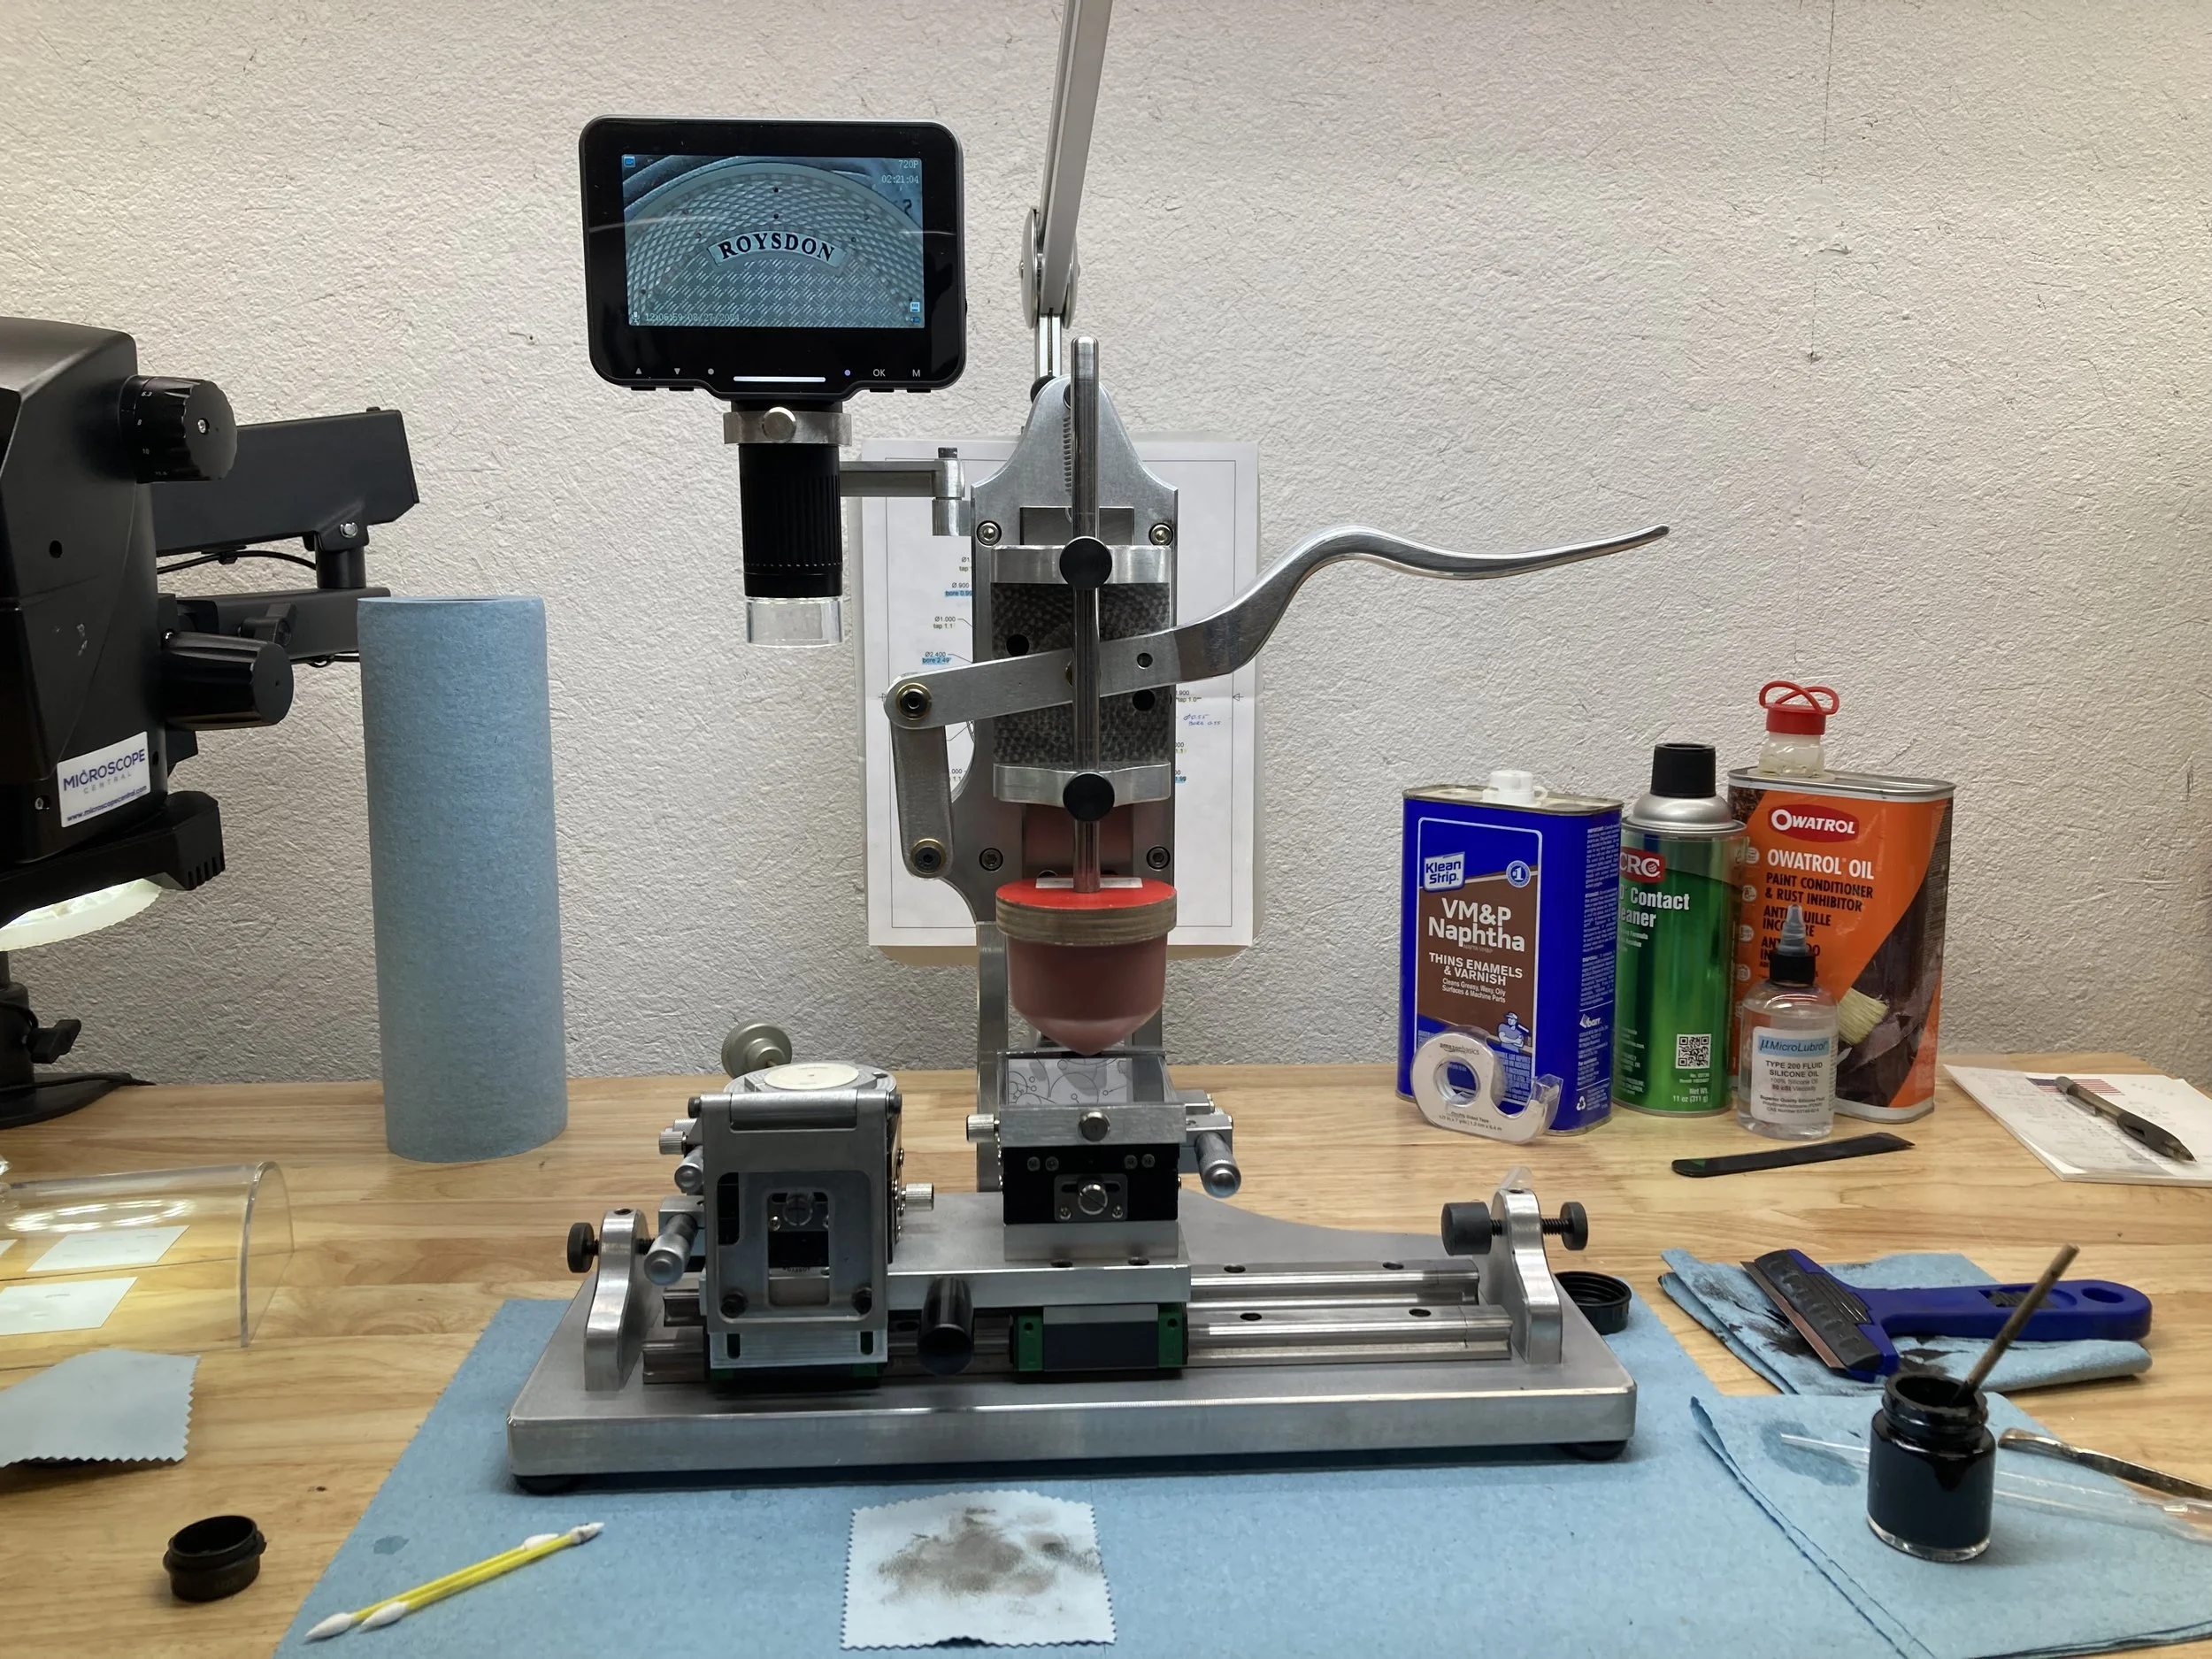
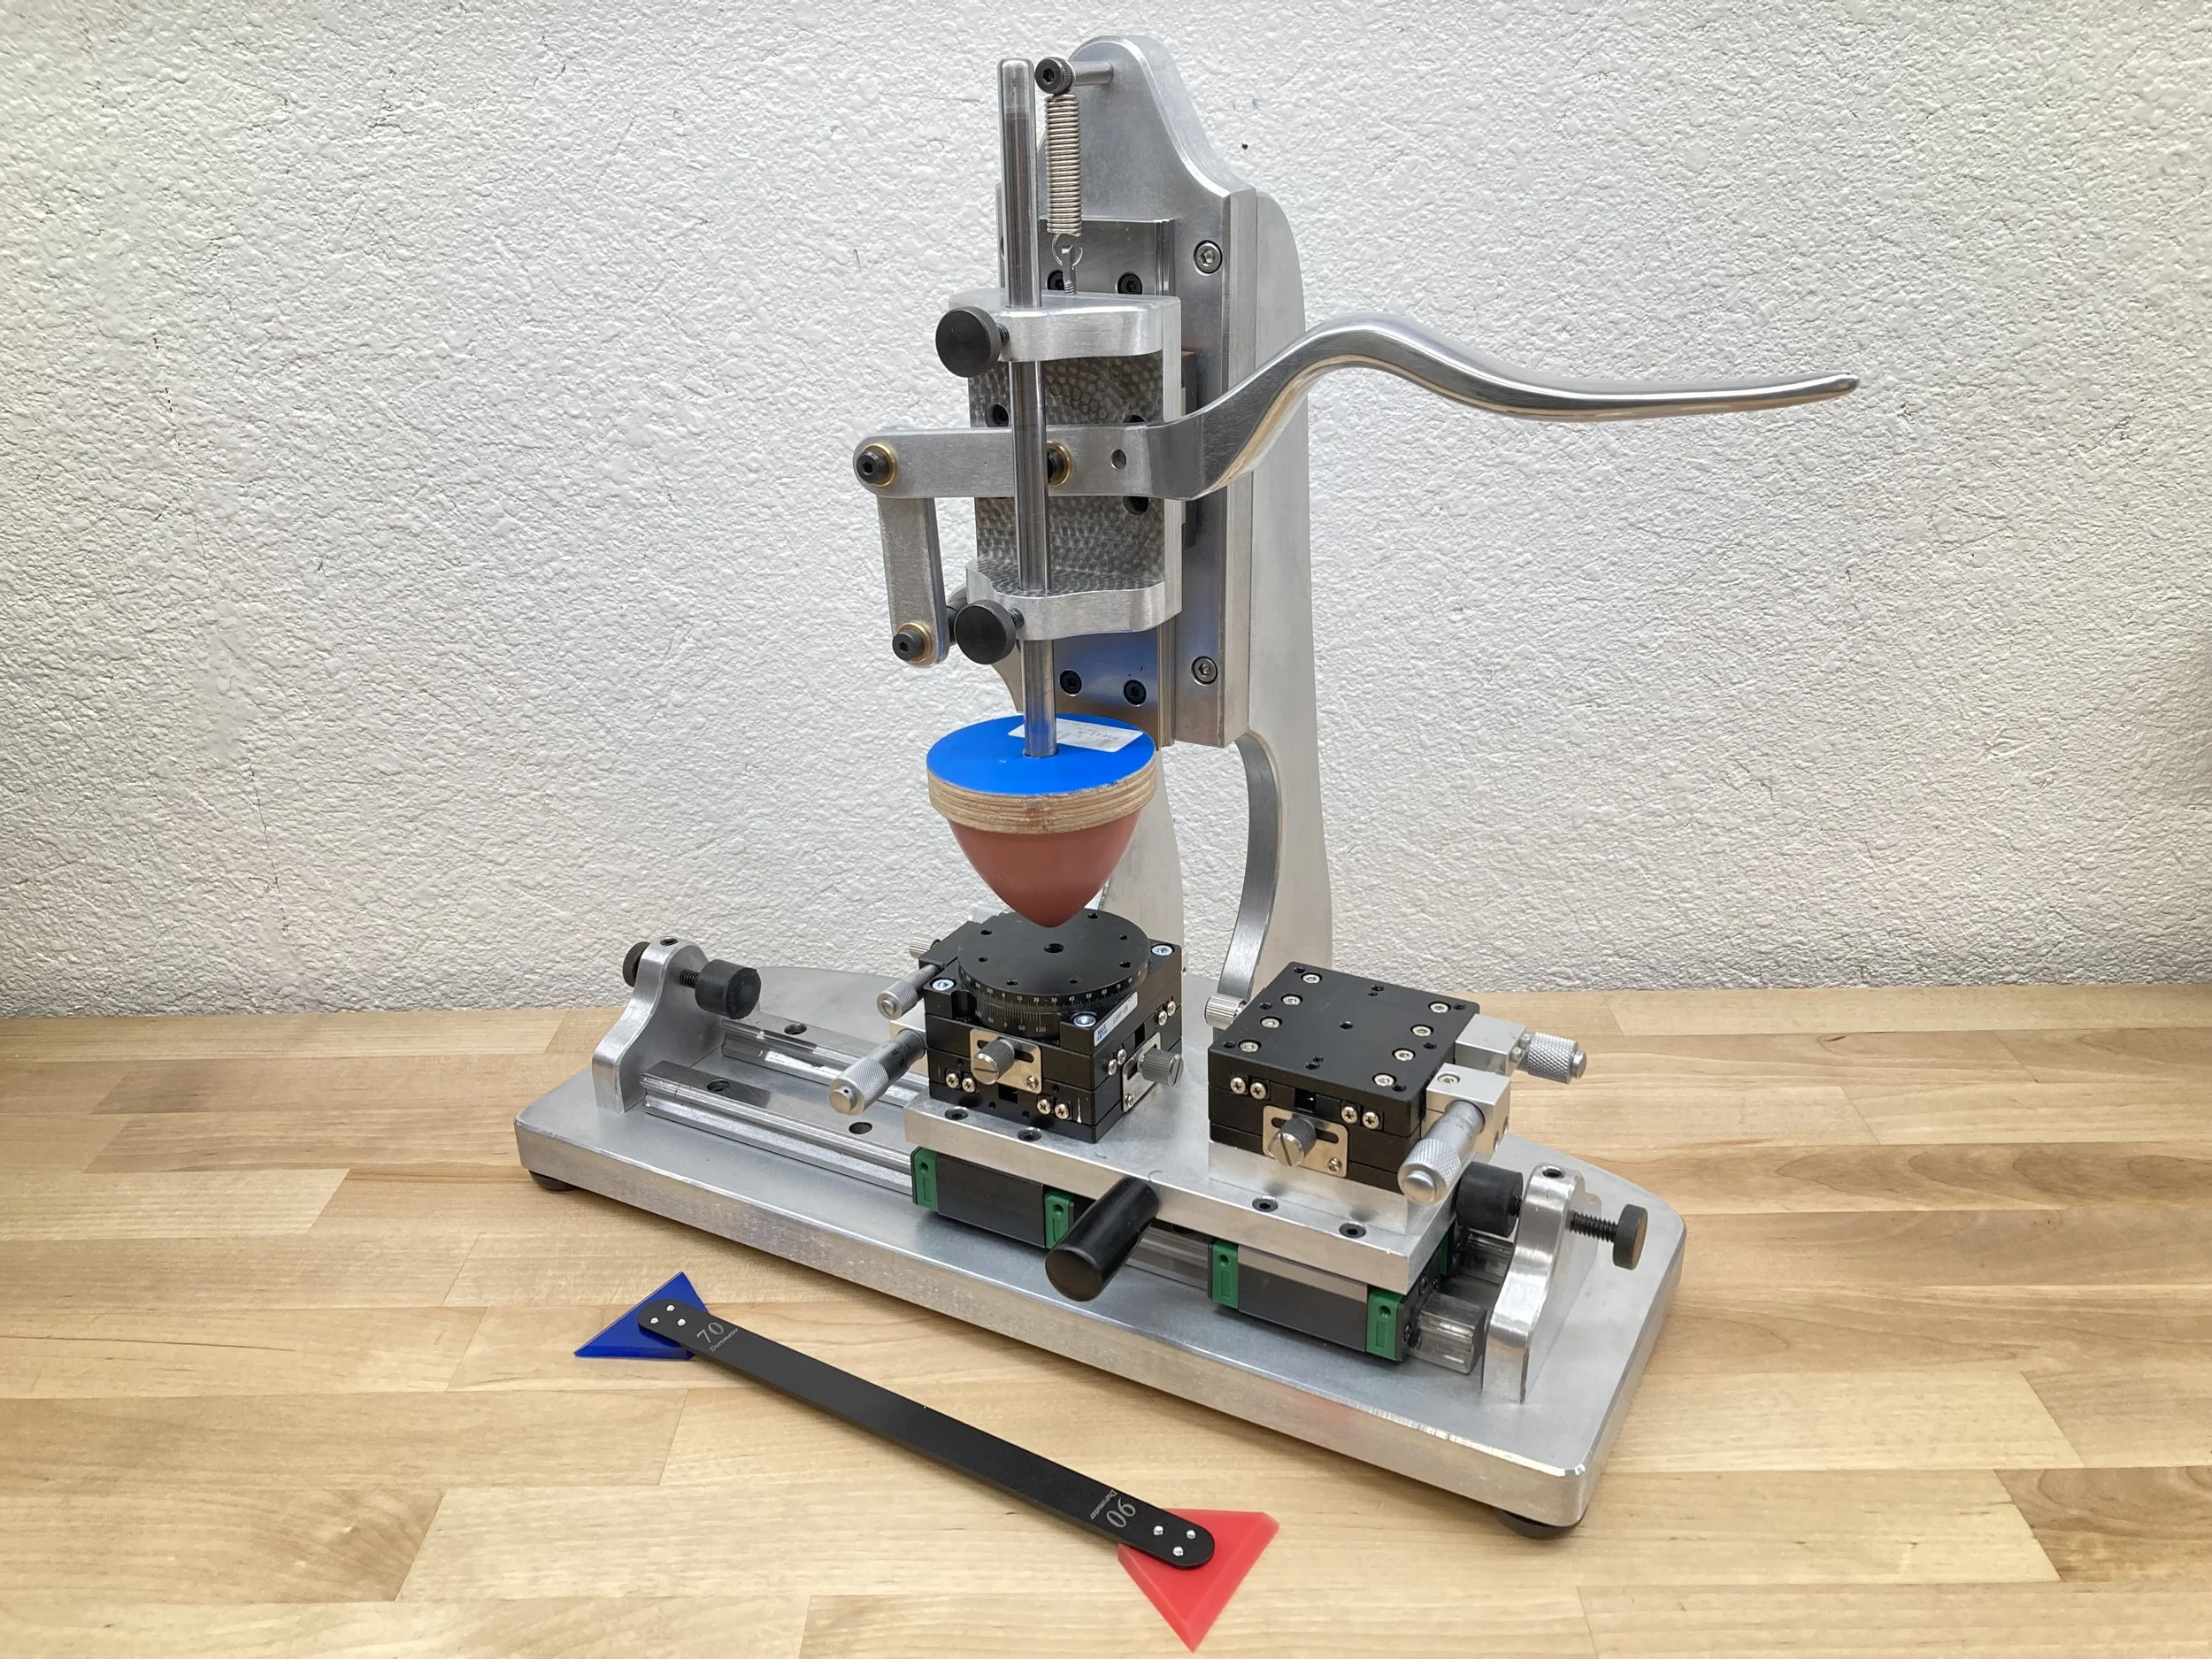
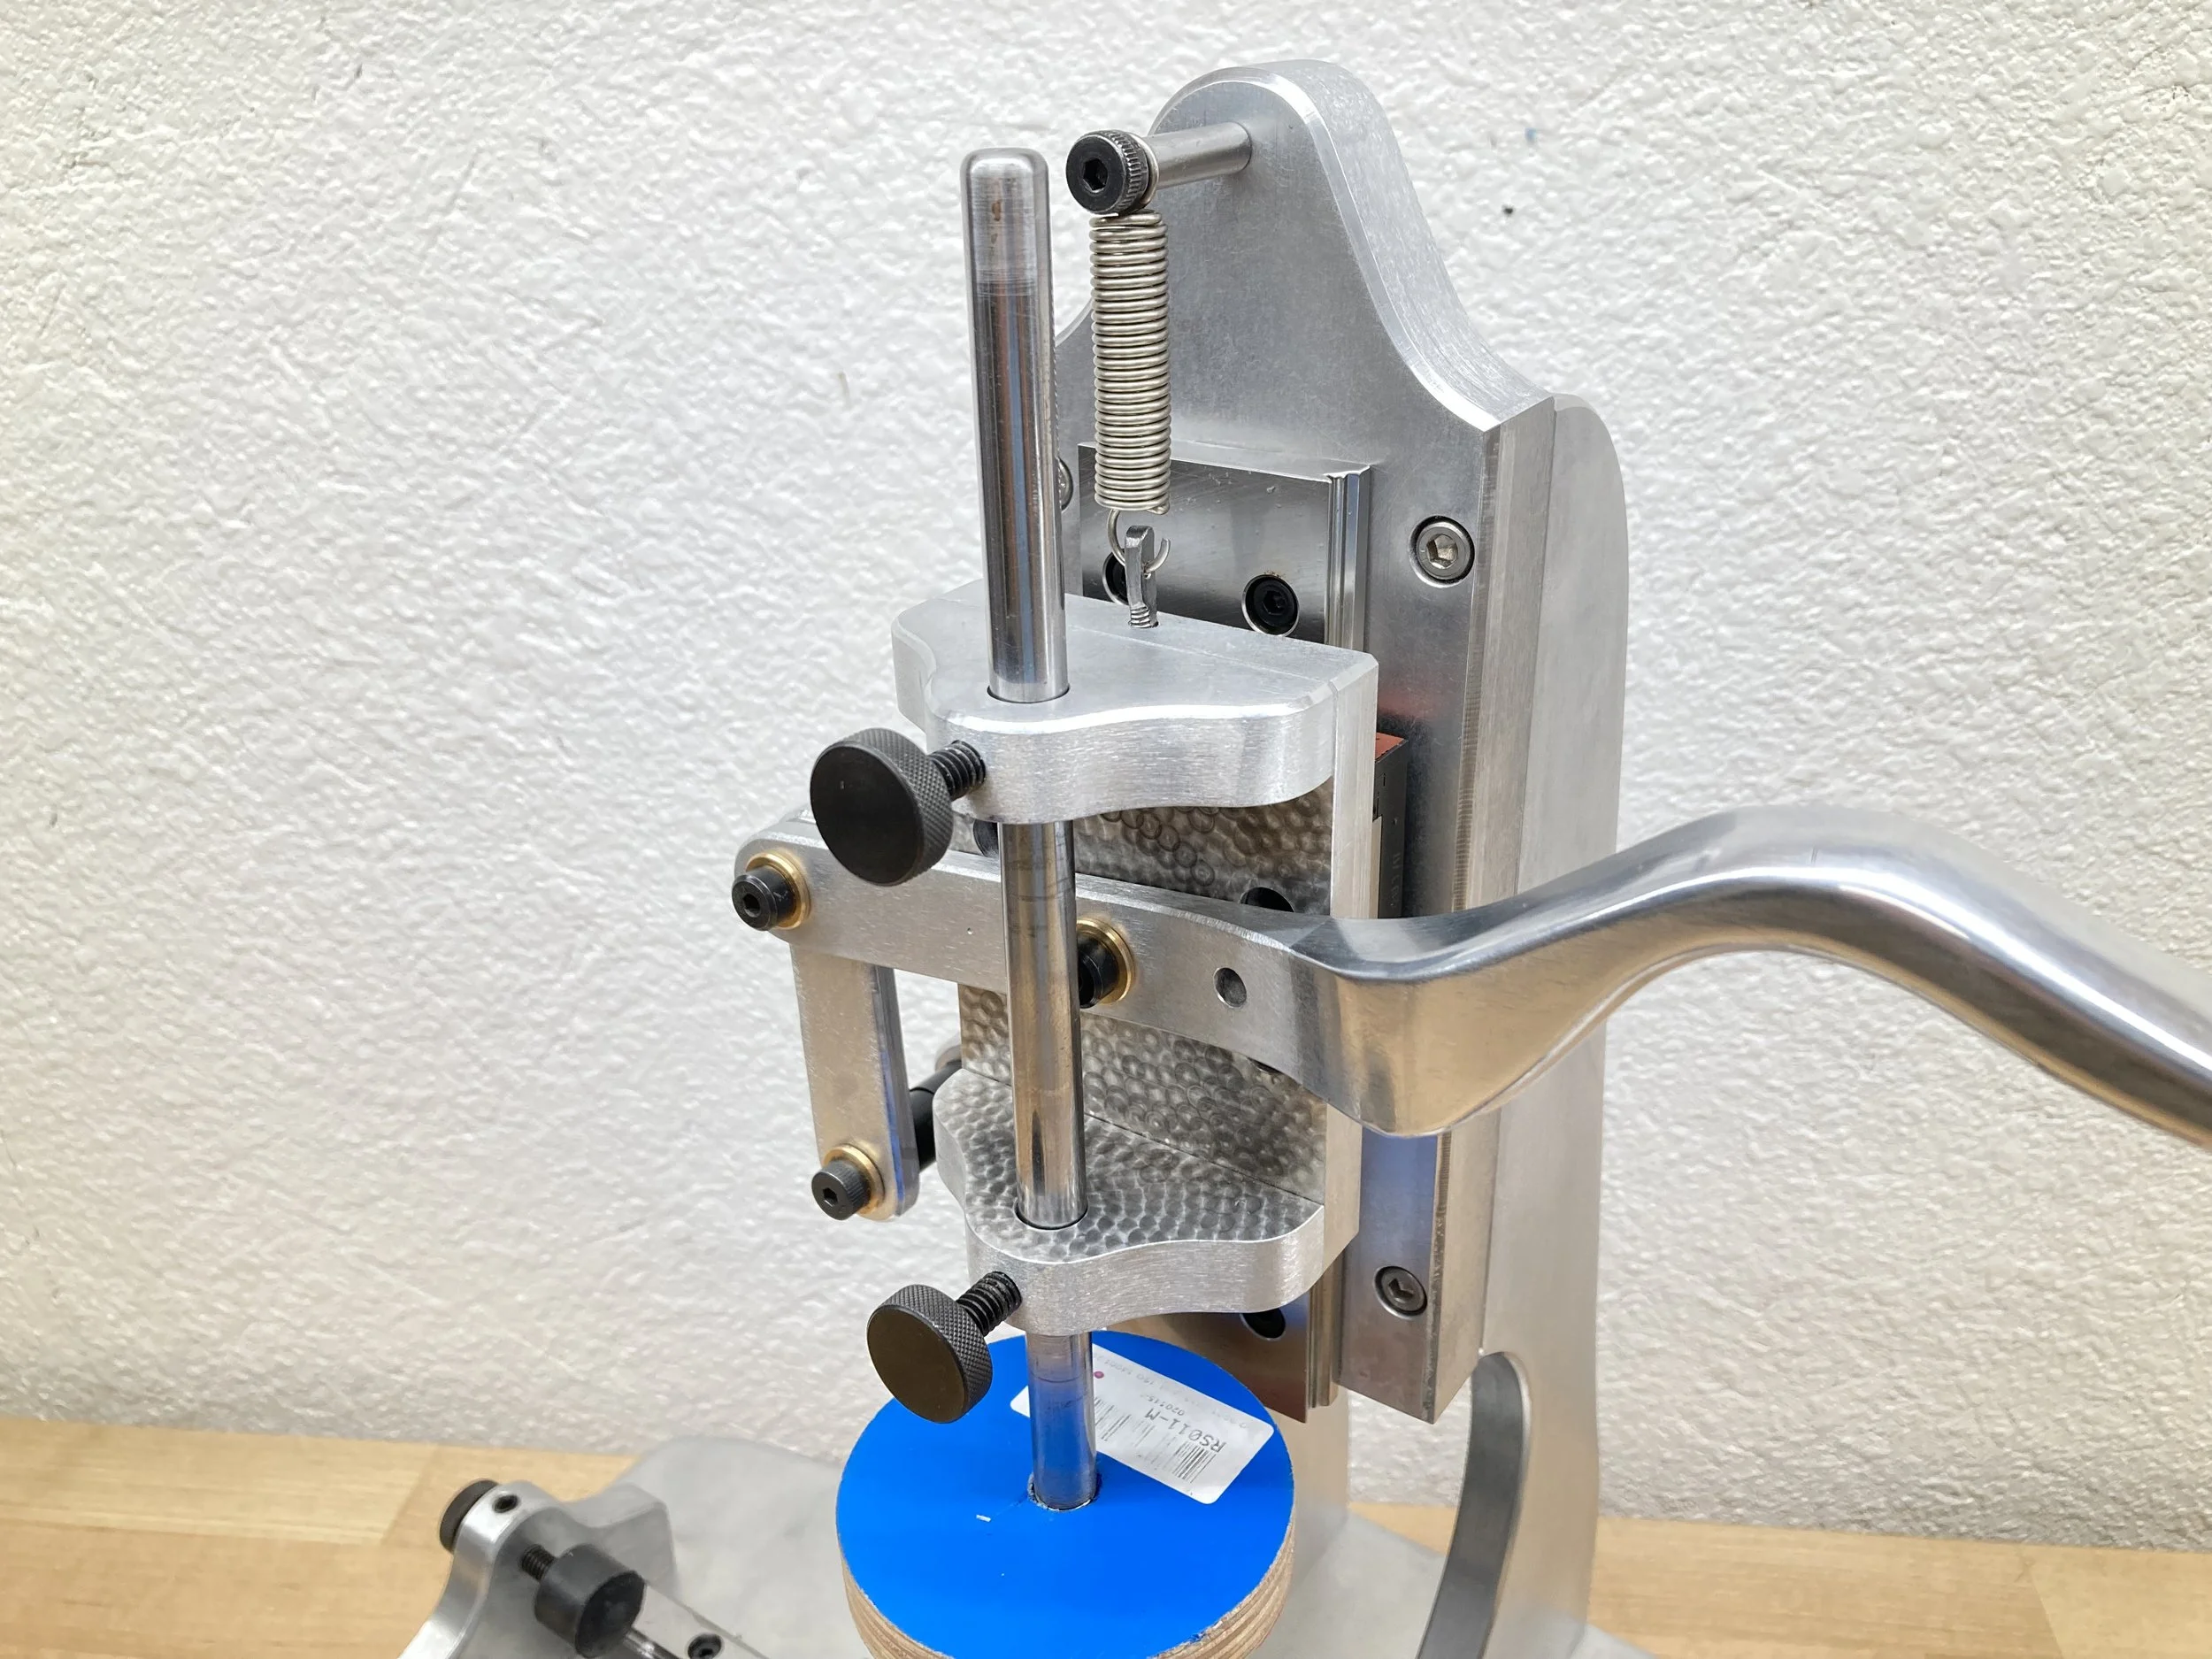
Dial Pad Printer
July 2, 2023
This manually operated watch dial pad printer was designed and built by Dr. Paul F. Roysdon in the Lone Star Lab. The Roysdon Model 2 is well underway, but there are some specialized tools that are needed. For example, the field area of the Model 2 dial has guilloche from both a straight-line engine and rose engine, but the tachymeter and lettering are applied with a pad printer. Vintage pad printers are rare and not accurate, so Dr. Roysdon made this pad printer from scratch using primarily a band saw, table router, and drill press (this is also a homage to watchmakers of years past)! This tool has the following features:
In true watchmaker fashion, the design has flowing geometry, and all of the edges of the aluminum structure are chamferred and mirror polished. The edges are straight-grained. The shuttle has pearlage applied in a circular pattern around the handle pivot point. The field areas are specular finished.
The handle is carefully sculpted (by hand) and mirror polished.
The XYR micrometer platform (left) holds the dial and provides precise adjustment in X, Y and rotation.
The XY micrometer platform (right) is for the laser-etched cliche and provides precise adjustment in X and Y. This is where the ink is placed before the pad transfers the ink to the dial.
The horizontal travel adjustment knobs use nylon-tipped set-screws to ensure precise end-stop adjustment.
The handle linkage uses bronze flange bearings and precision-ground shoulder bolts at each pivot point to ensure zero-play, zero-binding, and smooth actuation.
The vertical and horizontal shuttles both use ball-bearing linear rails, commonly used on CNC mills.
The metal rod, that holds the silicone pad, is threaded and pointed on one end to provide a secondary purpose (when the pad is removed) as an alignment tool; see the bottom video.
This pad printer took a few days to design in Fusion 360 and 2 weeks to machine mostly by-hand with some operations performed on the NS CNC Elara 4-axis Mill.
In the near future we will post a complete video of the build, plus a print on a new dial.
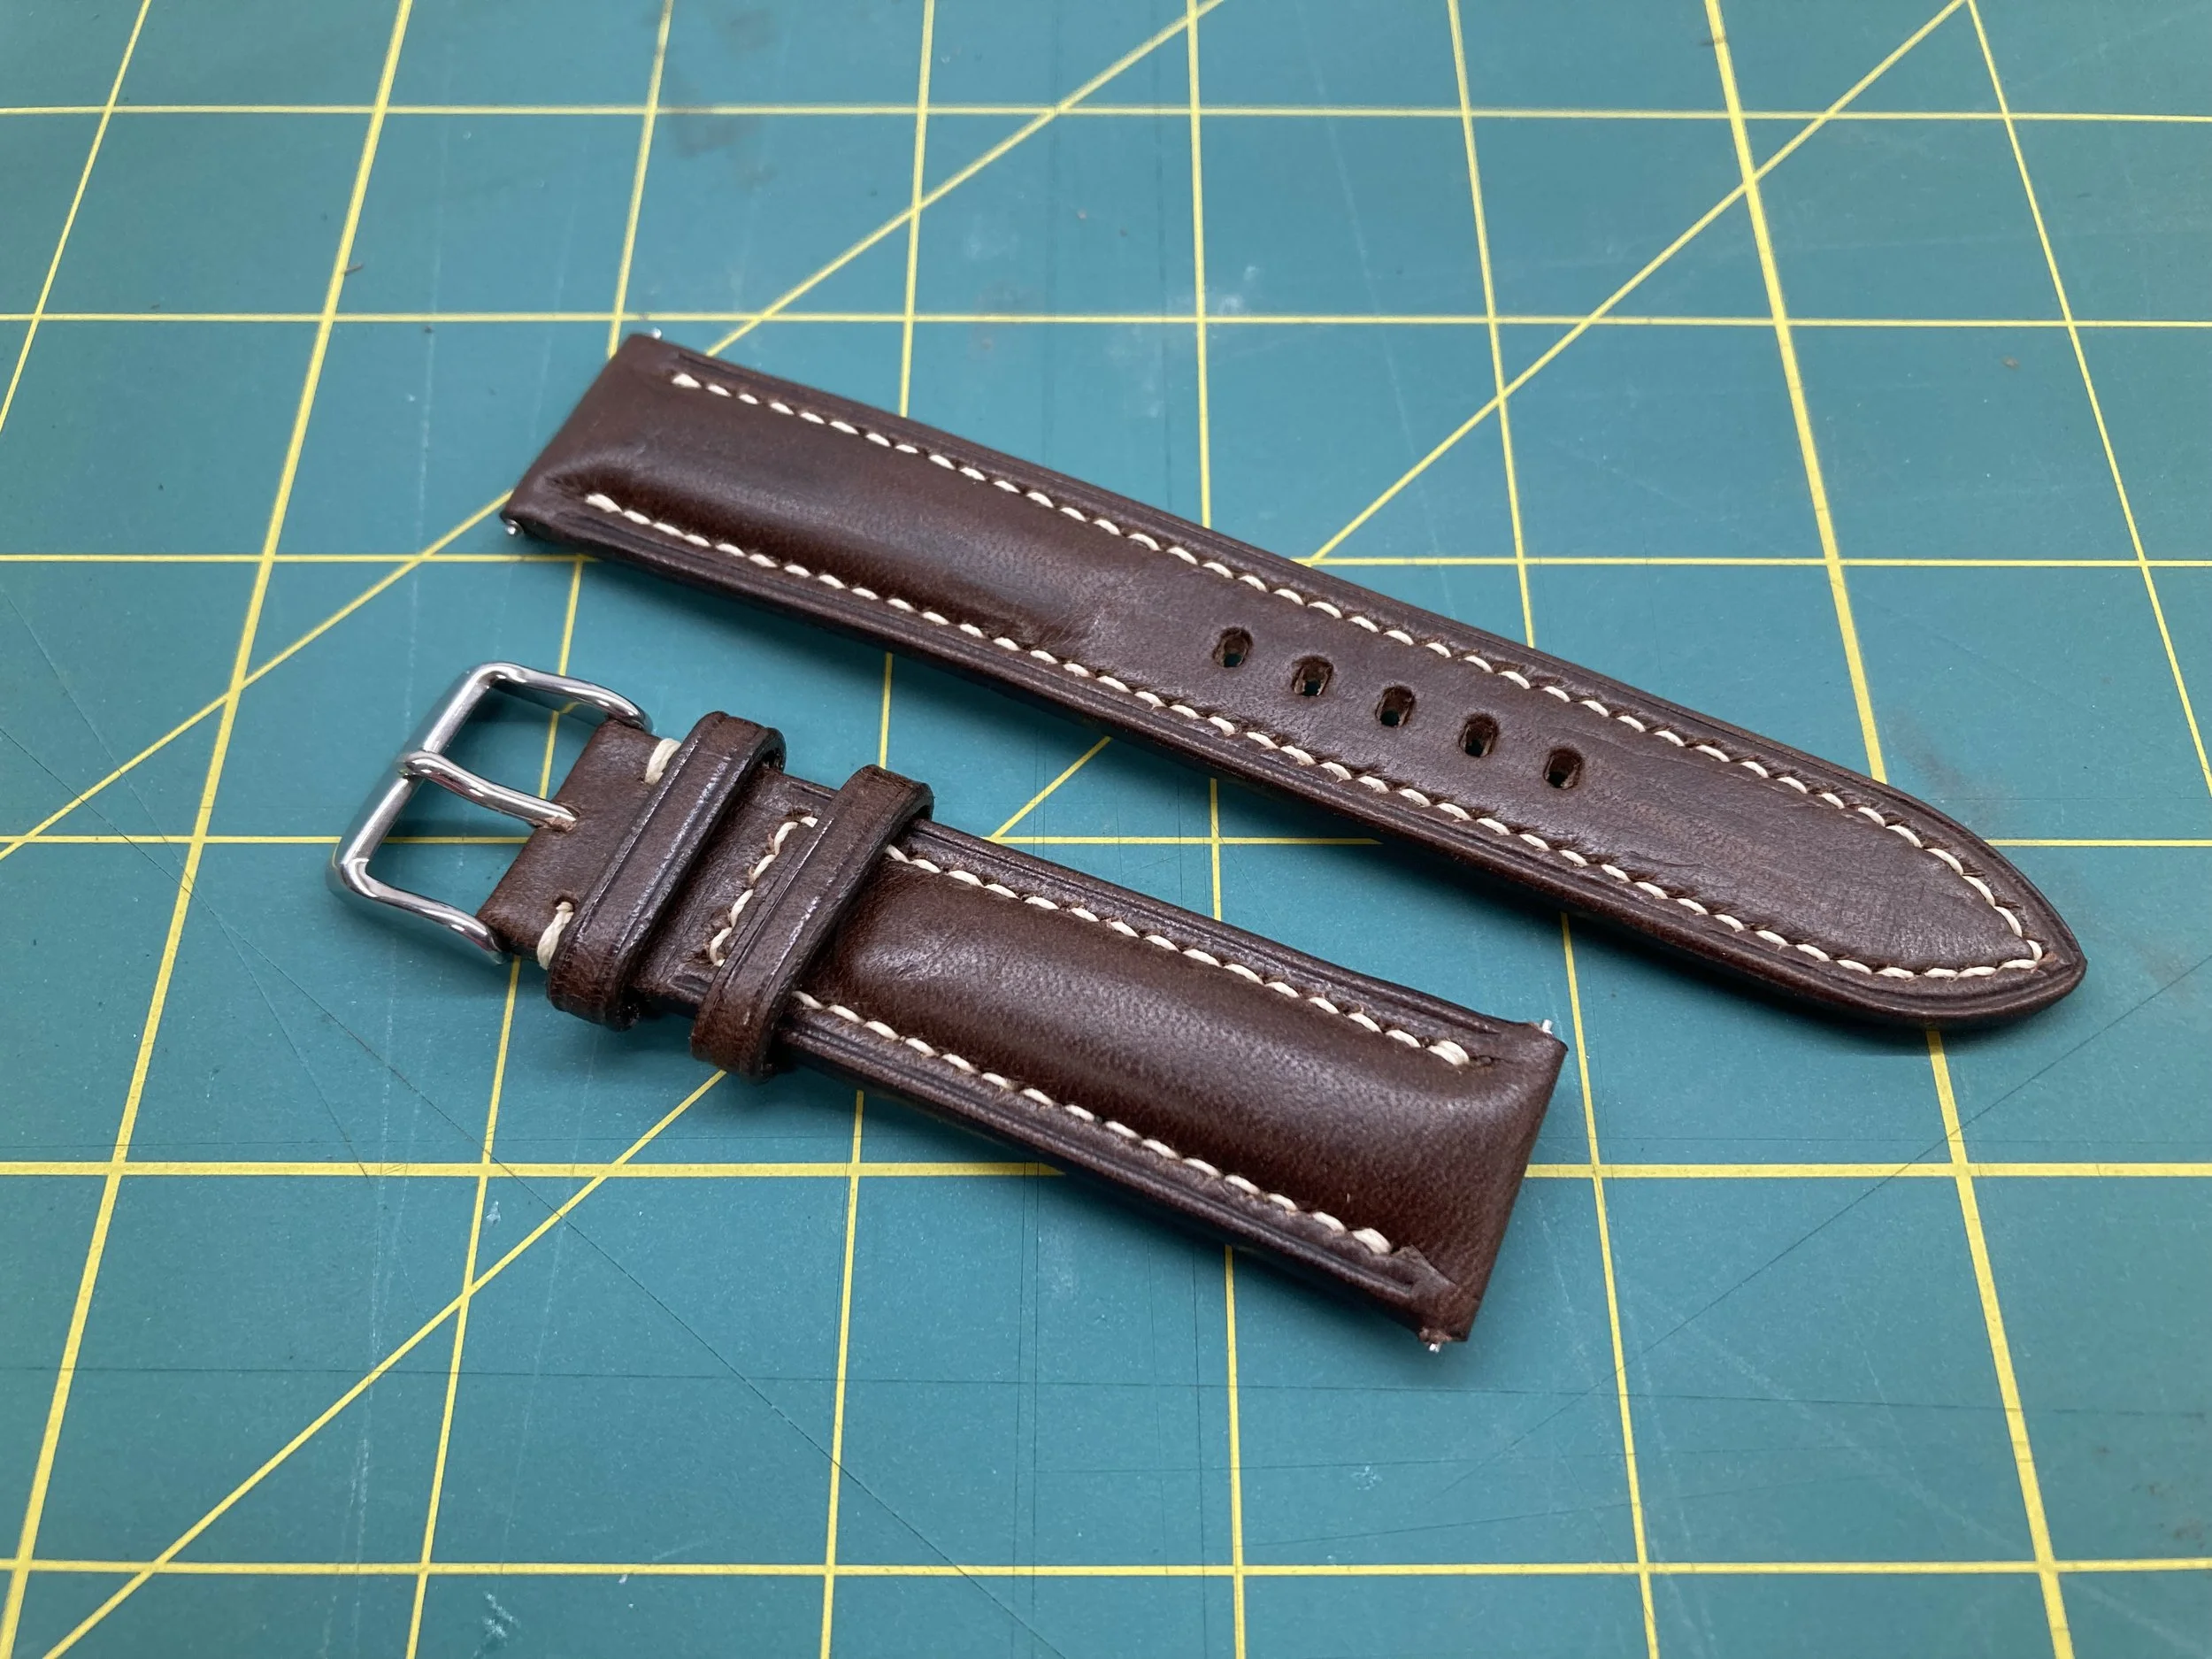
Leather Watch Band
May 25, 2023
We are considering making a small run (4 pieces), version 2, of the Roysdon Model One. This includes making a high-quality leather watch band (using Texas leather of course!) completely handmade by Dr. Roysdon.
While there are many videos on YouTube describing how to make a watch band, most videos just layer the leather and paint the edges. Dr. Roysdon took a different approach by tapering the top layer at the edge and draping the top layer over the sides. This new process requires 48 steps (versus 25 in the old process) to make a watch band. The result is a beautiful, continuous, leather grain from top to bottom. While this is a much more difficult process, the result is elegant, professional, and more comfortable to wear.
Enjoy the video!
*Note: we use the Artisan Leather Supply creasing tool to burnish and crease the edges of the leather. The “Made in USA” stamp was made by Dr. Roysdon on a CNC mill.
Keyence CMM
May 23, 2023
The NS CNC Elara 4-axis Mill is a very accurate CNC mill for the watchmaker with 0.002 mm position accuracy and repeatability. But to verify machined parts, they must be measured on a coordinate measuring machine (CMM) with at least 2X the accuracy as the mill, this is why we use a Keyence CMM in the Lone Star Lab.
Shown in the photo is the main plate for the Roysdon Model 1. The mainplate was machined on the Elara and the hole placement (between the third wheel and escape wheel) was verified on a Keyence CMM. The first part was machined on a less precise CNC resulting in an incorrect distance of 3.6074 mm (top photo), while the second part was machined on the Elara with the correct dimension of 3.6250 mm (bottom photo). The error of 0.0176 mm is unacceptable for watchmaking.
CAD, CAM, CNC, and CMM are all performed by Dr. Paul F. Roysdon in the Lone Star Lab.

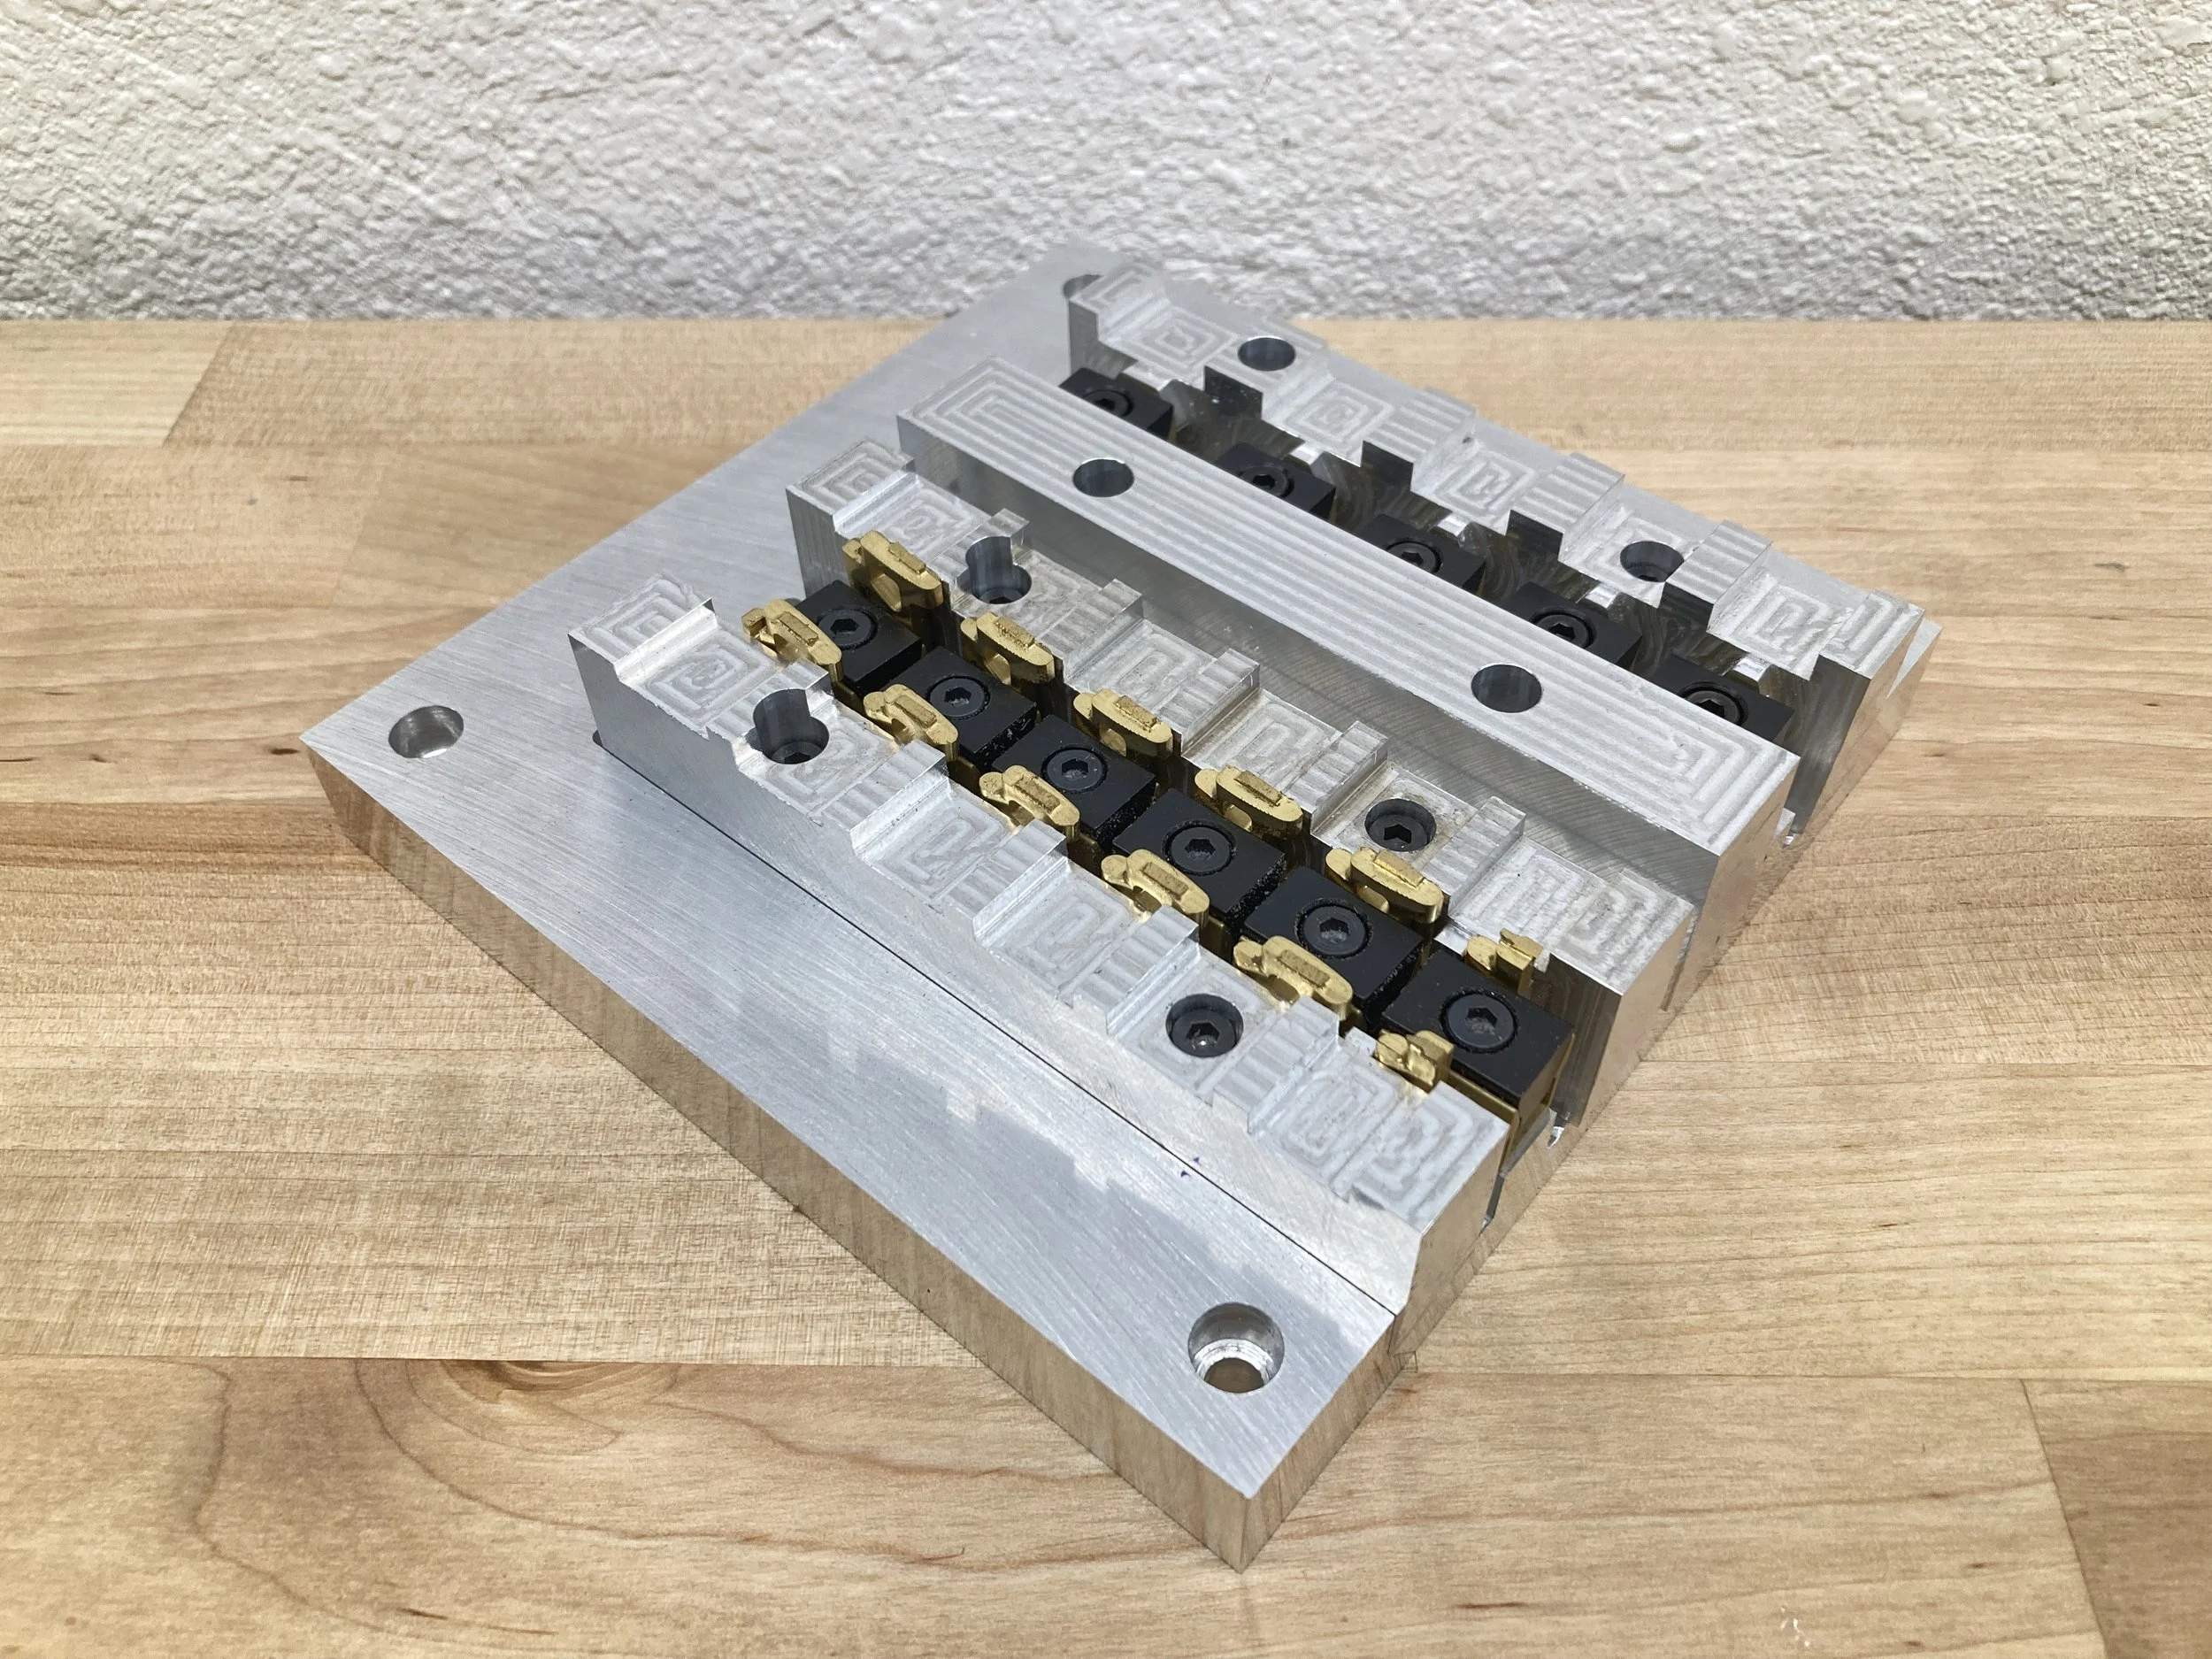
4th Axis Fixture
March 17, 2023
The Roysdon Model 2 is well underway, but there are some specialized fixtures that are needed. For example, while the top and bottom of the bracelet is machined on an Elara CNC mill, a 4th axis operation is required to drill the holes for the screws that connect each link. This 4th axis fixture is used for the following operations:
ball-mill and endmill finish-pass on the right and left side of each link
endmill finish-pass on the front and back of each link
drill the holes for the screws that connect each link (top video)
drill the holes for the spring bars in the clasp (middle video)
drill the holes in the clasp retainer (the part that keeps the clasp closed)
mill the holes for the clasp release buttons (bottom video)
This fixture took 2 months to design in Fusion 360, and 90 hours to machine on the NS CNC Elara 4-axis Mill.
In the videos, the bracelet parts are prototypes made in tool wax. The final bracelet is made of either 18k gold or 316L stainless steel.
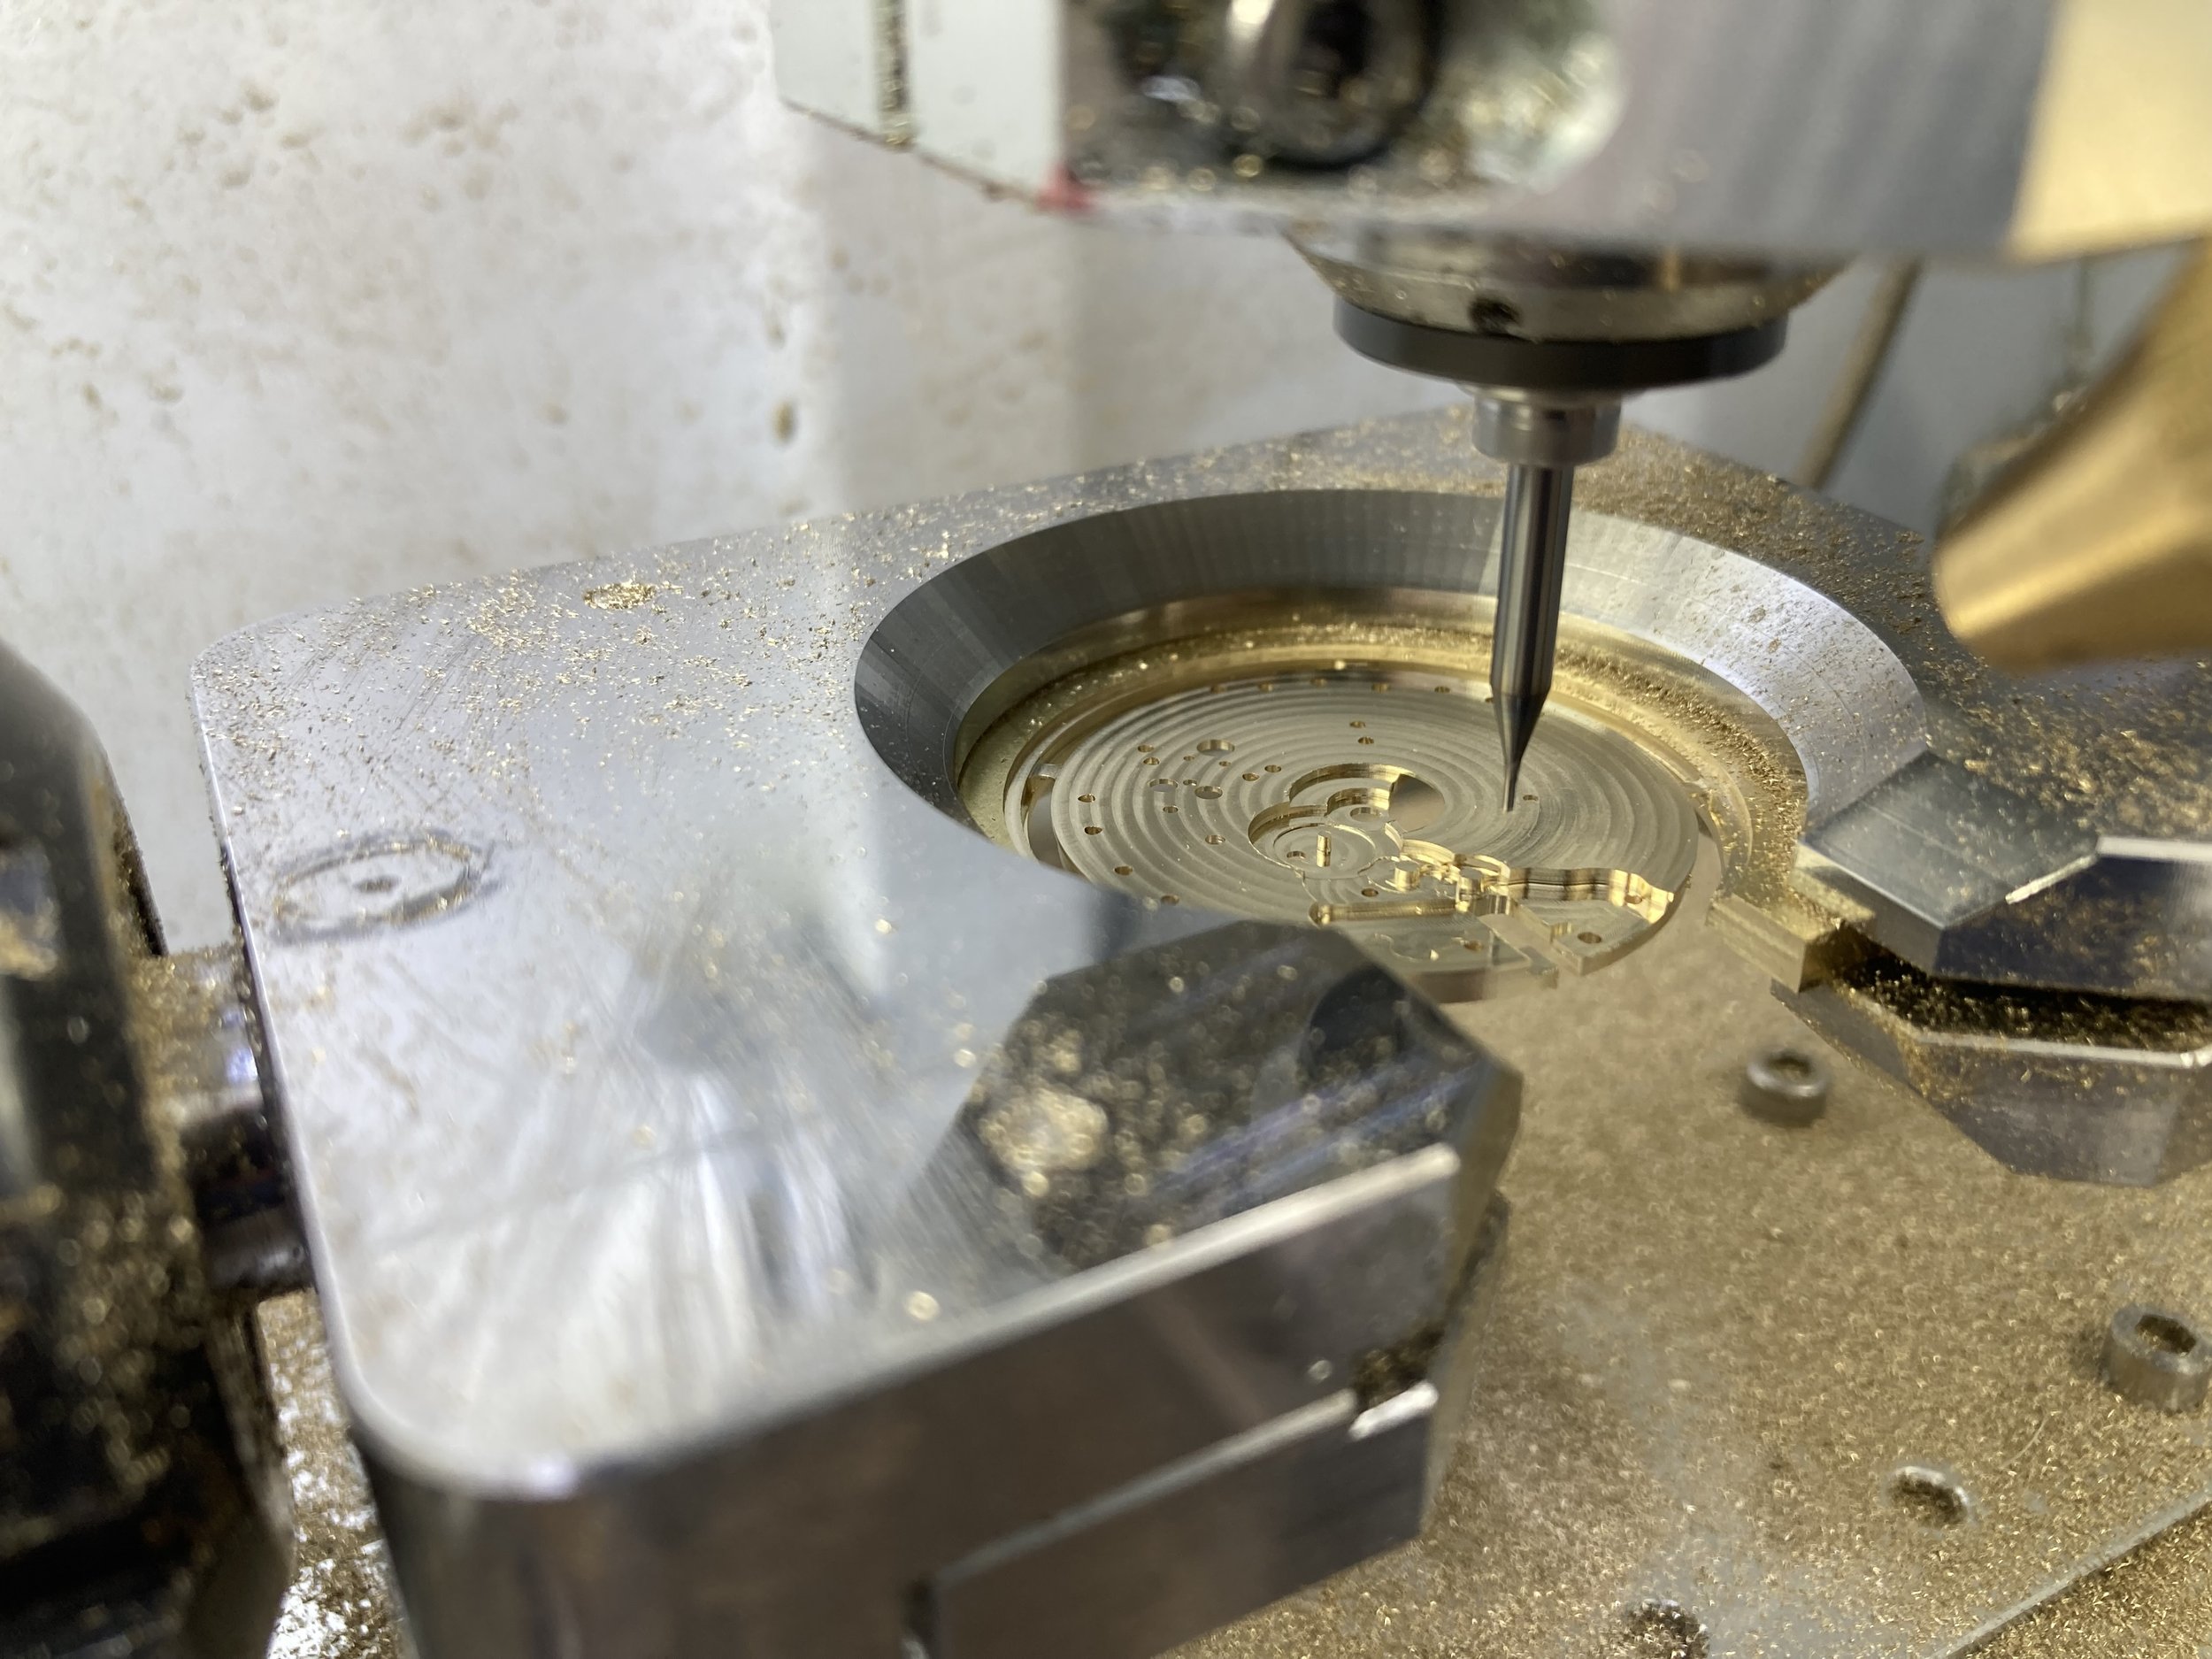
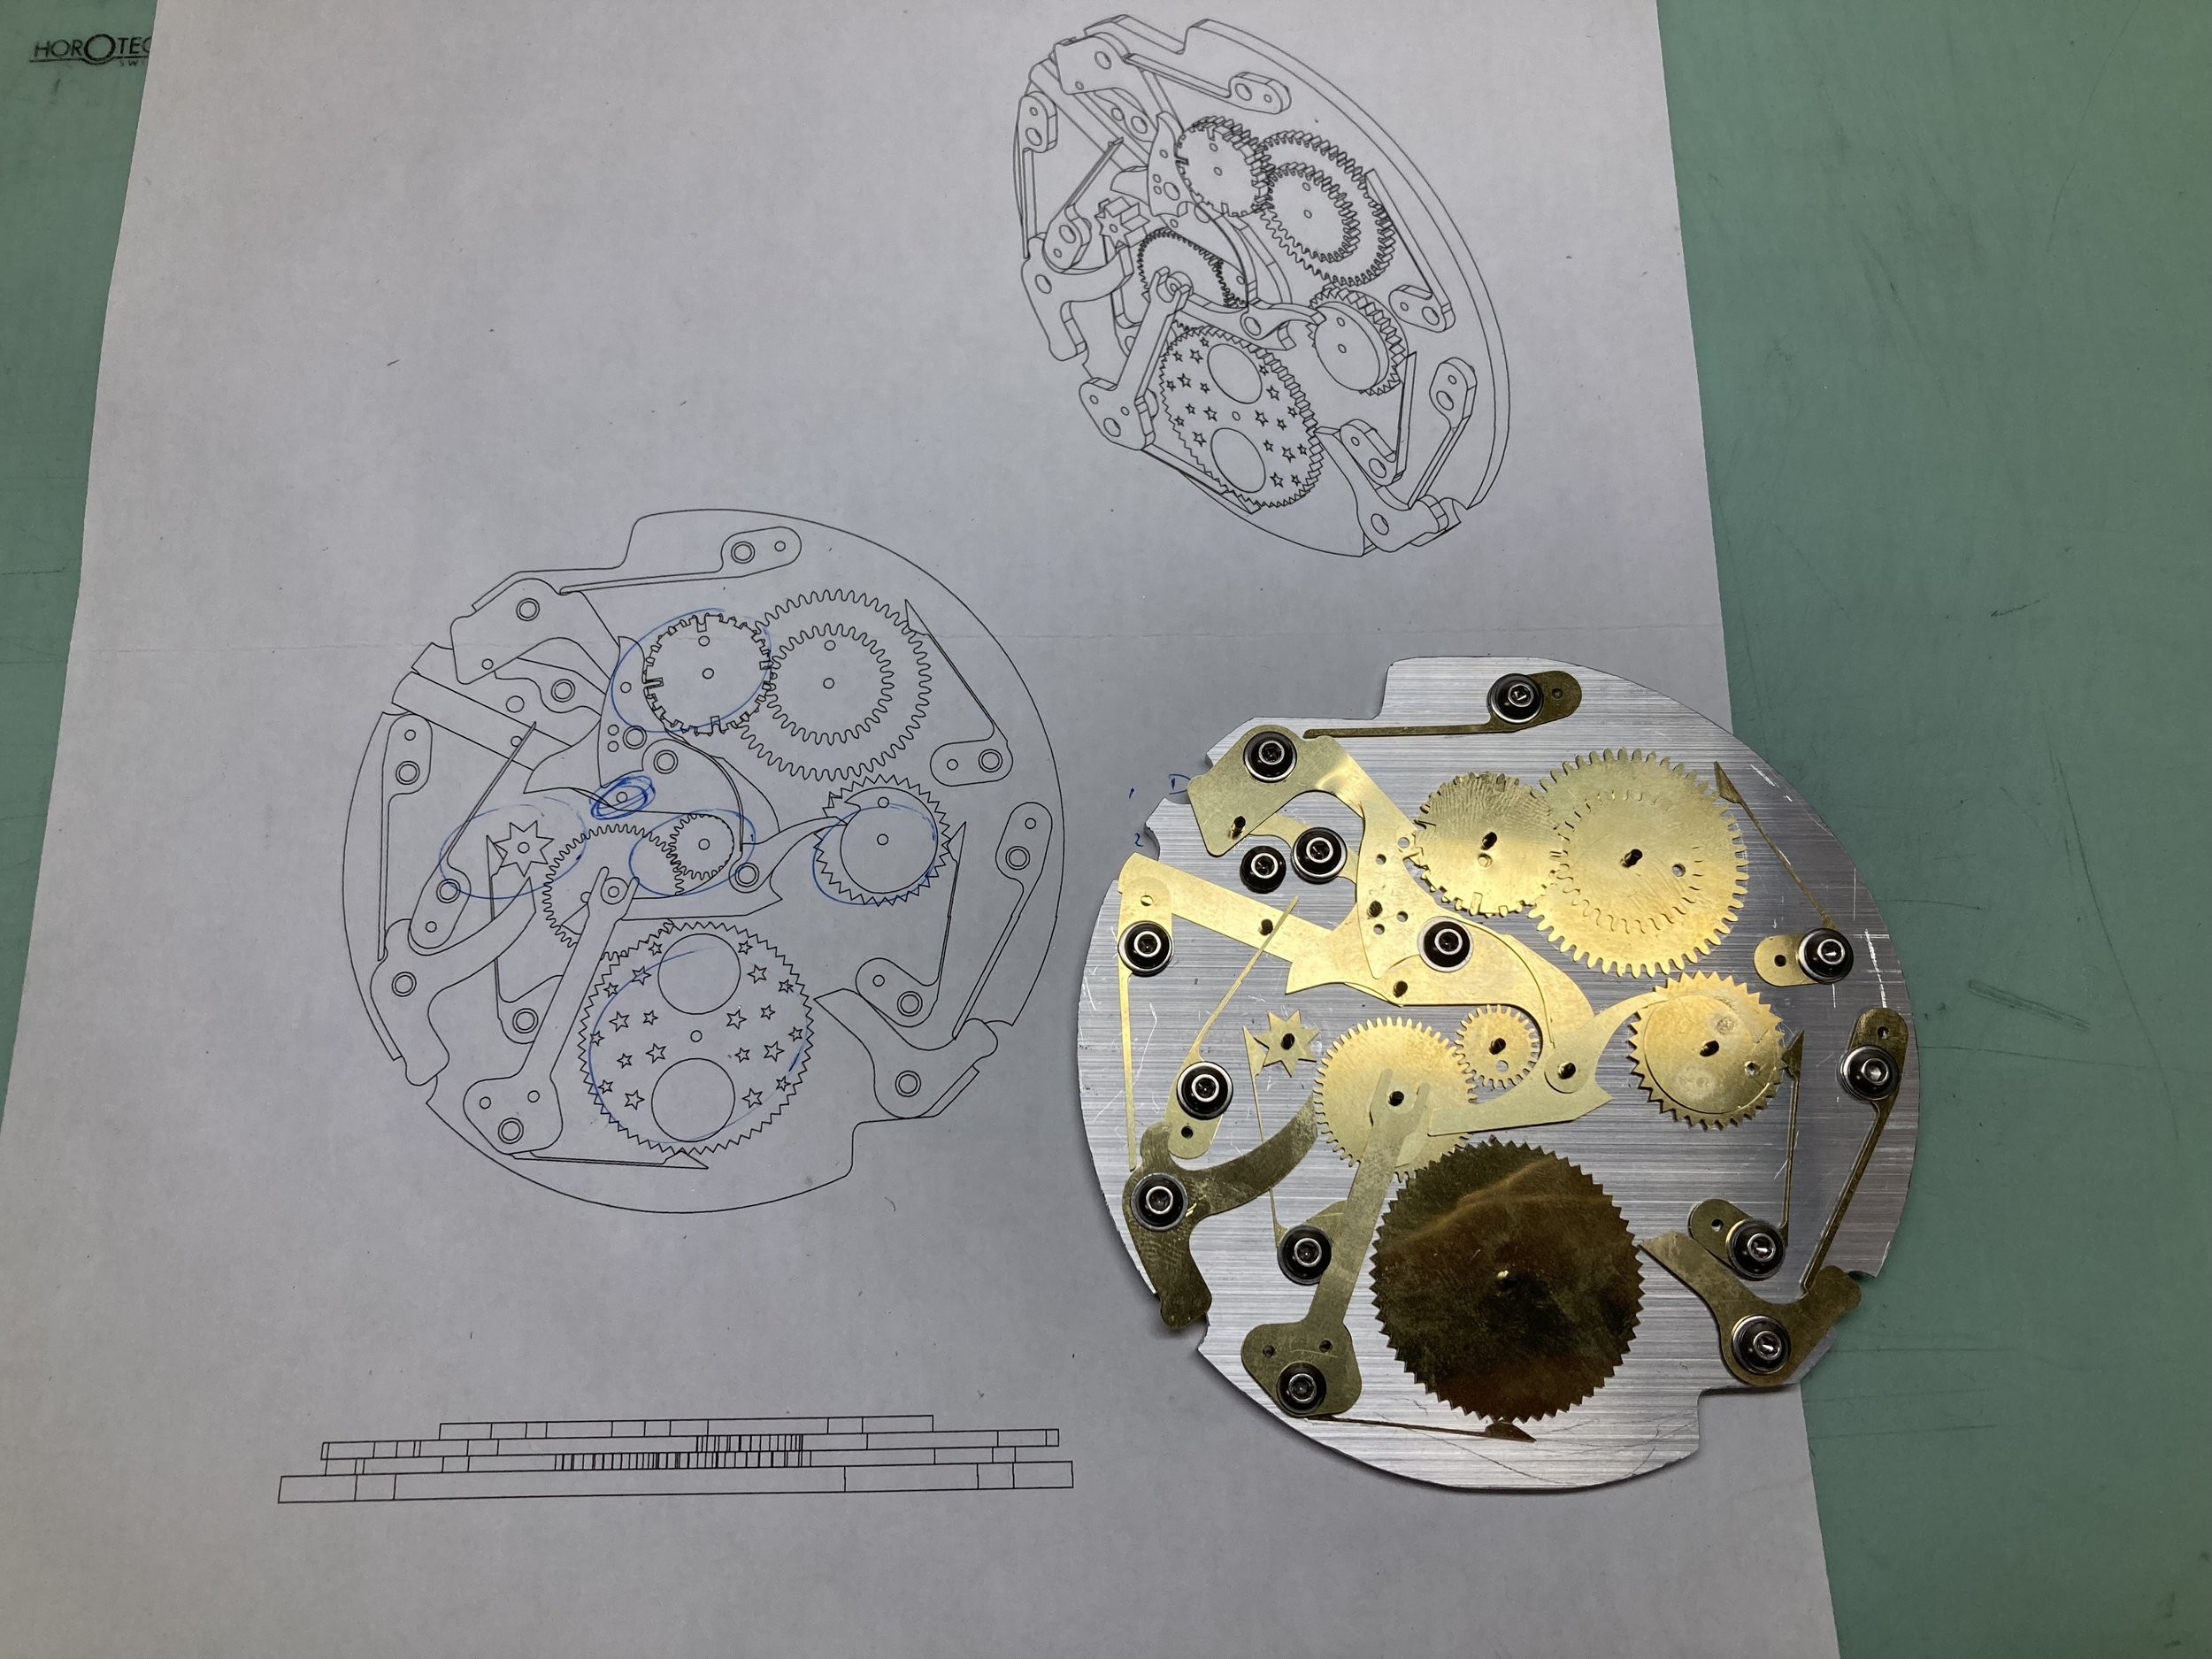
Perpetual Calendar
January 13, 2023
Dr. Roysdon really enjoys performing “studies” of complex problems. The perpetual calendar is a great example of complexity, with 78 components that sit atop a standard mechanical watch movement, e.g., the Model One movement. Based on the 1920’s Dubios Depraz design, this study was performed at 2x scale to evaluate each rotational part and their influence on the progression of months of different lengths, as well as the critical leap year month of February (as shown in the bottom video). This prototype was designed in Fusion360 and machined on the NS CNC Elara 4-axis Mill and Boley F1 Lathe. The scaled down prototype will soon be in the Roysdon Model 3.
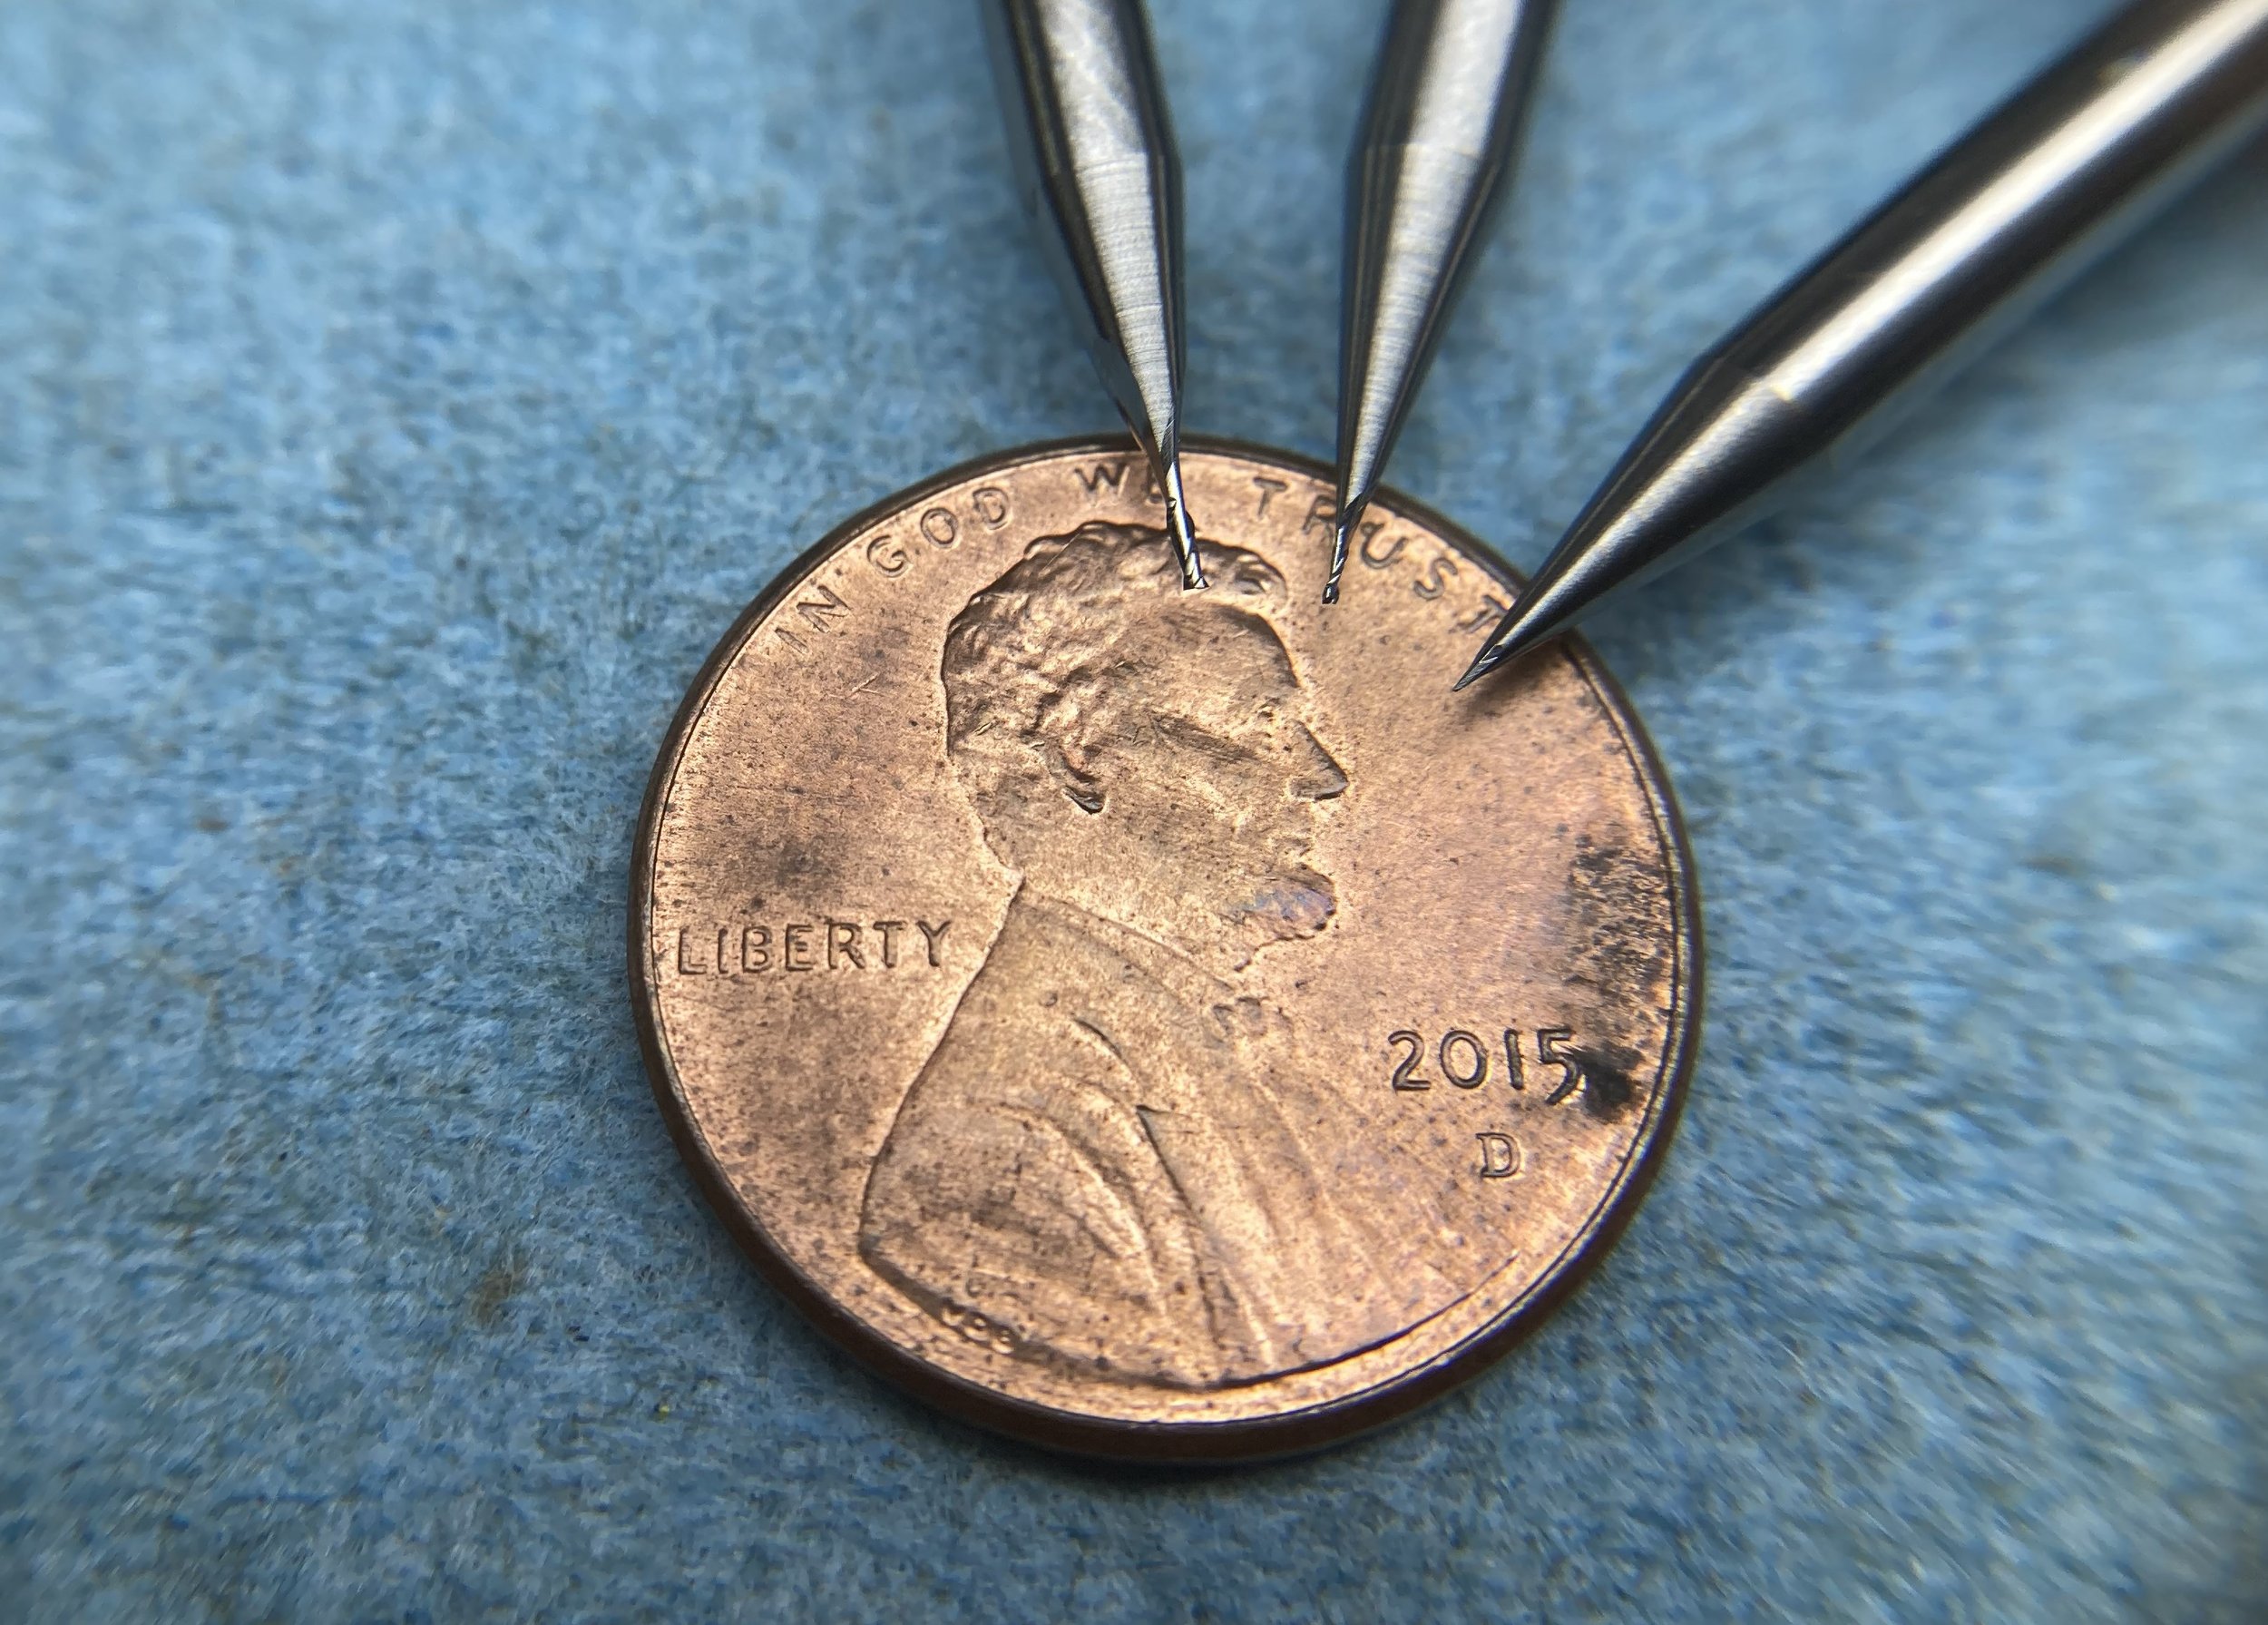
Micro-endmills are required for this work; 0.1 mm, 0.5 mm and 1.0 mm (see photo).
This perpetual calendar includes the following complications:
day/night indicator
moon phase
day
date
month
week number
year
leap-year indicator
There are 4 corrector levers to properly align the various complications; see the bottom video.
Chronograph
November 2, 2022
The yet-to-be unveiled Roysdon Model 2, includes a column-wheel shifter chronograph with a mono-pusher crown, based on the 1940’s Hamilton Model 23 design. This prototype Dr. Roysdon made entirely from scratch, designed in Fusion360, and machined on the NS CNC Elara 4-axis Mill, Boley F1 Lathe and Chung Lathe. Stay tuned for photos and videos.
Decimal Repeater
July 27, 2022
The yet-to-be unveiled Roysdon Model 4, includes a decimal repeater based on the 1880’s Depose minute repeater design with modifications similar to Voutilainen’s decimal repeater. This prototype Dr. Roysdon made entirely from scratch, designed in Fusion360, and machined on the NS CNC Elara 4-axis Mill, Boley F1 Lathe and Chung Lathe. Stay tuned for photos and videos.
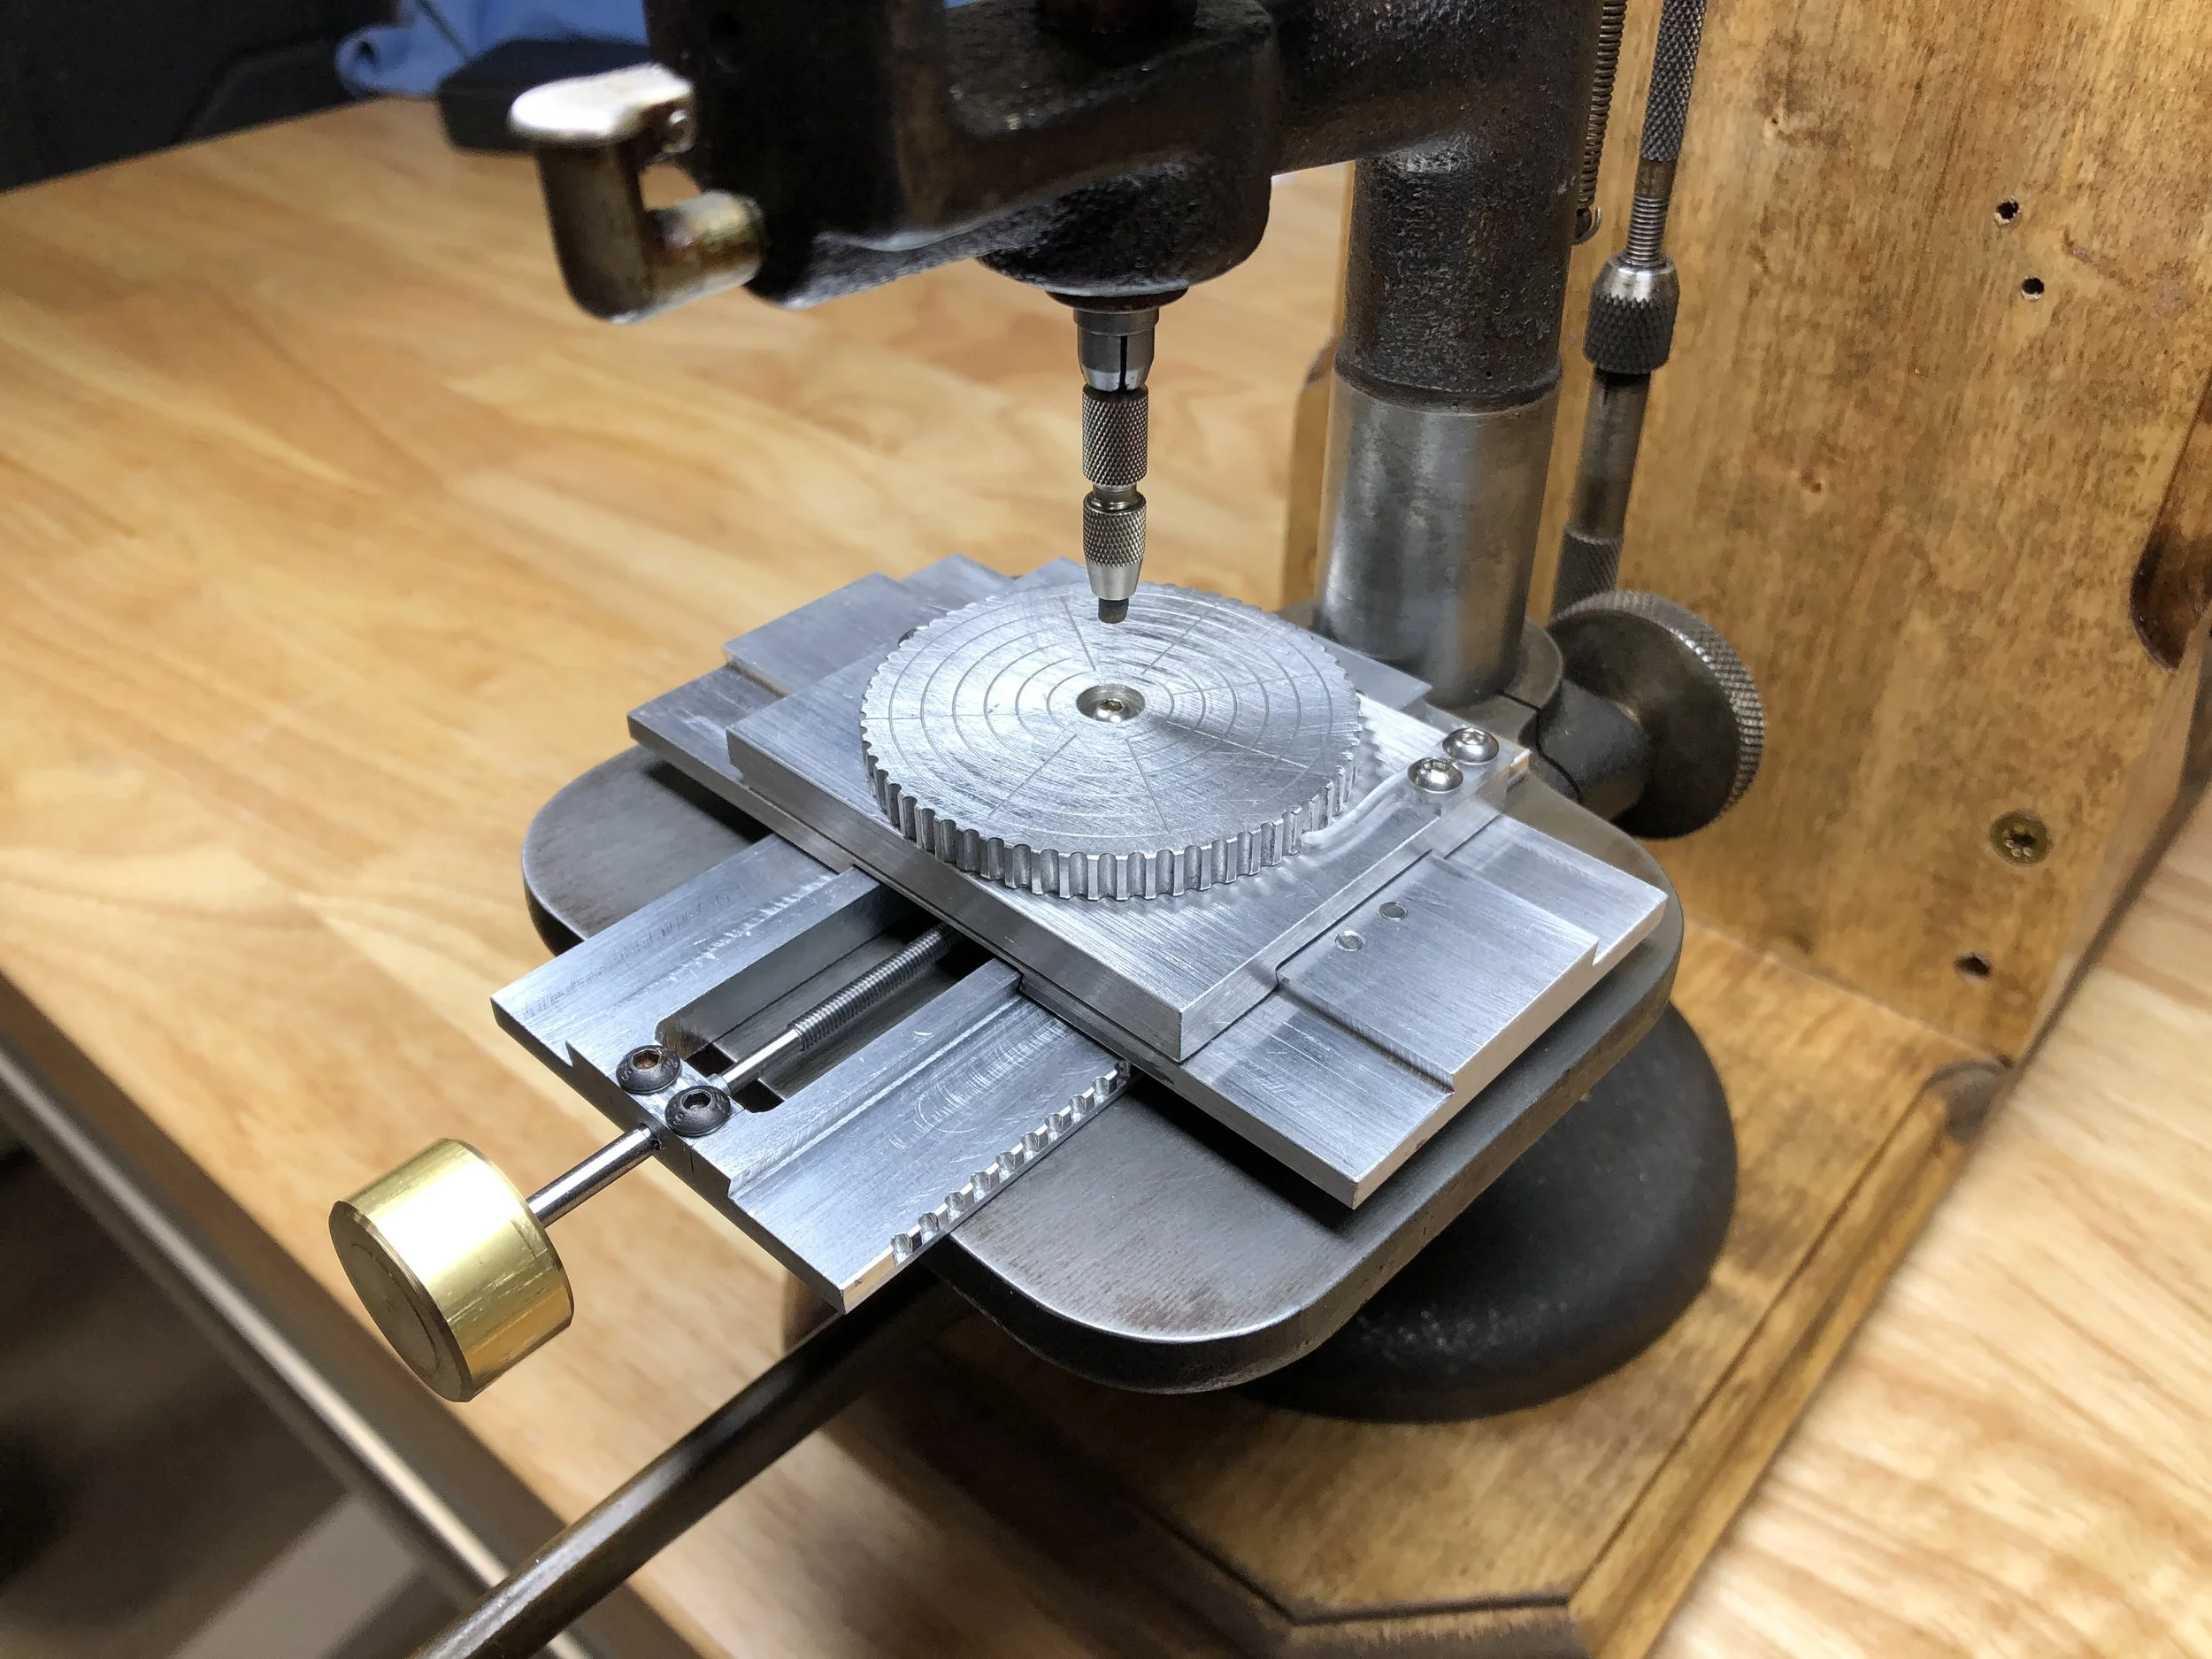
Pearlage Jig
January 9, 2021
This jig was designed to facilitate the addition of pearlage and Geneva Stripes to a watch movement. Originally built for the Roysdon Model One, this jig was designed in Fusion360 and machined on a 3-axis CNC Mill and Boley F1 Lathe. Initially the jig had equidistant hard stops on the y-axis (as shown in the video). Later we realized that an adjustable y-axis, with a lead screw and anti-backlash block (as shown in the photos) provided the necessary flexibility for various decoration operations.